
Specifications


6 P
ATCH
F
ILES
This section tells you how to manage your patch files. The patch editor is explained
in the next section.
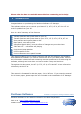
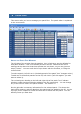
A
BOUT THE
P
ATCH
F
ILE
W
INDOW
The left side of the window lists the patches. Any in light grey are the defaults for
that patch location – this is not actually stored in the file. Note that the colour
settings can be altered so that these presets are not shown, so you may just see
empty “boxes”. You can scroll the list up or down with the scrollbar, or using the
mouse wheel.
To select a patch, left-click on it (the background of the patch “box” changes colour).
To add one of the default patches to the file, left-click it (left-click again if you also
want to select it).
The red and green shading to the left and right side of the patch “box” indicate
whether a patch has been edited or added to the file respectively. You can change
any of the colours used in the patch window – see section 12.
On the right side is summary information for the selected patch. This shows the
basic effect settings, and the date/time the patch was first loaded to the PC. At the
top right, there is space for some text that can be saved with the patch. You can
add any notes you want here.