
Specifications


4 G
ETTING
S
TARTED
B
ASIC
P
ROGRAM
S
ETTINGS
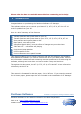
So you’ve installed the software and connected your effects pedal, now we can start.
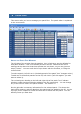
In GT Manager, under the Tools and Settings menu, select Connections . GT
Manager shows the available MIDI input and output ports. Normally, the software
will have found the right settings for you, but check that the input and output port
settings are correct.
The Device ID and EXP / CTL CC numbers default to the same as the default
settings in the GT-. If you changed these in your GT-, then change them here to
match. Alternatively, if the Auto-detect options are enabled, then GT Manager will
learn the correct settings for you once some data has been sent from the GT- to
the PC.
From the Tools and settings menu, select User info . Enter your name in the
relevant box. This is saved in any patch files you make, so other people know you
made them.
R
EGISTER THE
S
OFTWARE
Please follow the instructions in the Purchase section above.
M
AKE A
GT-
B
ACKUP
First thing to do is to backup all your settings and patches from your GT-. You
don’t want to lose them!
From the File and Windows menu, select Load (bulk dump) . On your effects
pedal, go to MIDI Bulk Dump (the dialog box reminds you how to do this), select
“System” as the start point, and the last of your patches as the end point. Start the
transfer from the GT-.
You should see the byte count increasing as the data is transferred to GT Manager.
The program notices when the transfer is done, and puts the patch data in a new
file; you will see this on-screen.
Important: if you have upgraded from an old version of GT Manager (v1.x),
please transfer the system data from your GT-
to your PC again as these
previous versions did not save the system data properly. You can do this
by transferring just the System (and QuickFx if relevant) data without any
patch data. The system data is saved automatically when you exit GT
Manager.