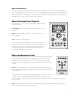
OWNER’S MANUAL / SAFETY INSTRUCTIONS / COMPLIANCE INFORMATION Duo-i plus High Performance Tabletop Music System Serious sound for your iPhone/iPod Italiano Deutsch Sistema de audio de mesa Impianto musicale da tavolo Hochleistungsfähiges Kompakt- de alto rendimiento ad alte prestazioni Musiksystem Sonido de calidad con Audio di qualità con collegamento Hervorragende Klangqualität mit conectividad para iPhone/iPod per iPhone/iPod iPhone/iPod-Dockstation Français Svenska Système de musique
E N G L I S H IMPORTANT SAFETY INSTRUCTIONS This symbol found on the apparatus indicates hazards arising from dangerous voltages. This symbol found on the apparatus indicates the user should read all safety statements found in the user manual. This symbol found on the apparatus indicates double insulation. 1. 2. 3. 4. 5. 6. 7. 8. 9. 10. 12. 13. 14. 15. 2 Read these instructions. Keep these instructions. Heed all warnings. Follow all instructions. Do not use this apparatus near water.
Introduction Thank you for choosing Boston Acoustics and congratulations on your purchase of the Duo-i plus High Performance Tabletop Music System. If you own other Boston products, the outstanding audio performance and ease-of-use of the Duo-i plus should come as no surprise. If you’re new to Boston, welcome – we think you’ve made a great choice.
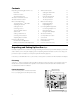
Contents Unpacking and Setting Up Your Duo-i plus Placement Power Connection AM and FM Antennas About the Front Panel Controls About the Remote Control Basic Control Operations Turning the Duo-i plus On or Off "EKVTUJOH UIF 7PMVNF Setting the Clock Selecting a Source Tuning In a Radio Station Station Seek Setting a Station Preset Selecting a Preset Station Adjusting Bass and Treble 6TJOH :PVS J1IPOF J1PE Front Panel Control Operation 3FNPUF $POUSPM J1IPOF J1PE 0QFSBUJPO 4 4 4 5 5 5 6 6 6 7 7 8 8 9 9
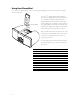
AM and FM Antennas The Duo-i plus DPNFT PVU PG UIF CPY SFBEZ UP VTF 5IF JOUFSOBM ". BOUFOOB JT DPOOFDUFE 5IF '. BOUFOOB JT BMTP DPOOFDUFE +VTU FYUFOE UIF XJSF DPOOFDUFE UP UIF QMVH 8JUI UIF TUBOEBSE BOUFOOBT ZPV MM QSPCBCMZ QVMM in more stations than any other radio you own.
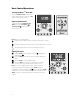
Basic Control Operations Turning the Duo-i plus On or Off Press the POWER/VOLUME control on the center of the front panel or the green button on the remote control. Adjusting the Volume Turn the front panel POWER/VOLUME KNOB or press the VOLUME UP or VOLUME DOWN buttons on the remote control. Note: On the control illustrations – Regular arrows indicate to press and release the button or control. Double headed arrows indicate to press and hold the button or control.
Selecting a Source Using the Front Panel Controls 1 Turn the MODE control until the source you want is highlighted with brackets. Note that other function and alarm setting control icons also may be selected. 2 Press the MODE control to select the highlighted item. Or just wait a few seconds and the source is automatically selected. The Duo-i plus begins playing the source selected. Using the Remote Control Press the button for the source you want to select.
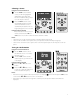
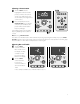
Station Seek Using the Front Panel Control Press the TUNE button. The Duo-i plus XJMM TFFL VQ UIF SBEJP CBOE GPS UIF OFYU receivable station. Using the Remote Control or button. Press and hold the The Duo-i plus will seek up or down UIF SBEJP CBOE GPS UIF OFYU SFDFJWBCMF station. [ ] Setting a Station Preset 1 2 3 8 Use the MODE control, or press the AM or FM button on the remote control to select the radio band you want to use. There are two sets of FM presets.
Selecting a Preset Station 1 Turn the MODE control to highlight the radio band of the preset you want to select. There are two sets of FM presets. They are selected by choosing the FM 1 or FM 2 source. 2 Press and quickly release the PRESET BUTTON (1-5) you want to select. The preset indicator, the preset number and the station frequency will light. In this example AM preset 5, with station frequency 1050 assigned to it, has been selected.
Using Your iPhone/iPod :PV DBO VTF ZPVS J1IPOF J1PE BT B NVTJD TPVSDF GPS HFOFSBM QMBZCBDL PS UP XBLF UP NVTJD XIFO VTJOH UIF alarm clock function. Docking Adapter The Duo-i plus is supplied with docking adapters. These fit in the docking well in the top of the Duo-i plus UP TVQQPSU WBSJPVT J1IPOF J1PE NPEFMT 5IF UBCMF CFMPX MJTUT UIF J1IPOF J1PE NPEFMT BOE UIF docking adapters to use with them. The number of the docking adapter is molded into the back of the part.
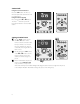
Front Panel Control iPod Operation 1 2 3 Press the TUNE button to start or pause playback of the selected track. Turn the TUNE control to skip forward or back one or more tracks. Press, hold and turn the TUNE button to start fast forward or rewind. Press the TUNE button again to stop fast forward or rewind and resume playback. Remote Control iPod Operation 1 ,> Press the button to play or pause the iPod. 2 [ ] Press the or button to skip back or forward one track.
Setting an Alarm If you plan to use the wake to music function, note that the last source and volume level settings will be used for this alarm. 1 Press the ALARM 1 or ALARM 2 buttons one or more times to turn on the alarm and set the alarm type. One press selects wake to music . A second press selects wake to tone . A third press selects both. Press the button a fourth time to cancel the alarm. This example shows how the display might look after the Duo-i plus is turned off.
The Sleep Function You can set the Duo-i plus UP QMBZ B SBEJP TUBUJPO PS ZPVS J1IPOF J1PE GPS VQ UP NJOVUFT After the specified time the Duo-i plus shuts off. 1 Select the source and set the volume level. Use the MODE control to highlight the Sleep icon in the display. 2 Press the MODE DPOUSPM 5IF 4MFFQ JDPO BOE i0''w XJMM nBTI JO the display. 3 Turn the MODE control clockwise until the number of minutes you want is displayed. 4 Press the MODE control.
Other Control Settings Display Information When you adjust the controls or settings of the Duo-i plus the display shows information and symbols related to what you are doing. After a few seconds the display goes back to showing the time or the source you are listening to. You can select which of the default displays you want. Using the Front Panel Controls 1 Turn the MODE control to highlight the Info icon of the display. 2 Turn the MODE control to select the Source display or the Time display.
Connecting Other Equipment Connecting Headphones Connect the headphone plug to the jack beside the symbol. This turns off the Duo-i plus internal speakers. If your headphones have a 1⁄4-inch plug you will need an adapter.
Limited Warranty Boston Acoustics warrants to the original purchaser of the Duo-i plus that it will be free of defects in materials and workmanship in its mechanical parts for a period of one year from the date of purchase. Your responsibilities are to install and use the Duo-i plus according to the instructions supplied, to provide safe and secure transportation to an authorized Boston Acoustics service representative, and to present proof of purchase in the form of your sales slip when requesting service.