GTA High Performance Monoblock Amplifiers
Specifications Introduction Thank you for choosing Boston Acoustics and congratulations, you’ve made the right choice. You’re now equipped for the open road. Your high performance GTA amplifiers are engineered to perform and built to last. These products represent the pinnacle of performance and innovation that Boston Acoustics is famous for. We hope you enjoy your amplifier and the road ahead.
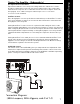
Connections / Controls Connections and Controls GTA-400m 1 GTA-800m 1 2 2 3 4 3 4 5 5 7 6 6 7 9 8 8 9 10 11 10 11 Speaker Level Input RCA Input (Left and Right) Gain (250mv to 5.0v - continuously variable) Q-Tune™ “Q” Adjustment (0.707 to 1.6 - cont. variable) Lowpass Crossover Adjustment (50Hz to 150Hz - cont. variable) Q-Tune™ Highpass (Subsonic) Adjustment (10Hz to 50Hz - cont.
Installation - General Installation - General WARNING! Before driving the amplifier mounting screws through any surface, be sure of what is behind that surface. Check for the gas tank, brake lines, and any vehicle wiring harness. Never run wires outside or under the vehicle or where they could become broken or interfere with the safe operation of the vehicle. Before You Install Before you install the unit, disconnect the negative (–) battery cable in the engine compartment of the vehicle.
Amplifier Fuses Although the amplifier has an internal fuse (s), additional fuse protection should be installed as close as possible to the battery on the positive (+) power wire going to the amplifier. An inline fuse should be installed at no more than 18" (46cm) on the positive (+) power wire. The rating of the inline fuse should equal the value of the internal fuse of the amplifier if only the single amplifier is connected to this wire.
Tuning The Amplifier - Subwoofer(s) Tuning The Amplifier - Subwoofer(s) 1) Head Unit The head unit should have all controls such as bass, treble, balance, and fader set to the flat or centered position. The volume control should be at the minimum setting. If the head unit has any equalization or bass management features such as boost, they should be deactivated at this time. Turn head unit on, and verify that the Blue status LED (logo) is illuminated on the amplifier.
4) Lowpass Crossover Control Experiment with the crossover point settings while the subwoofer is active. A higher setting will increase the perceived output, and a lower setting will make the bass response more omnidirectional. Since the Lowpass cannot be disengaged, set to 15Hz if using an outboard processor or electronic crossover on the headunit.
Amplifier Troubleshooting Guide Status LEDs on Amplifier not Lit—Head Unit (Source) Turned “ON” Verify Remote turn-on wire from source to amplifier has proper voltage Power (B+) connections at amplifier, terminal blocks, and battery are secure Ground (GND) connections at amplifier and vehicle chassis are secure Battery B+ fuse and amplifier fuse are OK B+ at battery and B+ at amplifier have proper voltage Status LEDs Lit, no Output from Speakers—Speakers in Normal Operating Condition Verify High-level cable
Car Audio Limited Warranty Information for the United States and Canada Boston Acoustics offers a limited warranty to the original purchaser of any Boston Acoustics car audio products or accessories purchased from an authorized dealer after January 1, 2003. This limited warranty protects against defects in materials or workmanship for a period of one (1) year from the date of purchase and will be repaired without charge for parts and labor.