LCAi220 Local Control Amplifier
LCAi220 Important Safety Instructions This symbol found on the apparatus indicates hazards arising from dangerous voltages. This symbol found on the apparatus indicates the user should read all safety statements found in the user manual. WARNING! To reduce the risk of fire or electric shock, do not expose this product to rain or moisture. 1. Read these instructions. 2. Keep these instructions. 3. Heed all warnings. 4. Follow all instructions. 5. Do not use this apparatus near water. 6.
Local Control amplifier LCAi220 Thank you Thank you for selecting a Boston Acoustics LCAi220 Local Control amplifier. Your LCAi220 has been designed to deliver years of music, enjoyment, and satisfaction. Please keep your manual in a safe place in case you need to refer to it at a later date. Our Installation Considerations are a guide for those with and without experience installing a local control amplifier.
Introduction LCAi220 The LCAi220 is an in-wall local zone amplifier that switches between a central audio source (whole house audio) and a local source (TV, CD player, etc.). In the standby mode, the local speakers are amplified by a centrally located distribution amplifier. When an input signal is detected from either the local high level, low level, or the 12v trigger/video in inputs, the LCAi220 switches on and the speakers switch over to the LCAi220’s high quality amplifier.
LCAi220 Benefits • Level Adjust to match the output of the LCAi220 to the central distribution audio amplifier • Signal Sensing (high and low level) and Input trigger for switching to local source • Output trigger for triggering on a connected component (Subwoofer, Etc.
Powering the LCAi220 A 16VDC power supply is included for powering the the LCAi220. There are two separate connection points for powering the LCAi220; a front mounted connection for local powering of the LCAi220 and a rear mounted connection for central powering of the LCAi220. It is only necessary that you connect power to one of the connections. Front Connection When using the front mounted input, connect the plug from the power supply to the input on the LCAi220.
New Home Construction Precautions The wiring and installing of in-wall electronics and devices is easier when the walls are free of insulation, prior to the drywall being applied. It is important that precautions are taken to avoid system failures. It is recommended that when wiring your open walls that you are aware of the potential hazards and the tools and hardware required to avoid them. Nails, screws and accidentally cut or exposed wire can cause failure in the system.
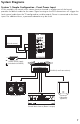
System Diagrams System 1; Simple Configuration - Front Power Input In this example, the central music source (receiver located in another part of the house) provides the default audio for the room. Signal sensing on the RCA connections will trigger the local source (audio from the TV configured to variable output). Power is connected to the front input. For additional bass, a powered subwoofer may be used.
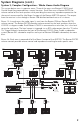
System Diagrams (cont.) System 2; Simple Configuration - Rear Power Input This example is similar to the System 1 diagram except the power supply from the LCAi220 is connected to the rear input with the power routed from a central location (usually located with the central music source equipment). Also a RVC90i volume control is added for volume control of the central music source when the LCAi220 is in bypass mode.
System Diagrams (cont.) System 3; Complex Configuration - Whole House Audio Diagram The system below uses six separate zones. Three of the zones use Boston LCAi220 Local Control Amplifiers powered from a central location. Each Zone uses a Boston RVC90i for volume control of the local speakers while providing the necessary impedance protection for the central source amplifier (the Room 2 output of the Boston AVR7120 receiver).
Installation Instructions Installing / Rear Connections 1. Prewire. Run the speaker wires from the receiver / amplifier and the power wires (if applicable) to the junction box and the speaker wires from the junction box out to the local speakers. (Figure #1) Tip: Label the speaker/power wires to simplify connecting the wiring later Figure #1 Figure #2 2. Install the LCAi220 mounting plate to the junction box using the two 11⁄4-inch (32mm) screws. (Figure #2) 3.
Installing / Rear Connections (cont.) Figure #5 5. Install the LCAi220 into the junction box bottom first. Proceed slowly making sure not to pinch any of the wires. (Figure #5) 6. Fasten the LCAi220 to the bracket using the four 1⁄4-inch (7mm) screws. (Figure #6) 7. Install the faceplate label to the LCAi220.
Connection Instructions Figure #1 Front Connections 1. Connect the local source to either the Left and Right RCA Inputs (Figure #1) or to the High Level In speaker level inputs (Figure #2). Note: Do not connect wires to both the RCA and High Level inputs. Figure #2 2. If used, connect the local source trigger to the 12V Trigger / Video In (Figure #3). 3. If used, connect the local source trigger output to the 12V Trigger / Video Pass Through (Figure #4). 4.
Set Up Instructions Central Music System Configuration Adjust the levels for the central music system. If an in-wall volume control is used, follow its instructions for configuration before continuing. If a volume control is not used, start with the volume on the central music system low, and turn it up until a comfortable volume level is achieved.
Adjusting the Input Once the audio level from the central music system is configured: Figure #1 1. Disconnect / turn off the power source to the LCAi220. 2. Set the device used for the local source to variable output. 3. Turn the input level on the LCAi220 to minimum, all of the way counter-clockwise. (Figure #1) 4. Reconnect / turn on the power source of the LCAi220. Figure #2 5. Turn on the local source device. Adjust the volume on the source device to approximately 80% of total output.
TroubleShooting Guide Problem Cause Solution No Power • Local power supply is off or disconnected • Central power supply is off or disconnected • Check / connect local power supply • Check / connect central power supply and rear connection to LCAi220 No Sound • Speaker wires are disconnected • Volume is adjusted too low • Source is off / disconnected • Connect speaker wires • Adjust source volume • Check source connections and power status No Audio From Local Zone • Source not configured correctly
If Service Seems Necessary First, contact the dealer from whom you purchased the LCAi220. If that is not possible, write to: Boston Acoustics, Inc. Attn: Parts and Service 300 Jubilee Drive Peabody, MA 01960 U.S.A. Or contact us via e-mail at: support@bostonacoustics.com We will promptly advise you of what action to take. If it is necessary to return your LCAi220 to the factory, please ship it prepaid. After it has been repaired, we will return it freight prepaid in the U.S.A. and Canada.
17
300 Jubilee Drive Peabody, MA 01960 U.S.A. 978.538.5000 www.bostonacoustics.com Boston, Boston Acoustics, and the Boston Acoustics logo are registered trademarks of Boston Acoustics, Inc. Specifications are subject to change without notice. © 2005 Boston Acoustics, Inc.