VRMX Manual 2/9/01 12:16 PM Page 1 VR-MX Wide Dispersion Home Theater Surround Speaker
VRMX Manual 2/9/01 12:16 PM Page 2 Specifications Frequency Response (±3dB) 80–20,000Hz Recommended Amplifier Power 15–200 watts Nominal Impedance 8 ohms Sensitivity [1 watt (2.83v) at 1m] 90dB Bass Unit 5 1⁄4" (135mm) copolymer Passive Radiator 5 1⁄4" (135mm) copolymer High-Frequency Driver Dual 1" (25mm) VR aluminum dome with AMD Crossover Frequency 2500Hz Dimensions (HxWxD) 11 x 115⁄16 x 515⁄ 16" (279 x 286 x 151mm) Weight /each 9 lbs (4.
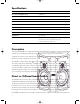
VRMX Manual 2/9/01 12:16 PM Page 3 of the room. This is accomplished by mounting the speaker so that the diffuse side of the arrow on the back of the speaker is aimed toward the bulk of the listening area. If you prefer the surround effects to be more discreet and localized, then you should mount the speakers so that the direct side of the arrow on the back of the speaker is aimed toward the bulk of the listening area.
VRMX Manual 2/9/01 12:16 PM Page 4 Room Placement Room placement is one of the most important factors contributing to the quality of home theater sound. Take a few minutes to place your speakers correctly to ensure they will sound their best. Place the VR-MX speakers on either side of the listening area. If the listening position is against the wall, place the speakers to either side, no less than 20" (50cm) from the rear wall. One or both of the VR-MX speakers may be hung from the ceiling.
VRMX Manual 2/9/01 12:16 PM Page 5 If the viewing area is in a corner, the speakers may be placed to either side on adjacent walls. IMPORTANT: Your speakers have been packed as a DIRECT or DIFFUSE matched set. Make sure that each speaker is mounted on the desired side, with the active bass driver (smaller dust cap) pointing to the listening area for a DIRECT sound field or the passive bass driver (larger dust cap) pointing to the listening area for a DIFFUSE sound field.
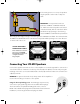
VRMX Manual 2/9/01 12:16 PM Page 6 Wall or Ceiling Mounting Your VR-MX Speakers The VR-MX is designed to be mounted directly onto a wall or ceiling. First attach the eight supplied self-adhesive felt pads, one on the back of each corner of both speakers. Then attach the bracket to the wall or ceiling and slide the speaker on to the bracket as shown below and on the next page. You may run wires to the speakers on the wall surface or behind the wall.
VRMX Manual 2/9/01 12:16 PM Page 7 Drill 1⁄ 2" (12mm) holes 2. Drill all holes as indicated. Insert the machine screws through the bracket and toggle wings thread them onto the toggle wings before penetrating the wall. Push the toggle wings through the holes in the wall. 6-32 x 2" machine screws 3. Level the bracket and tighten the screws.
VRMX Manual 2/9/01 12:16 PM Page 8 Limited Warranty For five years from the date of purchase, Boston Acoustics will repair for the original owner any defect in materials or workmanship that occurs in normal use of the speaker system, without charge for parts and labor.