
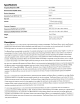
Specifications


Mount
the
Bracket
to
the
Wall
Decide
where
to
mount
bracket.
IMPORTANT:
See
"Ceiling Clearance" on page
6.
Determine
what
mounting
holes
in
the
bracket
will
be
used.
Mark
the
holes
on
the
wall
or
ceiling
using
bracket
as
a
template.
Drill
the
holes
using
the
appropriate
drill
bit
size
to
accommodate
the
mounting
hardware
that
you
plan
to
use (ie,
112-inch
diameter
to
clear
the
toggle
bolts
for
hollow
surfaces
or
small
enough
to
allow self-tapping screws in a solid surface).
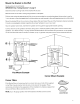
Mount
the
bracket
flat
or
into
a
corner
as
shown
below.
We
recommend
the
use
of
four
fasteners
wherever
possible.
Consult
a
knowledgeable
installer
regarding
the
proper
hardware
to
use
on
your
wall.
Strip
the
speaker
wires ends,
and
feed
the
speaker
wire
through
the
appropriate
bracket
opening.
Connect
the
wire
to
the
speaker's terminals,
taking
care
to
maintain
speaker
polarity.
(See"
How
to
Connect
Your
Speakers"
and
"Basic
Hookup"
on
page
3).
Both
the
Boston
Bravo
and
its
bracket
are symmetrical, so
the
speaker
can
be
mounted
with
either
its
woofer
or
tweeter
on
top.
In general. bass
performance
will
be
enhanced
with
the
woofer
as close
to
as
many
room
surfaces
as
possible.
'i«UU\Il!!!!!!!!lI!!!II
l1
!!!!I!!!!Q
-<1tmlll\!!!!!!!!!!!!!!!!!!!!l!!tlIIQ
Flat
Mount
Example
feed
wire
through
top
or
bottom
opening
Corner
Mount
Example
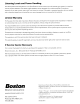
Corner Fillers
If
the
Boston
Bravo
is
being
mounted
in a corner,
then
one
or
both
of
the
supplied
corner
fillers
may
be
inserted
into
the
slots
on
the
back
of
the
speaker. These
accessories will
enhance
the
appearance
of
the
installation
by
making
it
appear
that
the
back
of
Boston
Bravo
extends
into
the
corner.
NOTE:
Up
to
16-gauge
speaker
wire will
fit
between
the
fillers
and
the
corner.
corner
filler (2)
5