
Specifications


7//
cellln
g
//
/
3
3
/s
inches
(86mm)
L=--r------r----
5/
S
Inches
(16mm)
t
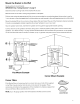
Ceiling Clearance
If
the
Boston
Bravo
is
to
be
mount-
ed
so
that
the
top
or
the
side
of
the
speaker
will
meet
a flush surface,
either
a wall (horizontally)
or
the
ceiling
(vertically),
then
measure
the
exact
distance
as shown here
from
that
surface
to
the
top
or
side
of
the
bracket.
Mount
the
Speaker
to
the
Bracket
Remove
the
speaker's
grille
by
grasping
the
back
of
the
cabinet
in
one
hand,
while
gently
pulling
the
grille
away
with
the
other
hand.
Align
the
openings
in
the
back
of
the
speaker
with
the
two
posts
protruding
from
the
bracket
as
shown
below.
Gently
remove
any slack in
the
speaker
wire
as
you
push
the
speaker firmly
onto
the
bracket.
Attach
the
speaker
to
the
bracket
by
inserting
the
supplied
screws
through
the
holes
in
the
front
of
the
speaker
and
into
the
bracket
as
shown
below
(do
not
over-
tighten
the
screws).
Replace
the
grille
on
the
speaker.
NOTE:
The
Boston
Bravo
is
not
securely
attached
to
its
bracket
unless
the
screws are used.
® @
@
Rotating
the
Logo
for
Horizontal Mounting
or
Placement
Place
your
thumb
against
the
split
post
and
press
firmly
until
the
logo
pops
out
of
the
grille.
Locate
the
logo's
split
post
protruding
through
the
bottom
inside
portion
of
the
grille.
Rotate
the
logo
to
the
desired
position
and
re-
insert
the
split
post
back
into
the
hole
until
it
snaps
into
place.
Remove
the
grille
and
turn
it
over.
s
EI
The
logo
plate
on
the
Boston
Bravo's
grille
can
be
rotated
90
0
in
either
direction
to
enhance
the
speaker's
appearance
when
mounting
or
placing
it
in a horizontal
position.
To
rotate
the
logo:
6