VR1, VR1,VR2 VR2, VR3 VRB,VRC VRC VR3, High Performance Home Theater Loudspeakers VR1 VRC
Specifications VR1 VR2 VR3 Frequency Response (±3dB) 46Hz-20kHz 41Hz-20kHz 41Hz-20kHz Recommended Amplifier Power 15-150 watts 15-150 watts 15-150 watts Nominal Impedance 8 ohms 8 ohms 8 ohms Sensitivity [1 watt (2.83v) at 1m] 93dB Bass Unit (2) 6 ⁄2" DCD (165mm) copolymer (2) 6 ⁄2" DCD (165mm) copolymer Midrange - 41⁄2" (115mm) neodymium copolymer 41⁄2" (115mm) neodymium copolymer Tweeter 1" (25mm) VRH.O.™ anodized 1" (25mm) VRH.O.™ anodized 1" (25mm) VRH.O.
The second benefit is smoother, more uniform upper bass/lower midrange frequency response in a real listening room. The dimensional relationship of the woofer to the nearby room boundaries (the walls and floor) in any speaker results in a reinforcement or cancellation of upper bass/lower midrange frequencies corresponding to the woofer-to-boundary distances.
Connecting the Speakers to Your Amplifier or Receiver Basic Hookup 1. Connect the speaker terminals to the amplifier speaker outputs. 2. Make sure the speaker terminal jumper straps are in place on the back of the speaker. (VR2 and VR3 only) IMPORTANT: When making all connections, be sure to connect + to + (red) and – to – (black).
Bi-amplification (VR2 and VR3 only) Bi-amplification requires using separate amplifiers dedicated to high and low frequencies. Using more than one amplifier can enhance the dynamic performance of your system. “Splitting the load” between two amplifiers lets each amplifier work less hard, increasing the available current to the drive units. When making all connections, be sure to connect + to + (red) and – to – (black). 1. Unscrew the terminal collars of both sets of terminals and remove the jumper straps.
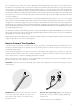
How to Place Your Speakers The VR speakers were designed to deliver exceptional bass extension and tonal balance, regardless of where they are placed. However, for optimal results, it is advisable to position the rear of the speaker to be at least 3 inches (76mm) away from the wall or curtains that are behind it. The speakers should also be at least 2 feet (0.6m) from the corners of the room.
Using the Carpet Spikes For placing speakers on thick carpet, we recommend using the four threaded carpet spikes and lock nuts (VR2 and VR3 only) which serve three purposes — leveling (an aesthetic issue), stability (a practical issue) and rigidity (an acoustic issue). The spikes concentrate the speaker’s weight on four points, creating focused pressure that anchors the speaker cabinet to the floor and enhances rigidity.
300 Jubilee Drive Peabody, MA 01960 USA 978.538.5000 bostonacoustics.com AMD is a trademark and DCD, VR, MagnaGuard, Boston, and Boston Acoustics are registered trademarks of Boston Acoustics, Inc. © 2004 Boston Acoustics, Inc. All rights reserved. Specifications subject to change without notice.