HZ030200TX Drake Mirror/Hidden Coat Rack Assembly Instructions For assistance with assembly contact: Southern Enterprises Inc. Customer Service 1-800-633-5096 service@seidal.com www.seifurniturestore.
Drake Mirror/Hidden Coat Rack Parts List Please check packaging for all parts and hardware before discarding. Unpack and lay parts on clean, padded surface like carpet or a blanket. Check that you have all parts indicated. Call customer service if any hardware is missing. Before beginning assembly, carefully study the diagrams below and sort your hardware according to the pictures. Using the incorrect hardware will cause damage.
1 Quantity 2 of 14 Quantity of 1 3 Short Bolt :Ø1/4”×1/2” L Long Bolt :Ø1/4”×1-1/4” L Allen Wrench 4 5 6 Quantity of 4 Wood Screw: 4.0×1/2” L 7 Quantity of 8 Flat washer Quantity of 4 Tablet Quantity of 1 Quantity of 12 Small Bolt: 4.0×3/8” L 8 Quantity of 4 Long Tablet 9 Quantity of 2 Long Wood screw :4.0×1” L 10 Wall anchor Quantity of 2 11 Quantity of 2 Wall brackets 12 Quantity of 2 Plastic strap Care and cleaning instructions: Before use, wipe with a clean, dry cloth.
Drake Mirror/Hidden Coat Rack Assembly Instructions . Put Mirror Panel(G) onto the Front frame Frame(A). Then put Paper Panel(H) onto the Mirror Panel (G). Put Wood Panel(J) onto the Paper Panel(H) Figure 1 Insert 8pcs Small Bolt (6) through holes on Long Tablet (8) to attach 4pcs Long Tablet (8) onto Front Panel (A) by Tool Required No.2 Phillips Screwdriver (Not Included). Insert 4pcs Small Bolt (6) through holes on Tablet (7) to attach 4pcs Tablet (7) onto Front Panel(A) by using- No.
Attach Right Side Panel (C) onto Front Panel (A) as shown. Insert 4pcs Bolt (1) and 4pcs Flat Washer (2) and then tighten by using Allen Wrench (3). Figure 3 Attach Left Side Panel (B) onto Front Panel (A). Insert 4pcs Bolt (1) and 4pcs Flat Washer (2) tighten by using Allen Wrench (3).
Insert 2pcs Short Bolt (1) through holes on Metal Tube (D) to attach Metal Tube (D) onto both side Panels(B & C) by Allen Wrench (3). Insert 2pcs Short Bolt (1) through holes on Bottom Metal Tube (E) to attach 1pc Bottom Metal Tube (E) onto both side Panels(B & C) by using Allen Wrench (3). Figure 5 Insert 2pcs Short Bolt (1) through holes on Handle Divider Tube (F) to attach Handle Divider Tube (F) onto Front Panel (A) by Allen Wrench (3).
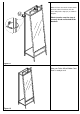
Slowly push the Wood Shelf Panel (K) into the both side Panels (B & C) by hand Insert 4pcs Wood Screw (4) through holes on both side panels (B & C) to attach Wood Shelf Panel (K) onto both Side Panels (B & C) by Tool Required - No.2 Phillips Screwdriver (Not Included). Figure 7 Find a desired location. Mark 2 locations for screws on wall One screw (for each unit) must be attached directly into a wall stud. Wall anchor is not needed when mounting to wall stud.
Insert plastic anchors(10) into the hole on wall as shown.(When doing this, you will need a hammer to help you) Figure 9 Using the Phillips head screwdriver, install screw (9) through holes on Wall Brackets (11) into Wall Anchors to attach Wall Brackets (11) onto Wall Anchors (10).
12 Move this item close to the fastened wall brackets and tie in brackets and side frame with plastic straps(12) as shown in diagram. Check to make sure the strap is securely laced and locked to the brackets.
Parts Replacement Form Customer Information Name Address City/State/Zip Code Phone Number Please indicate where you purchased this item: Store/Website/Catalog Please indicate color/size/style number: Style No Parts Letter Parts Description Quantity Needed Please immediately examine this product carefully. Any request for missing parts or damage replacement must be received within 90 days of your receipt of the product. Replacement, if available, will be honored within this time frame.