
Owner's manual

Hardened Stainless Steel Frame Dial Caliper
Please carefully review these instructions to ensure
proper and accurate use of your new Dial Caliper.
Precautions
• Maintenance & Cleaning
B
efore use, thoroughly remove oil, dust and dirt from the entire surface of the dial caliper. Be sure not to damage the measuring and
reference faces.
• Zero Point Confirmation
B
efore taking a measurement, clean and close the jaws and check that the dial needle points to "0" on the dial face.
• During Use
P
roperly close the caliper on the workpiece. Do not allow dirt, chips, etc., to enter the rack. Otherwise, the rack and pinion could be seriously
damaged, resulting in reduced accuracy and improper zero adjustment.
Zero Setting
• Clean both measuring faces of jaw (4) and close cali
per to see if the needle points to "0" on the dial face
• If caliper does not zero, loosen the bezel clamp scr
ew (2) and rotate the bezel to the "0" position
• Tighten the bezel clamp screw (2) to fix the "0" pos
ition
Readings
• Millimetre (1mm) measurement can be read on the main scale
• 0.02mm may be read on the dial gauge
• One revolution equals 2mm
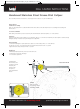
1: Thumb wheel
2: Bezel clamp screw
3: Carriage lock screw
4: Outside jaws
5: Internal jaws
6: Depth rod
7: Step measurement
8: Bezel
Example:
Main Scale 11mm
Dial Indicator 0.32mm
Total Value 11.32mm
5
3
7
8
2
1
6
4
DIAL CALIPER INSTRUCTIONS
For more information visit www.baty.co.uk precision measuring instruments
Model shown: B15-M
Hardened Stainless Steel Frame Dial Caliper_141_baty 22/07/2010 13:56 Page 1