
Use and Care Manual


114
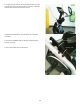
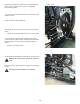
14.Usinga6mmhexwrench,removethehardware(indicated)fromthe
Console Mast. Slightly pull the Mast up and disconnect the cables. Set the
hardware aside for reassembly.
NOTICE: Do not crimp the cables. Do not allow the cables to fall
down into the Main Unit or into the Console Mast. This
step may require two people.
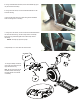
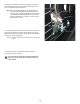
15. Using a small standard screwdriver, gently pry the Cap off of the
center of the Crank Cover.
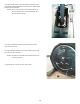
16.Usinga#2Phillipsscrewdriver,removethe6indicatedscrews(ovals
andarrows)fromtheCrankCover.
NOTICE: To assist with re-assembly, observe that the white arrows
are the longer screws.
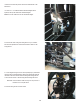
17. Repeat steps 15-16 on the other side of the machine.
Crank Cover
Cap (removed from
center of Crank Cover)
Console Mast