
Use and Care Manual


29
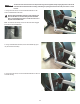
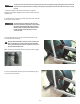
9.Insert2.5”x10”cardboardbetweentheFlywheelandtheBrake
Magnet, and tape the cardboard to the Brake Magnet.
Note: Be sure the cardboard covers all of the Brake Magnet.
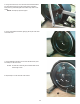
Brake Magnet
Flywheel
Servo Motor
Flywheel
Brake Magnet
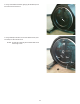
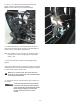
10.ToadjusttheBraketension,loosenthe2hexheadboltsandmove
the Servo Motor assembly until the closest point on the Brake Magnet is
within3.0mm(1/8”)oftheFlywheel.Tightenthebolts.
Note: Ifthecardboardisnot3mm(1/8”)thick,youcanusethepagesof
apaperbackbooktomeasurethegap.Approximately36pages
(sheets)=3mm.
11. Remove the cardboard from between the Brake Magnet and the
Flywheel.
12. Before fully attaching the Shrouds, power up the machine to verify that
the Magnet Arm can move freely, and that the Brake Magnet and Flywheel
donottouchatthemaximumresistancelevel.
!
Machine is on. Current is active. There is risk of electrical
shock. Be sure to keep ngers clear of all pinch hazards when
you change the resistance level.
13. Turn the power switch to off and disconnect all power and allow to sit
for 5 minutes.
!
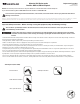
To reduce the risk of electrical shock or unsuper-
vised usage of the equipment, always unplug the
power cord from the wall outlet and wait 5 minutes
before cleaning, maintaining or repairing this
machine. Place the power cord in a secure
location.