Bowflex® 3, 5 & 7 Series Treadmills Assembly Manual P/N: 18566 Rev E (07/01/2007)
Congratulations on your commitment to fitness and your purchase of the Bowflex® 3, 5 and 7 Series treadmill. Before assembling your Bowflex® 3, 5, and 7 Series treadmill please read the Assembly Manual and follow the Important Safety Precautions. For information on how to use your Bowflex® 3, 5, and 7 Series treadmill refer to the Bowflex® 3, 5, and 7 Series treadmill Owner’s Manual. Nautilus, Inc. 16400 S.E.
Important Safety Precautions Before starting any exercise program, consult with your physician or health professional. He or she can help establish the correct exercise frequency, intensity (target heart rate zone) and time appropriate for your particular age and condition. The following 3 warnings listed below are also located on the handlebar of the treadmill. Failure to follow any of these safeguards may result in injury or serious health problems.
Getting To Know Your Machine Power Cord Information Nautilus, Inc. sells its products in many different countries some of which have different power cord and power outlet configurations. For locations where the furnished cord(s) are not suitable, contact your local dealer or service provider to find where a local high quality power cord meeting the following technical requirements is available. Do not attempt to use the treadmill without the proper power cord appropriate for your country and location.
Basic Assembly Principles Here are few basic assembly tips that can make assembly of your Bowflex® 3, 5, and 7 Series treadmill quick and easy. 1. You can make the assembly process go faster by gathering the pieces you need for each step prior to starting the step. 2. As a general rule, and for all fasteners on your Bowflex® 3, 5, and 7 Series treadmill, turning toward the right will tighten, turning towards the left will loosen.
Parts and Hardware Lists Bowflex® 3, 5, and 7 Series Treadmills' Parts List, Treadmill Hardware List, and Assembly Instructions Assembly of the Bowflex® 3, 5, or 7 Series Treadmill is divided into 5 easy stages; each comprised of only a few setup steps. Before proceeding with the assembly, please read over the easy to follow instructions to familiarize yourself with the process. You will need the following: • Flat area of 4’ x 8’ to assemble and properly use the Bowflex® 3, 5, or 7 Series Treadmill.
Parts List Check Quantity Description Reference # 1 Frame A 1 Handrail (L) B 1 Handrail (R) C 1 Computer Console D 1 Left Upright E 1 Right Upright F 1 Inner Handrail Cover (L) G 1 Outer Handrail Cover (L) H 1 Inner Handrail Cover (R) I 1 Outer Handrail Cover (R) J 1 Cross Bar K Exploded View Parts and Hardware Lists
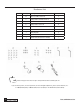
Hardware List Check Quantity Description Reference # 22 Allen Screw M8 x P1.25 x 15 a 6 Phillips Head Screw M8 x P1.0 x 15 b 6 Allen Screw M8 x P1.25 x 15 c 6 Phillips Head Screw 4 x 16 d 1 Allen Wrench 5mm/Screwdriver e 1 Allen Wrench 6mm f 1 Safety Key/Clip g 1 Silicon Lube h 1 *Power Cord (attached on 3.1 model) i Note: Please verify you have all correct parts and quantities before assembling the unit.
Assembly Drawing with Reference Numbers Parts and Hardware Lists
Parts List Reference # QTY 1 2 3 4 5 6 7 8 9 10 11 12 13 14 15 16 17 18 19 20 21 22 23 24 25 26 27 1 1 1 2 2 1 1 1 1 1 1 1 8 1 1 1 1 1 1 1 1 1 1 1 1 1 1 Description Console Hand Rail Cover set / Right Emergency Stop Magnet Hand Rail Hand Rail End Cap Right Upright Assembly Motor Soft Drop™ Cylinders Right Roller Cover Right Side Rail Right Bottom Side Rail Deck Bottom Plastic Cover Rubber Isolator Frame Assembly Rear Roller Deck Left Bottom Side Rail Left Roller Cover Left Side Rail Walking Belt Fr
Assembly Instructions To ensure ease of assembly please verify the size and quantity of all the required assembly hardware and parts with the enclosed parts list and hardware chart. The assembly process has been broken down into 5 easy-to-follow steps. Please take just a few moments to read over these instructions to familiarize yourself with the process to make assembly quick and trouble-free.
Assembly Step #2 Attach Cross Bar to Uprights 0HILLIPS HEAD 3CREWS #ROSSBAR Assembly hardware required: (6) M 8 x P1.0 x 15 Phillips-head Screws (item b) 1. Attach Crossbar between the Left and Right Uprights using Phillips-head screws. Do not fully tighten screws - leave loose for adjustment.
Assembly Step #3 Attach Console to Uprights Console Upper Control wire Console Flanges Lower Control Wire Allen Screws Allen Screws Right Upright Left Upright Assembly Hardware Required: (6) M8 x P1.25 x 15 Allen Screws (item c) This step requires two people. The Console is awkward and heavy. It is possible to pinch your fingers when connecting it to the Uprights. 1.
Assembly Step #4 Attach Handrail Covers Right Outer Handrail Cover Left Outer Handrail Cover Left Inner Handrail Cover Right Inner Handrail Cover Pillips-head Screws Assembly Hardware Required: (6) 4 x 16 Phillips-head Screws, 3 per side (item d). 1. Attach Inner and Outer Handrail Covers using Phillips-head screws.
assembly step #5 attach handrails Right Handrail Left Handrail Allen Screws Assembly Hardware Required: (8) M8 x P1 .25 x 15 Allen Screws, 4 per side (item a) . 1 . Attach Handrails to the sides of Console, aligning the holes and securing with Allen Screws .
Folding, Transporting & Unfolding Your Treadmill This treadmill has a folding mechanism; you must stop operation while folding and transporting. Make sure the power is off and the power cord is removed and unplugged before folding and transporting the treadmill. Note: After initial assembly your Bowflex Treadmill must be calibrated before it can be folded. Please follow calibration instructions in your Owner's Manual. To Fold the Treadmill: 1. Stop the Treadmill belt. 2. Bring Elevation to zero. 3.
To Transport the Treadmill: 1. After folding, as mentioned in the To Fold the Treadmill section, please be sure deck is locked and engaged in the up position. If treadmill will not lock in up position, check to see that elevation is at zero. 2. Unplug the Power Cord. 3. Pull backwards, holding the top of the deck, until the wheels can move smoothly.
To Unfold the Treadmill: Squeeze the release mechanism and slowly lower the deck until it sits on level ground. The SoftDrop™ feature lets the deck drop gently and safely under it’s own weight. That’s it! You’re finished and now you can begin to reach your fitness goals! Please reference the Owner’s Manual for information regarding computer operation, product maintenance and Warranty information.
Important Contact Numbers If you need assistance, please have both the serial number of your machine and the date of purchase available when you contact the appropriate Nautilus, Inc. office listed below. OFFICES IN THE UNITED STATES: E-mail: customerservice@nautilus.com • NAUTILUS INNOVATION CENTER Nautilus, Inc. 1886 Prairie Way Louisville, Colorado, USA 80027 Vancouver, Washington, USA 98683 Phone: 800-NAUTILUS (800-628-8458) Email: customerservice@nautilus.
© 2007 Nautilus, Inc. All Rights Reserved. Nautilus, Inc. World Headquarters, 16400 S.E. Nautilus Drive, Vancouver, Washington USA 98683 1-800-NAUTILUS (1-800-628-8458) Bowflex, SoftDrop, and the Bowflex logo are either registered trademarks or trademarks of Nautilus, Inc. All other trademarks are trademarks of their respective companies. Printed in China.