Bowflex® 3, 5 & 7 Series Treadmills Owner's Manual
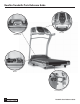
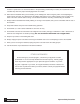
Bowflex Treadmills Parts Reference Guide Console Motor Cover Motor Lever Release 2 Treadmills Parts Reference Guide
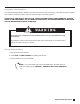
Preface WARNING Congratulations! You’ve just taken a big step towards improving your health and fitness. Your new Bowflex® treadmill will help you lose weight, increase your cardiovascular efficiency and ultimately help you look and feel better than ever before. With its innovative features and programs, you’ll enjoy maximum workout variety – you can even use the built-in heart rate monitor to track your fitness progress.
Table of Contents 4 Bowflex® 7 Series Console Bowflex® 5 Series Console 24 Important Safety Precautions 5 Understanding Your Treadmill Features 25 Grounding Instructions 5 Time 25 Emergency Stop Procedures 7 Elevation Gain 27 Normal Stop Procedures Using Your Bowflex® Treadmill 7 8 To fold the treadmill: 28 Getting Started 8 To transport the treadmill: 28 Going Forward 8 28 How Often Should You Exercise? 8 To unfold the treadmill: Fan (Bowflex® 5 and 7 Series Only) Suggested Workout
Important Safety Precautions 1. Please read, understand and carefully follow all warnings, instructions and procedures on the treadmill and in the owner’s manual before using this treadmill. 2. Plug the power cord of the treadmill directly into a dedicated grounded circuit carrying 15 amps (110 Volt model) or 7 amps (220 Volt model). We recommend the use of a surge protector. Position the treadmill so that the wall plug is visible and accessible.
increase in speed due to an electronics failure or the speed being inadvertently increased, the treadmill will come to a sudden stop when the pull pin is disengaged from the console. 10. Never start the treadmill while you are standing on the walking belt. After turning the power on and adjusting the speed control, there may be a pause before the walking belt begins to move. Always stand on the foot rails on the sides of the frame until the belt is moving.
Emergency Stop Procedures Your treadmill is equipped with a SAFETY KEY that can protect you from serious injury. The safety key uses a magnetic key to hold it in the proper position. Insert the safety key fully into the safety keyhole. ALWAYS CLIP THE SAFETY KEY CLIP TO YOUR CLOTHING DURING YOUR WORKOUT. UNLESS THERE IS AN EMERGENCY, DO NOT REMOVE THE SAFETY KEY WHEN STANDING OR WALKING ON THE WALKING BELT WHILE IN MOTION.
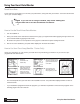
Using Your Bowflex® Treadmill Getting Started Prior to beginning any exercise program, obtain a physical exam from your physician or healthcare professional. If at any time during exercise you feel faint, dizzy or short of breath, or experience chest pain, stop exercising immediately! If the condition persists, you should consult your physician or healthcare professional before resuming exercise activities. Now it’s time to get accustomed to your treadmill.
The Calorie Burner • This intense workout helps you burn more calories. • Warm up for 5 minutes at 2.5 or 3 MPH. • Increase 0.2 MPH every 2 minutes until you find a challenging pace that you can maintain for 45 minutes. • To boost your workout, walk for the duration of an hour long TV show. • Increase the speed 0.2 MPH during every commercial break. • Go back to your regular speed until the next break.
Using Your Heart Rate Monitor Touch Heart Rate Touch heart rate grip enables you to monitor your pulse before, during and after your workout. Your heart rate will read out on your console’s display. NOTE: If you are new to using a treadmill, step off the walking belt onto the side rails to use the touch heart rate feature. How to Use the Touch Heart Rate Monitor: 1. Turn the treadmill on. 2.
Chest Strap Transmitter Battery Replacement If your chest transmitter requires batteries, follow these instructions for replacement. The battery in your chest strap can be replaced with a 3 Volt DC Lithium cell battery. 1. Remove the four screws from the battery door located on the rear of the transmitter. 2. Remove the battery door and the clear plastic battery cover. 3. Using a small, flat bladed screwdriver, gently pry the battery from the battery DS housing.
How to Operate Your Bowflex® Treadmill Before starting, straddle the belt and stand on the side rails. Do not stand on the walking belt while starting or stopping the treadmill. Insert the safety pull pin and attach the safety pull rope to your clothes. If you are a new user, stay at a slow speed and hold onto the hand rails until you become comfortable. Quick Start 1. Press POWER 2. Press QUICK START. The belt will start to move at 0.5 mph. 3. Adjust speed and incline using ARROW keys. To Stop 1.
P2- Cardio, P3 - Running, P4 - Fat Burn, P5 - Speed Interval, P6 - Hill Interval 1. Press POWER; “ENTER WEIGHT” will scroll across display. 2. Adjust weight using ARROW keys or numeric keypad (50- 300lbs). Press ENTER. 3. Select Program P2, P3, P4, P5 or P6 using the PROGRAM or ARROW keys or numeric keypad. Press ENTER. 4. Adjust workout time (5-99 minutes) using ARROW keys or numeric keypad. Press ENTER. 5. “PRESS START” will scroll across display prompting the user to begin workout. 6. Press START/PAUSE.
7. “ENTER HEART RATE TEST ZONE” will scroll across display and suggested heart rate (calculated from entered age) will flash in TIME display. 8. The Up/Down ARROW keys or numeric keypad may be used to select another target heart rate (70-200) if you desire. Press ENTER. 9. “PRESS START” will scroll across display prompting the user to begin workout. 10. Press START/PAUSE to start workout. 11. At the end of the workout the estimated maximal aerobic capacity will be displayed.
P9 - Calorie Goal Program 1. Press POWER; “ENTER WEIGHT” will scroll across display. 2. Adjust weight using ARROW keys or numeric keypad (50- 300lbs). Press ENTER. 3. Use the Up/Down ARROW keys or numeric keypad to select P9 for the Calorie Goal Program. Press ENTER. 4. “ENTER CALORIE GOAL” will scroll across display and “100” (or last entered value) will flash in TIME display. 5. Use the Up/Down ARROW keys or numeric keypad to set the desired calorie goal (50-9999). Press ENTER. 6.
P11 - Fat Burn Heart Rate Control Program 1. Press POWER; “ENTER WEIGHT” will scroll across display. 2. Adjust weight using ARROW keys or numeric keypad (50- 300lbs). Press ENTER. 3. Use the Up/Down ARROW keys or numeric keypad to select P11 Fat Burn Heart Rate Program. Press ENTER. 4. “ENTER WORKOUT TIME” will scroll across display and “20:00” (or last entered value) will flash in TIME display. 5. “ENTER AGE” will scroll across display and “34” will flash in TIME display. 6.
Programs 7-16 for 7 Series Treadmill P7 - Program, 5K Run 1. Press POWER; “ENTER WEIGHT” will scroll across display. 2. Adjust weight using ARROW keys or numeric keypad (50- 300lbs). Press ENTER. 3. Use the Up/Down ARROW keys or numeric keypad to select P7 5K Run. Press ENTER. 4. “PRESS START” will scroll across display prompting you to begin your workout. 5. Press START/PAUSE to start workout.
Fitness Rating Norms (VO2max) AGE 20 – 29 30 – 39 40 – 49 50 – 59 60 + High 51.4 + 50.4 + 48.2 + 45.3 + 42.5 + Good 51.3 – 46.8 50.3 – 44.6 48.1 – 41.8 45.2 – 38.5 42.4 – 35.3 Average 46.7 – 42.5 44.5 – 41.0 41.7 – 38.1 38.4 – 35.2 35.2 – 31.8 Fair 42.4 – 39.5 40.9 – 37.4 38.0 – 35.1 35.1 – 32.3 31.7 – 28.7 Low 39.4 or less 37.3 or less 35.0 or less 32.2 or less 28.6 or less High 44.2 + 41.0 + 39.5 + 35.2 + 35.2 + Good 44.1 – 38.1 40.9 – 36.7 39.4 – 33.8 35.
P10 - Calorie Goal Program 1. Press POWER; “ENTER WEIGHT” will scroll across display. 2. Adjust weight using ARROW keys or numeric keypad (50- 300lbs). Press ENTER. 3. Use the Up/Down ARROW keys or numeric keypad to select P10 for the Calorie Goal Program. Press ENTER. 4. “ENTER CALORIE GOAL” will scroll across display and “100” (or last entered value) will flash in TIME display. 5. Use the Up/Down ARROW keys or numeric keypad to set the desired calorie goal (50-9999). Press ENTER. 6.
P12 - Fat Burn Heart Rate Control Program 1. Press POWER; “ENTER WEIGHT” will scroll across display. 2. Adjust weight using ARROW keys or numeric keypad (50- 300lbs). Press ENTER. 3. Use the Up/Down ARROW keys or numeric keypad to select P12 Fat Burn Heart Rate Program. Press ENTER. 4. “ENTER WORKOUT TIME” will scroll across display and “20:00” (or last entered value) will flash in TIME display. 5. “ENTER AGE” will scroll across display and “34” will flash in TIME display. 6.
10. “PRESS START” will scroll across display prompting the user to begin workout. 11. Press START/PAUSE to start workout; the program will begin in the Warm-Up mode. 12. The Up/Down ARROW keys may be used to adjust SPEED and INCLINE to slowly increase your heart rate at any time during the program. P14 - BMI (Body Mass Index) Calculation This is not a fitness test or a course profile but rather a calculation to show ideal weight range for your height.
Custom User Programs P15 - User Defined 1 & P16 - User Defined 2 1. Press POWER; “ENTER WEIGHT” will scroll across display. 2. Adjust weight using ARROW keys or numeric keypad (50- 300lbs). Press ENTER. 3. Use the Up/Down ARROW keys or numeric keypad to select the User Programs P15 or P16. Press ENTER. 4. “ENTER WORKOUT TIME” will scroll across display and “20:00” will flash in TIME display (or last entered time). 5. Use the Up/Down ARROW keys or numeric keypad to set the desired workout time (5:00-99:00).
Bowflex® 7 Series Console Understanding Your Treadmill Features 23
Bowflex® 5 Series Console 24 Understanding Your Treadmill Features
Understanding Your Treadmill Features Time Time is displayed in the format 00:00. Time represents total time if time is counting up, or remaining time if time is counting down. (Time counts down if a workout time is entered at setup.) When time is counting up and reaches 99:59, it will roll over to 00:00. Pace Pace is displayed in the format 00:00. Pace represents the amount of time it will take to run one mile at the user’s current speed. Segment Time Segment Time is displayed in the format 00:00.
Elevation Gain Elevation gain represents the total vertical distance traveled during the workout session (in feet or meters) based on distance and incline. Average Speed Average Speed represents the average walking/jogging/running speed during the workout session (in mph or kph) based on distance traveled and elapsed time. Average Heart Rate Average Heart Rate represents the average of the user’s heart rate readings during the workout session (in beats per minute).
Folding, Transporting & Unfolding your Treadmill This treadmill has a folding mechanism; you must stop operation while folding and transporting. Make sure the power is off and the power cord is removed and unpluged before folding and transporting the treadmill. To fold the treadmill: 1. Stop the Treadmill belt. 2. Bring Elevation to zero. 3. Turn off power. 4. Squeeze the release mechanism then lift the deck to fold up the treadmill.
Conversion To Metric In order to convert to miles or kilometers, do the following: 1. Press and hold the Enter/Cool down button for 3 seconds while in sleep mode. 2. The beeper will sound once and the current units (Eng) will be shown in the left display. 3. Continue holding the Enter/Cool down button. After 3 seconds, the new units (Si) will be shown in the left display. 4. Release the Enter/Cool down button.
Keys Enter/Cool down You may enter the Cool-Down mode at any time during the workout session. When you press the Enter/Cool down key, the treadmill will exit the current program and the incline will return to zero. Speed Keypad 0-9 (Bowflex® 3, 5 & 7 Series) The Speed Keypad 0-9 is a multi-function keypad. During program setup, the Speed Key Pad (0-9) functions as a numeric keypad for data entry.
Taking Care of Your Treadmill Just like changing the oil in your car or replacing a filter in your home’s heating and cooling system, a little preventive maintenance will insure your treadmill will operate smoothly and quietly for years to come. Walking Belt Tension belt is centered. If the belt has moved to the left: Turn the right adjustment screw 1/2 turn counterclockwise, then turn the left adjustment screw 1/2 turn clockwise. If belt does not move, repeat until belt is centered.
General Cleaning DANGER ALWAYS UNPLUG THE TREADMILL FROM THE ELECTRICAL OUTLET BEFORE CLEANING, LUBRICATING, OR SERVICING THE UNIT. WARNING AT T E N T I O N General cleaning of the treadmill will prolong the life of the treadmill and improve performance. Keep the unit clean by dusting regularly. Be sure to dust the exposed part of the deck on either side of the walking belt and also the side rails. For best performance, we recommend your treadmill be placed on a treadmill mat.
Walking Belt and Deck Lubrication This treadmill is equipped with a pre-lubricated deck and belt system. The deck and belt friction may affect the function and life of your treadmill; we recommend periodic lubrication. We also recommend a periodic inspection of the deck surface under the walking belt. If the deck appears worn, contact our service department at call 1-800-864-1270 or 1-800-636-8316 (French Canadian).
Troubleshooting Guide PROBLEM CAUSE CORRECTION Treadmill will not start Not plugged in Plug into three prong grounded outlet. Safety pull pin not inserted. Insert safety pull pin. Treadmill circuit breaker tripped. Reset circuit breaker. Elevation not accurate Out of calibration. Recalibrate unit. Speed not accurate Out of calibration. Recalibrate unit. Set in wrong units. Change units. Walking belt slips Walking belt loose. Adjust walking belt tension.
Warranty All Bowflex® exercise products are warranted to the retail purchaser to be free from defects in materials and workmanship by The Nautilus Group, Inc. Warranty coverage is valid to the original purchaser only and proof of purchase will be required. Any product sold or placed in an application not recommended will void any warranty coverage set forth by Bowflex® warranty policies and procedures. Time Period – Residential Use (All Models): Fifteen years on frame. Ten years on drive motor.
Warranties or incidental or consequential damages, so the preceding limitations and exclusions may not apply to you. Procedures Warranty service will be performed by The Nautilus Group, Inc. or an authorized Bowflex® Fitness Dealer. The original purchaser must provide proof of purchase. Service calls and/or transportation to and from the Authorized Bowflex® Dealer is the responsibility of the purchaser. 1. The Nautilus Group, Inc.
The Nautilus Group, Inc. 1886 Prairie Way Louisville, Colorado 80027 1-800-864-1270 www.nautilus.