Special Edition Includes: Dr.
Table of Contents Important Safety Precautions.................................................................3 Getting To Know Your Machine...............................................................4 About Your Bowflex ® Ultimate™ Home Gym Attachments.................................................................................................9 Using Your Machine ................................................................................10 Defining Your Goals...................................
Important Safety Precautions • Always read and follow the Warning and Safety labels attached to your Bowflex® Ultimate ™ home gym. Do not remove these labels. If you need replacement labels, please call a Nautilus® Representative at (800) 605-3369. • Read the owner’s manual and follow it carefully before using the machine.
Getting to Know Your Machine CONGRATULATIONS on your commitment to fitness! By choosing Bowflex® Ultimate™ home gym to be your partner, you’ve chosen a machine that can deliver on its promises! The resistance and aerobic training that can be performed on the Bowflex® Ultimate™ home gym is unmatched by any other single piece of home fitness equipment available.
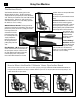
Using Your Machine Power Rod Resistance Safety Precautions Power Rods® are made from a special composite material. Your rods are sheathed with a protective black rubber coating. Each rod is marked with its weight rating on the rod cap. When hooking up the Power Rods®, do not stand directly over the tops of the rods. Stand off to the side while connecting and disconnecting the Power Rods ® from the cables.
Using Your Machine The Workout Bench Your Bowflex® Ultimate™ home gym has four different bench positions. To adjust the bench, simply locate the spring lock pin on the side of the seat. Pull out pin to release seat, then slide it to the desired position. Pull out pin, give it half a turn, and release to place it in a “free sliding” position for exercises such as rowing. position there are two possible holes for the spring lock pin to lock into, one forward and one back.
Using Your Machine Using the Bowflex Ultimate Home Gym Hand Grips ® ™ The Bowflex® Ultimate™ home gym hand grips can be used as regular grips, hand cuffs or ankle cuffs. Regular Grip: Grasp the handle and cuff together to form a grip without inserting your hand through the cuff portion. Most of the exercises you perform utilize this grip. Hand Cuff Grip: Slip your hand through the cuff portion of the grip so that the foam pad rests on the back of your hand.
Using Your Machine Using the Bowflex Ultimate Home Gym Adjustable Pulley System ® Make certain the adjustable pulley system is locked and secure before adding any Power Rod® resistance to the pulley. ™ Using the Bowflex® Ultimate™ home gym adjustable pulley system is as easy as pulling a pin and expanding the pulley out. Exercises in the wide position may require a lighter weight than those in the narrow position. Pulley knobs are spring-loaded and are The squat cable feeds through the low pulley.
Using Your Machine Using the Bowflex Ultimate Home Gym Leg Extension/Leg Curl Attachment ® ™ The Bowflex Ultimate home gym leg extension/ leg curl attachment is a gym-quality attachment that helps you develop strong, muscular legs. ® ™ Using The Bowflex Ultimate Home Gym Lat Tower ® ™ Build back and shoulder muscles quickly with this integrated lat tower. It is easy to set up and can get you on track in no time at all. To attach the tower, remove all Power Rod® resistance.
Using Your Machine 10 Folding & Moving Your Bowflex Ultimate Home Gym ® 1 2 3 4 5 6 ™ Folding and moving your Bowflex® Ultimate™ home gym is easy. Follow the simple steps below to fold your Bowflex® Ultimate™ home gym. Once it’s folded, simply tilt the machine back on its transport wheels and roll it to any location 1. R emove the leg attachment from the Bowflex® Ultimate™ home gym, if attached. 2. L ock the seat and bench into place using the spring lock seat pin. 3.
About Your Bowflex Ultimate Home Gym Attachments ® The Bowflex Ultimate™ Home Gym Leg Extension/Leg Curl Attachment ® This attachment is designed to add more effectiveness to all exercise routines where “leg work” is required. Safety • Before using the attachment, make sure all fasteners are in place and tightened. • Make sure the attachment's cables are securely fastened to the regular Bowflex® Ultimate™ home gym cables.
Defining Your Goals Your body will do what you train it to do. That’s why it’s important to define your goals and focus on those goals. Here are some fitness components that will help you define your goals and choose your fitness program. Muscle Strength is the maximum force you can exert against resistance at one time. Your muscle strength comes into play when you pick up a heavy bag of groceries or lift a small child.
Defining Your Goals Reaching Your Goals To reach your goals you must follow a consistent, well designed program that provides balanced development to all parts of the body and includes both aerobic and strength exercise. Only then will you meet your goals safely and efficiently. The workout routines found in this manual are professionally designed and written to target specific fitness goals.
Exercising Properly 14 Working Out Key Points: A workout begins in your mind’s eye. With concentration and visualization you can approach your workout with a positive, constructive attitude. A good pre-workout mental routine is to sit and relax, so you can focus on what you are about to do and think about achieving your end goal. • Do not lose spinal alignment — keep your chest lifted. Warming Up We recommend that you warm up by rowing on the Bowflex® Ultimate™ home gym.
The Workouts 15 20 Minute Better Body Workout Frequency: 3 Days Per Week (M-W-F) Time: About 20 Minutes Start by performing one set of each exercise. Warm up with a light resistance exercise that you can perform easily for 5 -10 reps without fatiguing. Focus on practicing and learning your technique before increasing the resistance. Then move to a more challenging resistance you can perform for no less than 10 reps and no more than 15 reps without your form deteriorating.
The Workouts 16 20 Minute Upper/lower Body Frequency: 4 Days Per Week (M-T-TH-F) Time: About 20 Minutes This program provides you with a quick and effective workout that combines muscle conditioning with some cardiovascular benefits. Do this routine when you are limited in time or just want a variation to your normal routine. Perform this program training 2 days, resting 1 to 2. Perform all exercises to near failure, stopping at the point that your technique starts to deteriorate.
The Workouts 17 Body Building Frequency: 3 Days On, 1 Day Off Time: About 45-60 Minutes Body building requires focused concentration and dedication to training, as well as proper eating habits. Train each muscle group to failure before moving on to the next exercise. Do not neglect any muscle group. If needed, include an aerobic activity to increase your caloric expenditure and help to reduce your body fat levels to achieve a defined muscular look. Rest 30-60 seconds between each set and exercise.
The Workouts 18 Circuit Training – Anaerobic/Cardiovascular Frequency: 2-3 Times Per Week Time: About 20-45 Minutes Circuit training is a great way to achieve the benefits of strength training and cardiovascular training in one quick, challenging routine. The idea is to move quickly from exercise to exercise, taking only as much rest between sets as it takes to set up the next exercise (less than 20 seconds). One circuit equals one set of each exercise.
The Workouts 1 True Aerobic Circuit Training Frequency: 2-3 Times Per Week Time: About 20-60 Minutes Circuit training is a great way to achieve the benefits of strength training and cardiovascular training in one quick, challenging routine. By returning to the aerobic rowing exercise between each set you are increasing your aerobic capacity, endurance and burning fat as energy.
The Workouts 20 Strength Training Frequency: 3 Days Per Week (M-W-F) Time: About 45-60 Minutes This program is designed to emphasize overall strength development. This is an advanced routine to be used only after you have progressed from the advanced general conditioning routine and only after you have perfected your exercise techniques. Work each set to near exhaustion. If you can perform more than 5 to 8 reps, you should increase your resistance 5 pounds and decrease your reps to 5.
Chest Exercises 21 Bench Press Shoulder Horizontal Adduction (and elbow extension) Muscles worked: This exercise emphasizes the chest muscles (pectoralis major). It also involves the front shoulder muscles (anterior deltoid, a portion of the middle deltoid) and the triceps, which are located on the back of the upper arm. START FINISH Pulley position: Wide or narrow (Wide offers a greater challenge throughout the entire range on specific movements, especially at the top of these movements.
Chest Exercises 22 Incline Bench Press Shoulder Horizontal Adduction (with elbow extension) Muscles worked: This exercise emphasizes the chest muscles (pectoralis major), especially the upper portion. It also involves the front shoulder muscles (anterior deltoid, a portion of the middle deltoid) and the triceps, which are located on the back of the upper arm.
Chest Exercises 23 Decline Bench Press Shoulder Horizontal Adduction (with elbow extension) Muscles worked: The entire chest muscle (pectoralis major) is emphasized. It also involves the front shoulder muscles (anterior deltoid, a portion of the middle deltoid) and the triceps, which are located on the back of the upper arms. START FINISH Pulley position: Wide or narrow (Wide offers a greater challenge throughout the entire range on specific movements, especially at the top of these movements.
Chest Exercises 24 Lying Cable Crossover Shoulder extension/adduction (elbow stabilized near extension) Muscles worked: This exercise emphasizes the chest (the pectoralis major muscles). The triceps muscles, located on the back of the upper arms, are also involved in maintaining the elbow position and also help with shoulder motion. Pulley position: Wide only. START Starting position: • W ith the bench flat, lie on your back with your head toward the Power Rods ®.
Shoulder Exercises 25 Seated Shoulder Press Shoulder Abduction (with elbow extension) Muscles worked: This exercise emphasizes the front portion of the shoulder muscles (front deltoids as well as the front part of the middle deltoids), the rotator cuff muscles, the upper back muscles (trapezius), and the triceps muscles located on the back of the upper arms.
Shoulder Exercises 26 Rear Deltoid Rows Shoulder Horizontal Abduction (with elbow flexion) Muscles worked: This exercise emphasizes the back portion of the shoulder muscles (the rear deltoids, as well as the rear portion of the middle deltoids, the posterior rotator cuff, upper lat and teres major) as well as the trapezius and rhomboids. Pulley position: Wide or narrow. START FINISH Starting Position: • Sit on the bench facing the Power Rods ®, knees bent and your feet on the platform.
Shoulder Exercises 27 Seated Lateral Shoulder Raise Shoulder Abduction (elbow stabilized) Muscles worked: This exercise emphasizes the side shoulder muscles (middle deltoids), the top muscle of the rotator cuff (supraspinatus) and the trapezius muscles. Pulley position: Narrow. START Starting position: • Sit on the bench facing the Power Rods ®, knees bent and your feet on the platform.
Shoulder Exercises 28 Scapular Depression Muscles worked: This exercise involves your lower trapezius muscles, and latissimus dorsi muscles. Both act as stabilizers and movers of your shoulder blades. This motion of scapula depression is very important in posture as well as when using the arms to raise from a chair. It is also involved in overhead pulling exercises. Pulley position: Wide or narrow.
Shoulder Exercises 29 Shoulder Rotator Cuff External Rotation START Muscles worked: This exercise emphasizes the rear portion of the rotator cuff (infraspinatus and teres minor muscles). This area generally gets very weak as we age and needs to be addressed by almost everyone. Motion: • Rotate your forearm away from your abdomen and out to the side, keeping your elbow/upper arm by your side during the entire motion. • Slowly return to the starting position. Pulley position: Wide or narrow.
Shoulder Exercises 30 Shoulder Shrug Scapular Elevation Muscles worked: The primary muscles emphasized are the upper trapezius and associated smaller muscles of the region. Pulley position: Narrow or wide. START Starting position: • S tand on the platform facing the Power Rods ®. Reach down and grasp the handles with the palms facing each other or facing backward, as comfort dictates. • L et your arms hang extending in the direction of the pulleys.
Shoulder Exercises 31 Lying Front Shoulder Raise Shoulder Flexion (elbow stabilized) Muscles worked: This exercise emphasizes the front portion of the shoulder muscles (front deltoids as well as the front part of the middle deltoids). Pulley position: Narrow only. START Starting position: • Sit on the bench facing the Power Rods ®, knees bent and feet flat on the platform. • Grasp the handles, with your arms straight and your palms facing down.
Shoulder Exercises 32 Military Press START FINISH Muscles worked: This exercise emphasizes the front portion of the shoulder muscles (front deltoids and the front part of the middle deltoids), the rotator cuff muscles, the upper back muscles (trapezius), and the triceps muscles located on the back of the upper arms. Motion: • S traighten arms overhead. • Slowly return to starting position keeping tension in the front shoulder muscles.
Back Exercises 33 Lying Shoulder Pullover Shoulder Extension (elbow stabilized) Muscles worked: This exercise emphasizes the upper back (the latissimus dorsi, teres major, and rear deltoid muscles). It also involves the chest (the pectoralis major muscles). The triceps muscles, located on the back of the upper arms, are involved in maintaining the elbow position and also help with shoulder motion. Pulley position: Narrow.
Back Exercises 34 Narrow Pulldowns Shoulder Extension (with elbow flexion) Muscles worked: This exercise emphasizes the latissimus dorsi, teres major and rear deltoid which make up the large pulling muscles of your upper back. It also involves the muscles on the front of your upper arms (the biceps group) which are responsible for bending your elbows. Pulley position: Lat tower. START FINISH Starting position: • Attach a single handle to each cable.
Back Exercises 35 Lying Narrow Lat Pulldowns Shoulder Extension (with elbow flexion) Muscles worked: This exercise emphasizes the latissimus dorsi, teres major and rear deltoid which make up the large pulling muscles of your upper back and eliminates the biceps from the movement. Pulley position: Narrow only. START Starting position: • L ie on your back on the bench, head toward the Power Rods ®. Your buttocks will eventually be off the end of the bench.
Back Exercises 36 Seated Lat Rows Shoulder Extension (with elbow flexion) Muscles worked: This exercise emphasizes the latissimus dorsi, teres major and rear deltoid muscles which make up the large pulling muscles of your upper back as well as the trapezius and rhomboids. The biceps muscles on the front of the upper arms are also involved in this movement. Pulley position: Narrow only. START Starting position: • Sit on the bench facing the Power Rods ®. • Grab handles with palms facing each other.
Back Exercises 37 Reverse Grip Pulldowns Shoulder Extension (with elbow flexion) Muscles worked: This exercise emphasizes the latissimus dorsi, teres major and rear deltoid which make up the large pulling muscles of your upper back. It also involves the muscles on the front of your upper arms (the biceps group) which are responsible for bending your elbows. Pulley position: Lat tower.
Back Exercises 38 Stiff-Arm Pulldown Shoulder Extension (elbow stabilized near extension) Muscles worked: This exercise emphasizes your upper back (the latissimus dorsi, teres major and rear deltoid muscles), as well as the muscles between the lower part of your shoulder blades (lower trapezius muscles). The triceps muscles, located on the back of the upper arms, will also be involved. Pulley position: Lat tower.
Arm Exercises 39 French Press Elbow Extension Overhead Muscles worked: This exercise emphasizes the triceps muscles located on the back of the upper arms. Pulley position: Narrow only. START Starting position: • Sit on the bench facing away from the Power Rods ®. Bend the knees and place your feet flat on the floor. • Reach behind and grasp the handles, palms facing each other (or angled upward).
Arm Exercises 40 Lying 45 Degree Triceps Extension Elbow Extension Muscles worked: This exercise emphasizes the triceps muscles located on the back of the upper arms. Pulley position: Narrow only. START Starting position: • L ie on your back with your head toward the Power Rods ®, knees bent and your feet flat on the floor. • Reach overhead and grasp the handles, palms facing toward the ceiling.
Arm Exercises 41 “Rope” Pushdowns Elbow Extension Muscles worked: This exercise emphasizes the triceps muscles located on the back of the upper arms. These muscles are responsible for straightening your arms and assist in any upper body pushing or pressing motion. Pulley position: Lat tower. START Starting position: • Remove the bench, straddle the rail and stand on the platform facing the Power Rods ®.
Arm Exercises 42 Cross Triceps Extension Muscles worked: This exercise develops the triceps muscle located on the back of the upper arms. Pulley position: Wide only. START Starting position: • Seated in the 45 degree position, reach across and straight behind your body, grasp a handle, and bend your elbow until your hand is near your chest. • Keeping knees bent and feet flat on the floor, lay your head back against the bench and straighten your arm to the front.
Arm Exercises 43 Seated Triceps Extension Elbow Extension Muscles worked: This exercise emphasizes the triceps muscles located on the back of the upper arms. Pulley position: Narrow only. START Starting position: • Seated in the 45 degree position, reach straight behind your body, grasp the handles, and bend your elbows until your hands are near your chest and your palms are facing toward the floor.
Arm Exercises 44 Seated Biceps Curl Elbow Flexion (in supination) Muscles worked: This exercise emphasizes and develops the biceps muscles, which are located on the front of your upper arms and are primarily responsible for bending your elbows, as well as the brachialis and brachioradialis. Pulley position: Narrow. START Seated position: • Sit facing the Power Rods ®, knees bent with one foot resting on the bench and one on the floor.
Arm Exercises 45 Standing Wrist Extension START Muscles worked: This exercise emphasizes the back and top parts of your forearms. It also isometrically challenges your elbow flexors, located on the front part of your upper arms. Motion: • Slowly curl your knuckles upward. • Keeping your forearms still, slowly return to the starting position. Pulley position: Narrow. Key points: • Move slowly and never relax the wrist. • Do not move your forearm or alter the bend in your elbow.
Arm Exercises 46 Standing Wrist Curl Muscles worked: This exercise emphasizes the front part of your forearms as well as increases the strength of your grip. It also isometrically challenges your elbow flexors, located on the front part of your upper arms. Pulley position: Narrow. START Starting position: • Remove the bench and stand on the platform facing the Power Rods ®. • Bend down and grasp the handles with your palms facing forward. • S tand with your upper arms and elbows by your sides.
Arm Exercises 47 Lying Biceps Curl Elbow Flexion (in supination) Muscles worked: This exercise emphasizes and develops the biceps muscles, which are located on the front of your upper arms and are primarily responsible for bending your elbows, as well as the brachialis and brachioradialis. Pulley position: Wide or narrow (wide will work ideally for most people due to the angle created in the arm (carrying angle) in the palm forward (supinated position).
Arm Exercises 48 Barbell Curls — Elbow Flexion (in supination) Muscles worked: This exercise emphasizes and develops the biceps muscles, which are located on the front of your upper arms and are primarily responsible for bending your elbows. The brachialis and brachioradialis are also involved. Pulley position: Low pulley. START FINISH Starting position: • Remove the bench and stand on the platform facing away from the Power Rods ®. • Grasp the bar with an underhand grip.
Abdominal Exercises 49 Seated (Resisted) Abdominal Crunch Spinal Flexion Muscles worked: This exercise emphasizes the abdominal area including the upper and lower front abs (rectus abdominus) and the side abs (obliques). Pulley position: Wide or narrow. START Starting position: • W hile seated in the 45 degree position, spread the cuffs from the handles and put the arms through, positioning each cuff around the front of the respective shoulder.
Abdominal Exercises 50 Reverse Crunch Spinal Flexion Muscles worked: This exercise works your entire abdominal area including your upper and lower front abs (rectus abdominus) and your side abs (obliques). Pulley position: None. START Starting position: • W ith the bench in the flat position, lie on your back with your head toward the Power Rods ®. • Bend your knees fully. • T he amount of bend at the hips based on desired difficulty. Beginners should be fully bent, bringing the legs near the abs.
Abdominal Exercises 51 Trunk Rotation Muscles worked: This exercise involves most of the trunk and deep spinal muscles. It does not “spot reduce” or eliminate “love handles.” It should be noted that rotation is more limited in the spine than most people realize and should be performed with minimal resistance, and always in proper erect alignment. Pulley position: Narrow.
Leg Exercises 52 Leg Extension Muscles worked: This exercise emphasizes the muscles on the front of the upper thigh (quadriceps muscle group) which are responsible for straightening your leg against resistance. This powerful muscle group helps provide stability for the knee joint and is essential for producing power in running, jumping and lifting activities. Pulley position: Leg extension/ Leg curl attachment.
Leg Exercises 53 The Squat Knee Extension, Hip Extension, Ankle Plantarflexion Muscles worked: Although the squat is often considered a total body exercise, the glutes, adductors, hamstrings and quads are primary movers and the spinal erectors are key to stabilization. Pulley position: Low pulley. START FINISH Starting position: • Remove the back support and place the seat in free sliding position. • Use the bar harness to adjust strap length allowing tension at the appropriate depth.
Leg Exercises 54 Lying (Prone) Leg Curl Knee flexion Muscles worked: This exercise emphasizes the hamstring muscle group (biceps femoris, semimembranosus, semitendinosus) on the back of the thigh as well as the back of the calf (gastrocnemius). Pulley position: Narrow. START Starting position: • Seated on the flat bench, attach the cuffs to the respective ankles. • Turn and lie on your stomach with your head facing away from the Power Rods ®. The cables will cross.
Leg Exercises 55 Standing Hip Flexion With knee flexion Muscles worked: This exercise primarily develops and strengthens the muscles on the front of your hips (iliopsoas and rectus femoris) that are primarily responsible for bending or flexing your hips. Pulley position: Narrow. START Starting position: • Remove the bench. • S tand on the base platform, facing away from the Power Rods ®, on one side of the bench.
Leg Exercises 56 Lying Leg Extension Knee Flexion with Hip Flexion START Muscles worked: This exercise allows you to strengthen and develop the front part of your upper thighs (quadriceps muscle groups), helping to increase your muscular stability at the knee joints. Motion: • Slowly straighten your leg, moving only your knee/lower leg. • Slowly return to the starting position without relaxing the quad. Pulley position: Narrow.
Leg Exercises 57 Standing Leg Kickback Hip extension and knee extension START Muscles worked: This exercise strengthens and develops the muscles of your buttocks area (gluteus maximus). Remember, there is no such thing as “spot reduction.” Do not do this exercise because you believe it will remove fat from this area — do it to strengthen and build these muscles. Motion: • E xtend your entire leg backward, straightening the knee.
Leg Exercises 58 Standing Hip Abduction Muscles worked: This exercise will not burn off fat from your hips or outer thigh! There is no exercise that will burn fat from a specific area. This exercise will, however, strengthen the muscles on the sides of your hips (gluteus medius), especially on the standing/support side. Use light resistance and controlled range of motion on this exercise.
Leg Exercises 59 Seated Hip Abduction Muscles worked: This exercise will not burn off fat from your outer thighs or make them smaller! There is no exercise that will burn fat from a specific area. This exercise will, however, strengthen the muscles on the sides of your hips, which in the seated (hip flexed) position includes the piriformis and gluteus maximus. Pulley position: Wide.
Leg Exercises 60 Ankle Eversion Muscles worked: This exercise strengthens and develops the muscles on the outside of your lower legs (peroneals). These muscles are essential for standing balance and lateral agility of the ankle. Pulley position: Narrow. START Starting position: • Sit on the bench with one side of your body facing toward the Power Rods ®. • Attach the handle around the ball of the foot farthest from the pulley. • S traighten the attached leg and sit up straight.
Leg Exercises 61 Stiff-Leg Deadlift Hip extension Muscles worked: This exercise emphasizes and develops the hamstrings and glutes, while requiring the spinal erectors to stabilize. Pulley position: Low pulley START FINISH Starting position: • Remove the bench and stand on the platform facing the Power Rods ®. • Grasp the bar with an overhand grip approximately shoulder width. • The bar harness may have to be adjusted to insure that there is enough movement in the cable to complete the range of motion.
The Bowflex Body Leanness Program ® By Ellington Darden, Ph.D. The following program was created by Dr. Ellington Darden. It contains a rigorous fitness and dietary program. Please consult your physician before beginning any fitness or dietary program. Some of the names of the exercises listed in this program have been changed in order to match the names of the exercises in this manual. The exercises themselves have not been changed, in order to preserve the integrity of Dr. Darden’s Study.
A Personal Guarantee From Dr. Ellington Darden Dear Bowflex® Enthusiast, I’m excited, really excited! I’m elated because I’ve developed an exercising and eating program that produces fat loss faster than any plan I’ve ever tested. The men involved in my research, for example, had an average fat loss of 27.95 pounds (12.68 kg) per man. Women on the same program averaged a reduction of 16.96 pounds (7.69 kg).
Introduction The Bowflex® Body Leanness Program This program is scientifically designed for maximal fat loss over six weeks. It is important that you practice every aspect of the plan to achieve optimum results. The program separates into three two-week stages. During each stage you will exercise, control the number and quality of calories you consume, and drink plenty of ice-cold water. Before starting the exercise routine you must be familiar with your Bowflex®.
Measurements 66 If you would like to measure your personal before-and-after results, there are several steps you need to take. It is important that you accurately perform each task, then at the end of the six-week program, repeat the process in the same manner. Body Weight: Women Measure: Suprailium, triceps, and thigh. Men Measure: Chest, abdomen, and thigh. Remove clothing and shoes and record your weight to the nearest quarter pound or hundred grams.
Measurements 67 Skinfold Measurements To accurately track your progress through this six-week program, it is necessary to take skinfold measurements. By measuring yourself in this way, you will be able to determine your lean-body mass and your body-fat percentage. The goal of this program is to increase your lean-body mass and decrease your body-fat percentage. Please read this section carefully. Proper measuring techniques are essential to track your success. It is best to have someone measure you.
Measurements Using Calipers When Measuring Skinfolds The procedure for measuring skinfold thickness is to grasp firmly with the thumb and forefinger a fold of skin and surface fat and pull it away from the underlying muscle. Take the caliper in your other hand and open the jaws. Clamp the jaws over the pinched skin and fat. The jaws exert constant tension at the point of contact with the skin.
Determining Your Body Fat 69 To Use The Nomogram: 1) Locate the sum of your three skinfolds in the right column and mark it. 2) Locate your age in years on the far left column and mark it. 3) Connect the two marks with a straightedge. Where the straightedge intersects the line in the middle column appropriate to you, you will find your body-fat percentage. Baun, W.D, Baun, M.R., and Raven, P.B. A nomogram for the estimate of percent body fat from generalized equations.
Calculating Lean Body Mass 70 Now that you know your body-fat percentage, you can calculate your lean-body percentage. This will eventually show you how many pounds of muscle were added to your body, after completing the program. For Example: Before the program, Joe weighs 200 pounds (90.7 kg) and measures 30% fat, which amounts to 60 pounds (27.2 kg). Thus, his lean-body mass is 70%, or 140 pounds (63.5 kg). After the program, Joe weighs 180 pounds (81.6 kg) and is 20% fat, which equals 36 pounds (16.
Your Results Summary Sheet Name Age Height Weight Loss Weight Before Muscle Gain Weight After Fat Loss Please follow the instructions in the “Measurements” section for measuring circumferences. Measurements Before After Difference Right Arm Left Arm 2” (5 cm) Above Navel Navel 2” (5 cm) Below Navel Hips Right Thigh Left Thigh Total Percent Body Fat If you wish to send in your results to Bowflex®, please send to: Bowflex® Results, 1400 N.E. 136th Ave., Vancouver, WA. 98684.
The Workouts 72 GUIDELINES Week 1&2 All exercises should be practiced with one set of 8 to 12 repetitions. The style of performance is very important. The movement for each repetition should be 4 seconds in the positive phase and 4 seconds in the negative. Keep the motion slow and smooth. When 12 repetitions are accomplished, increase the resistance by approximately 5 percent. Keep the time between exercises to a minimum, no longer than 60 seconds.
Eating Guidelines 73 You will be following a reduced-calorie nutrition program, which is divided into three two-week segments. The program is a proven method for achieving maximal fat loss over a six-week period. It consists of a carbohydrate-rich, descending-calorie eating plan, and a superhydration routine. Follow a Carbohydrate-Rich, Descending-Calorie Eating Plan: Approximately 60 percent of the daily calories should be from carbohydrates.
Superhydrate Your System Drinking plenty of water is essential to the success of this program. Drinking the recommended amount of water can seem like a challenge at first. Stick with it. Carry a large sports bottle or similar item with you throughout the day. After several weeks, you will find that you actually thirst for more and more water, and the amounts recommended are easily reached. Superhydration aids fat loss in a number of ways.
The Eating Plan The menus in the Bowflex® eating plan are designed for maximum fat-loss effectiveness and nutritional value. For best results, follow them exactly. Every attempt has been made to utilize current popular brand names and accurate calorie counts, which are listed in the menus. But as you probably realize the products are sometimes changed or discontinued. If a listed item is not available in your area, you’ll need to substitute a similar product.
The Eating Plan - US Measurements Breakfast = 300 calories Choice of bagel, cereal or shake. Bagel 1 plain bagel, Sarah Lee (frozen) (210) 3/4 oz. light cream cheese (45) 1/2 C. orange juice, fresh or frozen (55) Any beverage without calories, caffeine, or sodium, such as decaffeinated coffee or tea. Cereal 1.5 oz. (42 grams) serving equals approximately 165 calories. Choice of one: Kellogg’s Low Fat Granola (without raisins), General Mills Honey Nut Clusters, General Mills Basic 4 1/2 C.
The Eating Plan - Metric Measurements* Breakfast = 300 calories Choice of bagel, cereal or shake. Bagel 1 plain bagel, Sarah Lee (frozen) (210) 21 g light cream cheese (45) 120 ml orange juice, fresh or frozen (55) Any beverage without calories, caffeine, or sodium, such as decaffeinated coffee or tea. Cereal 42 gram serving equals approximately 165 calories.
Shopping List Quantities needed for listed items will depend on your specific selections. Review your choices and adjust the shopping list accordingly. It may be helpful for you to photocopy this list each week before doing your shopping. Staples Orange juice, skim milk, whole-wheat bread, Promise Ultra Vegetable Oil Spread, Italian fat-free dressing, Dijon mustard, safflower oil, noncaloric beverages (tea, decaffeinated coffee, diet soft drinks, water).
Q&A Q. I often get headaches when I eat only 1000 calories a day. What should I do? A. Your headaches may be caused by going longer than three hours between meals or snacks. Try spacing your meals and snacks where there are fewer hours between them. Some people who are used to drinking regular coffee with caffeine notice headaches when they stop consuming coffee for several days. If this is the case with you, you might want to ease off the coffee more gradually. Q. I don’t like red meat.
Q&A American women develop excessively large muscles. Progressive resistance exercise such as Bowflex® will make your muscles larger – but not excessively large – and larger muscles will make your body firmer and more shapely. Q. W hy is it so important I perform the Bowflex® exercises with a 4-second count on the lifting and lowering? A. Because a slow, smooth 4-second lifting followed by a 4-second lowering involves more muscle fibers more thoroughly than faster speeds of movement.
Q&A Q. I ’m pleased that I lost the fat I wanted to lose. What do I do to maintain my new body weight? A. Once you’ve lost your excessive fat, your next task is to maintain that status. Here are the adjustments you need to make to your current practices. Adhere to a carbohydrate-rich, moderate-calorie eating plan. Instead of eating from 1000 to 1500 calories a day, you’ll be consuming from 1600 to 2400 calories per day. Maybe you can eat even more after your new body weight has stabilized.
Exercise Log 82 Please feel free to make copies of this chart to continue your exercise log.
Muscle Chart Sternocleidomastoid 83 Trapezious Pectoralis Major Anterior Deltoid Medial Deltoid Biceps Brachialis External Obliques Serratus Anterior Rectus Abdominus Posterior Deltoid Infraspinatus Teres Major Flexor Digitorum Superficials Triceps Latissimus Dorsi Brachioradialis Pronator Teres Flexor Carpi Radialis Gluteus Medius Tensor Fasciae Latae Gluteus Maximus Iliopsoas Adductor Magnus Pectineus Rectus Femoris Vastus Lateralis Vastus Medialis Peroneus Longus Extensor Digitorum Longus
This manual is written and designed by industry professionals. If you have any questions regarding your Bowflex® Ultimate™ home gym or any instructions found in this manual, please call 1-800-605-3369 for assistance. ©2004 Nautilus® Inc. All rights reserved. 1400 N.E. 136th Ave., Vancouver, WA 98684. Bowflex, Bowflex Ultimate, Power Rod and the Bowflex and Nautilus logos are either registered trademarks or trademarks of Nautilus®, Inc.
The Bowflex Ultimate™ Home Gym Assembly Instructions ® 51370 Rev AA (2004)
Bowflex® Ultimate™ Parts Reference Guide Lat Tower Assembly (if so equipped) Bent Lat Bar Pulley Special features unique to the Bowflex® Ultimate™ are the special cable storage areas. When the lat cables are not in use they can be conveniently tucked into the lat tower assembly as shown to the top left. In addition, the leg extension cables can be clipped into the special clip assembly located under the bench as shown in the picture to the left.
Before You Start Basic Assembly Principles Here are a few basic assembly tips that can make your assembly of the Bowflex ® Ultimate™ quick and easy. By using these principles, you can simplify the process and save yourself some extra time and effort. 1. W hen you are using a ratchet to tighten a locknut on a bolt, use a close-ended combination wrench to grip the locknut. This will ensure that the locknut is fastened securely. 2.
Bowflex® Ultimate™ Parts List A-2 Item #: 1 Item #: 2 Item #: 3 Item #: 4 Item #: 5 Item #: 6 Qty.: Qty.: Qty.: Qty.: Qty.: Qty.: 1 1 1 1 1 1 Descr: Lower Lat Tower Descr: L eft Main Frame Assembly Descr: R ight Main Frame Assembly Descr: Squat Frame Descr: Squat Platform Descr: Adjustable Pulley System Item #: 7 Item #: 8 Item #: 9 Item #: 10 Item #: 11 Item #: 13 Qty.: Qty.: Qty.: Qty.: Qty.: Qty.
Bowflex® Ultimate™ Hardware List A-3 Note: Drawings are actual size. Item #: 45 Qty.: Item #: 44 Qty.: 3 Descr: #10X 1” Self Drilling Screw 4 Descr: #10X 3/4” Self Tapping Screw Item #: 46 Qty.: Item #: 51 Qty.: Qty.: Descr: 3/8”X 4-3/4” Bolt 2 Descr: 3/8”X 3” Bolt 4 Item #: 49 Qty.: Qty.: 3 2 Descr: 3/8”X 2-1/2” Bolt Descr: 3/8”X 2” Bolt 5 Descr: 3/8”X 3/4” Bolt Item #: 52 Item #: 48 Item #: 53 Qty.: 1 Descr: 3/8”X 5” Bolt Item #: 54 Qty.
A-4 Assembling Your Bowflex Ultimate™ ® Step 1: LOWER MAIN FRAME ASSEMBLY 2 Locate the following for this step: • Lower lat tower (Item #1) • Left main frame (Item #2) • Right main frame (Item #3) • Two (2) 3/8”X3” bolts (Item #51) • Four (4) 3/8” washers (Item #54) • Two (2) 3/8” nylon lock nuts (Item #57) 1 3 P lace the left main frame (Item #2) into the saddle bracket of the lower lat tower (Item #1) as shown in Figure A.
Assembling Your Bowflex Ultimate™ A-5 ® Step 3: SQUAT PLATFORM & FRAME ASSEMBLY 52 54 54 Locate the following parts for this step: • Large plastic squat platform (Item #5) • Squat frame (Item #4) • Four (4) 3/8”X4-3/4” bolts (Item #52) • Six (6) 3/8” washers (Item #54) • Two 3/8” lock nuts (Item #57) 57 4 A lign the holes in the main frame (Items #2&3) and the squat frame (Item #4) and insert the four bolts with washers on them into the four holes as shown in Figure C.
A-6 Assembling Your Bowflex Ultimate™ ® Step 5: REAR LEG Locate the following parts for this step: • Bench leg (Item #13) • Seat rail (Item #10) • Four (4) 3/8” nylon lock nuts (Item #57) • Four (4) 3/8” washers (Item #54) Find the four bolts in the channels on the bottom of the seat rail assembly closest to the warning sticker. Place the rear leg mounting bracket (Item #13) over the four bolts. Make sure the edge of the bracket is ½” to 1” from the end of the rail.
Assembling Your Bowflex Ultimate™ A-7 ® Step 7: SEAT RAIL INSTALLATION 54 53 The following parts are required for this step: • Seat Rail (Item #10) • One (1) 3/8”X5” bolt (Item #53) • Two (2) 3/8” washers (Item #54) • One (1) 3/8” nylon lock nut (Item #57) • Large Knob (Item #37) 37 Figure G 54 57 If you have not already done so, remove the twist-tie that holds the rail spacer blocks and tube in place on the side of the seat rail.
Assembling Your Bowflex Ultimate™ A-8 ® Step 9: RAIL END CAP INSTALLATION Locate the following parts for this step: • Rail End Cap (Item #58) • Two (2) #10X3/4” self tapping screw (Item #44) Place the end cap (Item #58) on the end of the rail with arrow inside end cap facing up. 44 58 S ecure the end cap to the end of the rail using two (2) #10X3/4” self tapping screws (Item #44) shown in Figure J.
Assembling Your Bowflex Ultimate™ A-9 ® Step 11: ROD BOX INSTALLATION Locate the following parts for this step: • Rod box with Power Rods® (Item #23) • Rod box frame (Item #24) • Three (3) #10X1” self tapping screw (Item #45) • Three (3) 1/4” washers (Item #55) 23 24 S lide rod box with Power Rods® (Item #23) into rod box frame (Item #24) as shown in Figure L.
Assembling Your Bowflex Ultimate™ A-10 ® Step 13: LOWER LAT CROWN INSTALLATION Locate the following parts for this step: • Lower lat crown (Item #76) P ress Lower Lat Tower Crown (Item #76) into open end of lower lat tubing to finish off. Bottom surface of lower lat crown should be in contact with incline bench rest. 76 Note: if you have attached a lat tower, skip this step and discard this piece.
Bowflex Ultimate™ Lat Assembly Parts Reference Guide A-11 ® Lat Assembly The Lat Assembly is an optional attachment which, depending on the machine you ordered, may or may not be part of your Bowflex®. Item #: 17 Item #: 19 Item #: 20 Item #: 31 Item #: 33 Item #: 34 Qty.: Qty.: Qty.: Qty.: Qty.: Qty.: 1 Descr: Upper Lat Cross Bar w/pulleys 1 Descr: Upper Lat Tower 1 Descr: Strap Hook 2 Descr: Lat Cable 2 Descr: Snap Hook Qty.
A-12 Assembling Your Bowflex Ultimate™ Lat Assembly ® Step 1: LAT TOWER ASSEMBLY Locate the following parts for this step: • Lat cross bar w/ pulleys (Item #17) • Upper lat tower (Item #19) • Two (2) 3/8”X2-3/4” bolts (Item #50) • Four (4) 3/8” washers (Item #54) • Two (2) 3/8” nylon lock nuts (Item #57) • Strap hook (Item #20) • Two (2) 1/4”X5/8” phillips head screws (Item #40) 54 20 54 50 Strap Hook A ttach the lat cross bar assembly (Item #17) to the upper lat tower (Item #19) with two (2) 3/8”
16 Bowflex Ultimate™ Leg Assembly Parts Reference Guide A-13 ® Leg Assembly The Leg Assembly is an optional attachment which, depending on the machine you ordered, may or may not be part of your Bowflex®. Item #: 61 Item #: 62 Item #: 63 Item #: 64 Item #: 65 Item #: 66 Qty.: Qty.: Qty.: Qty.: Qty.: Qty.: 1 Descr: Leg Extension Seat Assembly 1 Descr: Leg Ext.
A-14 Assembling Your Bowflex Ultimate™ Leg Assembly ® Step 1: LEG EXTENSION FOOT TUBE INSTALLATION 62 Locate the following parts: • Leg extension main frame (Item #62) • Leg extension foot tube (Item #63) • Two (2) 3/8”X3” bolt (Item #51) • Two (2) 3/8” nylon lock nuts (Item #57) • Four (4) 3/8” washers (Item #54) Figure R 57 I nsert the leg extension foot tube (Item #63) into the leg extension main frame (Item #62) saddle bracket, aligning the holes in the bracket with the holes in the foot tube, a
Assembling Your Bowflex Ultimate™ Leg Assembly ® Step 3: LEG EXTENSION SEAT INSTALLATION A-15 Hinges 61 72 Locate the following parts: • Leg extension assembly (from previous step) • Leg extension seat assembly (Item #61) • Two (2) 1/4”X2-3/4” bolt (Item #71) • Two (2) 1/4” nylon lock nuts (Item #72) • Four (4) 1/4” washers (Item #55) 55 55 71 P lace the leg extension seat (Item #61) on top of the horizontal tube on the leg extension assembly (Item #62) with the hinge brackets facing the directi
A-16 Assembling Your Bowflex Ultimate™ Leg Assembly ® Step 5: INSTALLING THE LEG EXTENSION ATTACHMENT P lace the leg extension on the end of the rail and tighten the two small star knobs (Item #68) through the sides of the leg extension rail bracket and into the rail as shown in Figure V. Make sure that the leg extension does not interfere with the rear leg, and if it does interfere, check to make sure the rear leg is mounted 1/2” to 1” from the end of the seat rail.
Expanding Your Bowflex Ultimate™ With Extra Power Rods ® ® Expanding your Bowflex® Ultimate™ from 10 lb. (1 0 kg) to 10 lb. (18 kg) Step 1: Simply slide the new rods into the back of the Ultimate™’s rod pack. Make sure the new Power Rods® are secure and fully seated into the base before using them. Get an EXTRA PAIR of 50 lb. (22.5 kg) POWER RODS® to boost your total weight to 410 lb.
Bowflex 6 WEEK SATISFACTION GUARANTEE ® We want you to know that Bowflex® Home Gym is a superior product. Your satisfaction is guaranteed. If for some reason you are not 100% satisfied with your Bowflex®, please follow the instructions below in order to return your merchandise and receive a refund of the purchase price, less shipping and handling. 1. Call our Customer Service Department at (800) 605-3369 for a Return Authorization Number.
Bowflex Ultimate™ Warranty Registration Card ® IMPORTANT! MAIL WITHIN 30 DAYS OF PURCHASE PLEASE PRINT CLEARLY – THANK YOU ■ Mr. 2. ■ Mrs. 3. ■ Ms. 4. ■ Miss Customer ID from Invoice Name: Address: Apt.
What Is Covered commercial or institutional use. Nautilus® warrants to the original purchaser of the Bowflex® Ultimate™ home gym that the Bowflex® Ultimate™ home gym is free from defects in materials or workmanship, with the exceptions stated below. This warranty is not transferable or applicable to any person other than the original purchaser and is only applicable for products sold and used in the United States or Canada or Mexico. Tampering with the unit will void the warranty.
Warranty Information (Keep for your records) 6-Week Satisfaction Guarantee We want you to know that the Bowflex® Ultimate™ home gym is a superior product. Your satisfaction is guaranteed. If, for any reason, you are not 100% satisfied with your Bowflex® Ultimate™ home gym , please follow the instructions below to return your merchandise and receive a refund of the purchase price, less shipping and handling. 1. Call a Nautilus® Representative at 1-800-605-3369 or write to Bowflex® at 1400 NE 136th Ave.
This manual is written and designed by industry professionals. If you have any questions regarding your Bowflex® Ultimate™ home gym or any instructions found in this manual, please call 1-800-605-3369 for assistance. ©2004 Nautilus® Inc. All rights reserved. 1400 N.E. 136th Ave., Vancouver, WA 98684. Bowflex, Bowflex Ultimate, Power Rod and the Bowflex and Nautilus logos are either registered trademarks or trademarks of Nautilus®, Inc.