SelectTech® 5.
Congratulations on your commitment to fitness and your purchase of the Bowflex® SelectTech 5.1 Bench. Before assembling your Bowflex SelectTech 5.1 Bench please read the Owner’s/Assembly Manual and follow the Important Safety Precautions. ® ® ® Nautilus, Inc. 16400 S.E. Nautilus Drive Vancouver, Washington, USA 98683 1-800-NAUTILUS (1-800-628-8458) NautilusInc.com Bowflex.com © 2010 Nautilus, Inc. All Rights Reserved. Nautilus, Inc. World Headquarters, 16400 S.E.
Important Safety Instructions The following definition applies to the word “WARNING” found throughout this manual: WA R N I N G Indicates a potentially hazardous situation which, if not avoided, could result in death or serious injury. DANGER WARNING! Before Abeginning T T E N T Iany O Nexercise program consult your physician or health care professional. Only he or she can determine the exercise program that is appropriate for your particular age and condition.
Safety Warning Labels The following safety warnings are located on the Bowflex® SelectTech® 5.1 Bench. Please read all safety precautions and warning information prior to using your product. Be sure to replace any warning label if damaged, illegible, or missing. If you need replacement labels, please call a Bowflex® Representative at 1-800-605-3369. Label 1: “Warning!: - Read and understand the complete user manual. Keep manual for future reference.
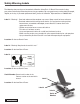
Before You Assemble Before You Assemble Basic Assembly Principles Please take the time to read all assembly instructions before attempting to assemble your Bowflex ® SelectTech® 5.1 Bench. The best place for your Bowflex ® SelectTech® 5.1 Bench is on a hard, level surface. Here are a few basic tips that will make your assembly of the Bowflex ® SelectTech® 5.1 Bench quick and easy. By using these principles, you can simplify each process and save yourself extra time and effort. 1.
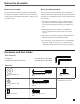
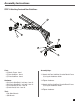
Parts Guide 9 8 10 1 2 4 12 5 6 7 15 14 11 16 15 3 Item #: 1 2 3 4 5 6 7 8 9 4 Qty: 1 1 1 1 1 2 2 1 1 Description: FRAME ASSY STABILIZER, REAR STABILIZER, FRONT LEG HLD DOWN ASSY TUBE, FOAM ROLLER PAD, FOAM ROLLER CAP, END 3/4” SEAT, BOTTOM PAD, BACK Item #: 10 11 12 13 14 15 16 13 Qty: 1 10 3 2 10 7 2 Description: PAD, HEAD BHCS 0.3125-18 X 2.5 X.75 BLK BHCS 0.375-16 X 1X1 BLK BHCS 0.
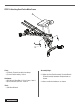
Assembly Instructions STEP 1: Attaching Front and Rear Stabilizers 2 1 12 15 3 16 15 13 Parts: • (1) Bench Frame - Item 1 • (1) Rear Stabilizer - Item 2 • (1) Front Stabilizer - Item 3 Assembly Steps: Hardware: • (2) 3/8 inch Allen Bolt, 3 inch long - Item 13 • (3) 3/8 inch Allen Bolt, 1 inch long - Item 12 • (7) Flat Washer 3/8 inch - Item 15 • (2) Lock Nut 3/8 inch - Item 16 1-2 Tighten hardware.
STEP 2: Attaching Seat Pad to Main Frame 8 14 11 Parts: • (1) Bench Frame Assembly from Step 1 • (1) Seat Pad Assembly - Item 8 Hardware: • (4) 5/16 inch Allen Bolt, 2 1/2 inch long - Item 11 • (4) Flat Washer 5/16 inch - Item 14 Tools: • 3/16 Allen Wrench 6 Assembly Steps: 2-1 Align the Seat Pad Assembly (1) to the Bench Frame Assembly between the open holes as shown. 2-2 Secure with the hardware as shown.
STEP 3: Attaching Back Assembly to Main Frame 10 9 14 11 Parts: • (1) Bench Frame Assembly from Step 2 • (1) Back Pad Assembly - Item 9 • (1) Head Pad Assembly - Item 10 Hardware: • (6) 5/16 inch Allen Bolt, 2 1/2 inch long - Item 11 • (6) Flat Washer 5/16 inch - Item 14 Tools: • 3/16 Allen Wrench Assembly Steps: 3-1 Align the Back Pad Assembly (9) to the Bench Frame Assembly between the open holes as shown. 3-2 Secure with the hardware as shown.
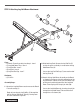
STEP 4: Attaching Leg Hold Down Attachment 7 6 5 6 4 7 20 1 Parts: • (1) Bench Frame Assembly from Step 3 - Item 1 • (1) Leg Hold Down Tube - Item 4 • (1) Leg Pad Bar - Item 5 • (2) Leg Pad - Item 6 • (2) Leg Pad End Cap - Item 7 Hardware: • (1) Pull Pin Assembly Steps: 4-1 A ttach the Leg Hold Down attachment to the Bench Frame Assembly (1). egin by inserting the Leg Pad Bar (5) through the B hole in the Leg Hold Down Tube (4), leaving room on each side for the Leg Pads.
STEP 5: Final Inspection You have successfully completed assembly of your Bowflex ® SelectTech® 5.1 Bench. Please inspect your exercise bench to ensure that all fasteners are tight and components are properly assembled. Review all warnings affixed to machine. WA R N I N G Failure to visually check and test assembly before use can cause damage to the Bowflex® SelectTech® 5.1 Bench and serious injury to users and bystanders and can also compromise the effectiveness of your exercise program.
Bench Positions Flat 10 30 degrees 45 degrees 60 degrees 90 degrees Decline with Seat raised
Bench Maintenance Daily After each use, wipe bench free of sweat with a clean, dry cloth. Upholstery can be cleaned with a mild detergent or spray cleaner. Weekly If used often, your bench should be thoroughly cleaned using a clean cloth and an ammonia based cleanser. Wipe bench down completely and be sure to touch up any scratches with touch up paint to prevent rusting. Monthly Check the frame of the bench for any sign of cracking or permanent bending.
Warranty Information Who Is Covered This warranty is valid only to the original purchaser and is not transferable or applicable to any other person(s). What Is Covered Nautilus, Inc. warrants that this product is free from defects in materials and workmanship, when used for the purpose intended, under normal conditions, and provided it receives proper care and maintenance as described in the Product’s Assembly and Owner’s manual.
Important Contact Numbers If you need assistance, please have both the serial number of your machine and the date of purchase available when you contact the appropriate Nautilus office listed below. Serial number location is shown with Safety Warning Labels on page 2. NORTH AMERICA EUROPE, MIDDLE EAST & AFRICA Customer Service Tel: (800) 605–3369 E-mail: bowflex@nautilus.com International Customer Service Nautilus International GmbH Albin-Köbis-Str.
Printed in China.