
TreadClmber Assembly Guide & Owner's Manual

17
Bowflex® TreadClimber® Assembly and Owner’s Manual
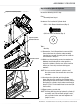
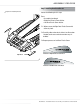
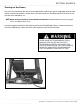
Hydraulic Cylinder
Workout Level Dials
Button Head Screw
Flat Washer
Step 3: Installing Hydraulic Cylinders
Locate the following for this step:
Parts:
• Assembly from Step 2
Hardware: Pre-installed in Cylinder Stud.
• 5/16 x 1 inch Button Head Screw (Qty. 2)
• 5/16 inch SAE Flat Washer (Qty. 2)
Tools:
• Hex Key
3-1 Remove the 1 inch Button Head screw and 5/16
flat washer from the cylinder stud protruding
from the base treadle assembly and set aside for
reinstallation in Step 3-3.
3-2 Make sure that the white arrows located on the
Workout Level Setting Dials at the top of the
hydraulic cylinders face the rear of the machine
where you can easily see them during your
workout.
NOTE: You can turn the hydraulic cylinders until
the white arrows are towards the rear of the
machine.
3-3 Starting on the right side, pull the cylinder
down and place the eyelet on the Cylinder Stud
protruding from the base treadle assembly. Attach
the hydraulic cylinder using hardware removed in
Step 3-1 (5/16 x 1 inch button head screw and 5/16
flat washer).
3-4 Repeat process on left side.
NOTE: If having difficulty placing hydraulic cylinder(s)
on treadle stud, loosen lower upright screws,
place cylinder on the stud and retighten the
upright screws.
Figure 3: Installing Hydraulic Cylinders
ASSEMBLY PROCESS
Cylinder Stud