Bowflex® TreadClimber® Assembly Guide and Owner’s Manual Special Edition Includes: Dr.
Preface CONGRATULATIONS on your commitment to improving your health and fitness! By choosing Bowflex® TreadClimber® exercise machine as your key to success, you will be using the best tool available to help you shed pounds, increase cardiovascular efficiency, and most importantly, look and feel GREAT! The Bowflex® TreadClimber® machine is an innovative blend of the best features from the three most effective aerobic workout machines available: elliptical, stair climber, and treadmill, which means your resul
Table of Contents Before You Start TreadClimber® Workout Instructions TreadClimber® Features . . . . . . . . . . . . . . . 1 Determining Your Fitness Level. . . . . . . . . 42 TreadClimber® Specifications . . . . . . . . . . . 2 Treadmill Workout . . . . . . . . . . . . . . . . . . . 44 Important Safety Precautions . . . . . . . . . . . 3 Stair-Stepper Workout. . . . . . . . . . . . . . . . 46 Emergency Stop Procedures . . . . . . . . . . . 5 TreadClimber® Workout . . . . . . . . . . . . . . .
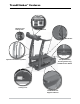
TreadClimber ® Features Workout Level Setting Dials Console Belt Guides (Rear View) Hydraulic Resistance Cylinders Transport Handles, Incoming Power Plug, and Main Power Switch Locking Lever Treadle Side Foot Support Platforms Bowflex® TreadClimber® Owner’s Manual
TreadClimber ® Specifications Throughout this manual, all references to the left or right side, and to the front or back, are made as if you were on the TreadClimber® machine, ready to exercise. For example, the power cord is plugged into the incoming power plug at the back of the base.
Important Safety Precautions Save These Instructions The following definition applies to the word “Warning” found throughout this manual: WARNING – Used to call attention to POTENTIAL hazards that could result in personal injury or loss of life. READ ALL INSTRUCTIONS BEFORE USING THE MACHINE 7!2.).
Important Safety Precautions 10. Keep your hands on the support handlebars and stand as close to the front of the machine as is comfortable in order to remain in balance on the treadles. 11. Never convert from or into treadmill mode while the belts are in motion or the machine is powered up. Turn off power, unplug cord from wall outlet, line up the treadles, and then lock or release the treadle locking lever. 12. Never adjust the Hydraulic Cylinder Workout Settings while belts are in motion.
Emergency Stop Procedures Your TreadClimber® machine is equipped with a SAFETY KEY that can protect you from serious injury and inhibit children from playing with and/or being injured on the TreadClimber® machine. If the Safety Key is not fully inserted into the safety keyhole, the TreadClimber® machine will NOT power up. Always ATTACH the safety key clip to your clothing during your workout.
Care of your TreadClimber Exercise Machine ® !4 4 % . 4 ) / . The Bowflex® TreadClimber® machine’s safety and integrity can only be maintained when it is regularly examined for damage and immediately repaired. It is the sole responsibility of the owner to ensure that regular maintenance is performed. Worn or damaged components still under warranty must be replaced immediately and the TreadClimber® machine shall remain unused until the required repair is made.
Care of your TreadClimber Exercise Machine ® Walking Belt and Deck Lubrication 7! 2 . ) . ' The TreadClimber® machine is equipped with a pre-lubricated, low maintenance deck and belt system. Belt friction may affect the function and life of the TreadClimber® machine. For the best results from your TreadClimber® machine, lubricate the treadles periodically with a silicone lubricant, using the following instructions: 1.
Care of your TreadClimber Exercise Machine ® Determining Hours Used (TC3000 and TC5000 models only) To determine the number of hours you have used your TreadClimber® machine: 1. With the TreadClimber® Main Power Switch turned on, stand on the side foot support platforms. 2. Remove and re-insert the SAFETY KEY. 3. The total whole hours used will be displayed in the TIME display window. No fractions of, or partial hours will be displayed. 4.
Assembly Guide Before You Assemble Basic Assembly Principals Here are few basic assembly tips that can make assembly of your Bowflex® TreadClimber® exercise machine quick and easy. 1. You can make the assembly process go faster by gathering the pieces you need for each step prior to starting the step. 2. As a general rule, and for all bolts and locknuts on your Bowflex® TreadClimber® exercise machine, turning toward the right will tighten, turning towards the left will loosen.
TreadClimber® Parts Reference Guide Box 1 contains: Qty: 1 Descr: Rear Cover Qty: 1 Descr: Control Panel/Handlebar Assembly Qty: 2 Descr: Plastic Upright Junction Covers Qty: 2 Descr: Left and Right Side Foot Support Platform Qty: 1 Descr: Left Side Plastic Frame Cover Qty: 1 Descr: Right Side Plastic Frame Cover Qty: 1 Descr: Right Side Plastic Drive Cover Qty: 1 Descr: Left Side Plastic Drive Cover Bowflex® TreadClimber® Owner’s Manual Qty: 2 Descr: Left & Right Hydraulic Cylinder Qty:
TreadClimber® Parts Reference Guide 7!2.).' To reduce the risk of electric shock and fire, and to prevent severe damage to the machine, use only the power cord approved for use with this equipment. In addition, your machine should be properly grounded using a rubber or rubberized mat beneath the TreadClimber® machine to protect from static electricity. Do not use near water! $!.
TreadClimber® Parts Reference Guide Box 2 contains the TreadClimber® treadles. Cylinder Stud Qty: 1 Descr: TreadClimber® Treadle Assembly Box 3 contains the TreadClimber® base.
TreadClimber® Hardware and Tool List NOTE: IMAGES BELOW ARE NOT TO SCALE Hardware: Qty: 6 Descr: 1/4” x 1” Flat Head Screw Qty: 2 Descr: 5/16” x 1 1/2” Button Head Screw Qty: 16 Descr: #10 Phillips Head Screw Qty: 14 Descr: 5/16” x 1” Button Head Screw Qty: 2 Descr: 5/16” Flat Washer Qty: 12 Descr: 5/16” Flat Washer SAE Qty: 4 Descr: 3/8” Cosmetic Plugs Qty: 1 Descr: 5/16” Nylock Nut Qty: 2 Descr: 5/16” Acorn Nut Qty: 1 Descr: 3/8” x 3 3/4” Shoulder Bolt Tools: Qty: 1 Descr: #2 Phillips Screwd
Assembly Guide Assembly Instructions Step 1: PLACING TREADLES ON BASE Locate the following for this step: PARTS: • TreadClimber® Base Assembly • TreadClimber® Treadle Assembly HARDWARE: • Four (4) 3/8” x 1-1/4” Hex Bolts Figure 1-1 TOOLS: • 9/16” Open End Wrench (included) • Scissors or other cutting tool 1-1 P lace the latch lever on the base in the unlocked position (see Figure 1-1). 1-2 C ut the wire ties on the teeter assembly and extend the teeter to the center of the treadles (see Figure 1-2).
Assembly Guide Step 2: CONNECTING SPEED PICKUP WIRE Locate the following for this step: PARTS: • TreadClimber® Base & Treadle Assembly from Step 1. 2-1 Connect the speed pickup wire from base assembly and left rear roller casting (see Figure 2-1 & 2-2). Speed pickup wire from base. Speed pickup wire from left rear roller casting. Figure 2-1 Note: S peed pickup needs to be about 1/8" from the pulley and the red speed pickup cap is flush to the left drive bracket/roller casting.
Assembly Guide Step 4: INSTALLING DRIVE BELT Locate the following for this step: PARTS: • TreadClimber® Base & Treadle Assembly from Step 3. • One (1) Drive Belt TOOLS: • 3/16” Hex Key (included) Figure 4-1 4-1 P lace drive belt over roller pulley and motor pulley (see Figure 4-1). 4-2 Make sure belt is seated into grooves and installed exactly as shown (see Figure 4-2).
Assembly Guide Step 6: INSTALLING THE UPRIGHTS Locate the following for this step: PARTS: • TreadClimber® Base & Treadle Assembly from Step 5. • One (1) Left Upright Support & Hydraulic Cylinder • One (1) Right Upright Support & Hydraulic Cylinder Figure 6-1 HARDWARE: • Two (2) 5/16” x 1” Button Head Screws 6-1 O n the base assembly screw a 5/16" x 1" button head screw half way in on the outside of both the right and left lower upright bracket (see Figure 6-1).
Assembly Guide Step 8: I NSTALLING THE CONSOLE/ HANDLEBAR ASSEMBLY Locate the following for this step: PARTS: • TreadClimber® Base & Treadle Assembly from Step 7. • Console/Handlebar Assembly Figure 8-1 HARDWARE: • Six (6) 5/16” x 1” Button Head Screws • Six (6) 5/16” Flat Washers SAE TOOLS: • 3/16” Hex Key (included) 8-1 W ith the help of another person, carefully lift the console/handlebar assembly above the tops of the upright supports.
Assembly Guide Step 9: SECURING THE CONSOLE/ HANDLEBAR ASSEMBLY Locate the following for this step: PARTS: • TreadClimber® Base & Treadle Assembly from Step 8. Figure 9-1 HARDWARE: • Six (6) 5/16” x 1” Button Head Screws NOTE: Two (2) of the 5/16” x 1” Button Head screws are already inserted into the bottom of the right and left upright supports.
Assembly Guide Step 10: ATTACHING THE HYDRAULIC CYLINDERS Locate the following for this step: PARTS: • TreadClimber® Base & Treadle Assembly from Step 9.
Assembly Guide Step 12: MOUNTING THE FRAME COVERS Locate the following for this step: PARTS: • TreadClimber® Base & Treadle Assembly from Step 11. • Left Plastic Frame Cover • Right Plastic Frame Cover HARDWARE: • Six (6) #10 Phillips Head screws Figure 12-1 TOOLS: • #2 Phillips Head Screwdriver (included) 12-1 Using the provided #2 Phillips screwdriver, mount the left and right Plastic Frame Covers to the sides of the base frame using (6) #10 Phillips head screws (3 per side—see Figures 12-1 & 12-2).
Assembly Guide Step 14: MOUNTING THE DRIVE COVERS Locate the following for this step: PARTS: • TreadClimber® Base & Treadle Assembly from Step 13. • Left side Plastic Drive Cover • Right side Plastic Drive Cover HARDWARE: • Six (6) #10 Phillips Head Screws Figure 14-1 TOOLS: • #2 Phillips Head Screwdriver (included) 14-1 Using the #2 Phillips screwdriver, mount the left and right plastic drive covers to the sides of the base using (6) #10 Phillips head screws (3 per side—see Figure 14-1).
Assembly Guide Step 16: AFFIX TreadClimber® DECALS Locate the following for this step: PARTS: • TreadClimber® Base & Treadle Assembly from Step 15. Treadle decal 1 per side Drive decal 1 per side HARDWARE: • Two (2) Treadle Decals • Two (2) Drive Cover Decals 16-1 There are four places on the Bowflex® TreadClimber® exercise machine where you will need to affix the enclosed TreadClimber® Decals (see Figure 16-1 and Illustration 16A).
Assembly Guide Step 19: CALIBRATION PROCESS (TC3000 and TC5000 only) 7!2.).' Failure to calibrate your machine prior to use could result in machine failure and could cause injury. During the entire calibration process, stand on the side foot support platforms or rubber mat only, do not stand on the walking belts! $!.'%2 DO NOT STEP ON THE BELTS DURING THIS ENTIRE PROCESS. Owners of the TC3000 or TC5000 will need to calibrate the TreadClimber® machine before they can begin exercising.
Assembly Guide 19-7 R elease the POWER and SLOWER buttons. The TIME display will read “CAL”, “PrSS”, “Strt”. 19-8 P ress the START/STOP button. This will start the calibration procedure. 19-9 D uring the calibration procedure, the belts will start and stop and the displays will show various numbers that relate to calibration—DO NOT INTERRUPT CALIBRATION. 19-10 W hen calibration has completed “CAL” “PASS” will show in the TIME display.
Bowflex® TreadClimber® Owner’s Manual 26
® ® Bowflex TreadClimber 100% Satisfaction Guarantee We want you to know that your TreadClimber® machine is a superior product. Your satisfaction is guaranteed. If, for any reason, you are not 100% satisfied with your TreadClimber® machine, please follow the instructions below to return your merchandise and receive a refund of the purchase price, less shipping and handling. 1. C all a TreadClimber® Representative at 1-800-NAUTILUS (1-800-628-8458) for a Return Authorization Number.
Warranty What Does This Warranty Cover? Nautilus, Inc. warrants to the original purchaser of the Bowflex® TreadClimber® home fitness machine that the TreadClimber® machine is free from defects in materials and workmanship, when used for the purpose intended, under normal conditions, provided it receives proper care and maintenance as set forth herein. This warranty is extended only to the original purchaser and is not transferable or applicable to any other person.
Warranty Warranty Does Not Cover • A Bowflex® TreadClimber® exercise machine purchased for commercial or institutional use. • Damage due to use by persons who weigh more than 300 pounds (136 Kilograms). • Damage due to abuse, accident, failure to follow instructions or warnings in the Owner’s Manual, misuse, mishandling, accident or Acts of God (such as floods, tornadoes, hurricanes, power surges, etc.). • Damage due to normal wear and tear.
® ® Bowflex TreadClimber Warranty Registration Card IMPORTANT! MAIL WITHIN 30 DAYS OF PURCHASE PLEASE PRINT CLEARLY – THANK YOU 1. ■ Mr. 2. ■ Mrs. 3. ■ Ms. 4. ■ Miss Customer ID from Invoice Name: Address: City: Apt.
What Is Covered TreadClimber® TC1000 Nautilus, Inc. warrants to the original purchaser of the TreadClimber® home fitness machine that the TreadClimber® machine is free from defects in materials or workmanship, with the exceptions stated below. This warranty is not transferable or applicable to any person other than the original purchaser and is only applicable for products sold and used in the United States or Canada. Unauthorized tampering with or opening the unit will void the warranty.
Getting Started Before You Start 1. M ake sure you have calibrated your machine (TC3000 or TC5000 only) as outlined in Step 19 of the Assembly Guide before using your Bowflex® TreadClimber® exercise machine for the first time. 2. Determine your workout mode (treadmill, stair-stepper or TreadClimber® mode). Note: I f you are working out in treadmill mode, you must lock the treadles by following the locking procedure in the Locking the Treadles section in this manual. 3.
Getting Started 8. Begin your workout using the appropriate instructions for your selected workout mode. Note: Resistance and weight settings are what your Bowflex® TreadClimber® exercise machine uses to calculate your calories burned (TC3000 and TC5000). If your Workout Level or weight changes, you must remember to change your settings on the console to insure accurate calorie burn calculation. Select Your Workout Level Consult Your Physician Before Starting Any Exercise Program.
Getting Started 7!2.).' Never change your Workout Level Settings without stopping the Bowflex® TreadClimber® belts and getting completely off the machine! Failure to do so could result in injury. Adjusting Workout Level Settings $!.'%2 If you wish to change your Workout Level Settings during a workout, you must get off the machine before changing the settings. Workout Level Settings are dials located at the top of the Hydraulic Cylinders. Use the dial to line up your desired level with the white arrow.
Getting Started 7!2.).' When not in use, always lock the treadles and remove the Safety Key for safe storage. This could prevent unsupervised use and/or accidents. Pausing or Stopping Pausing or Stopping the TC3000 and TC5000 $!.'%2 1. Step off of the belts onto the Side Foot Support Platforms on either side of the treadles. 2. Press START/STOP to stop the belts and console displays, (if you are in stair-stepper mode, pressing START/STOP will stop the console displays).
Getting Started TC5000 Features TC5000 Displays • HEART RATE/BEATS PER MIN – Displays your heart rate in beats per minute when you are correctly wearing and using the TreadClimber® heart rate transmitter chest-strap or a TreadClimber® compatible heart rate transmitter chest-strap. • CALORIES/CALORIES PER MINUTE – This screen will toggle between total calories burned (whole number) and calories per minute (includes one decimal place—e.g. 15.5).
Getting Started Remote Heart Module (TC5000 Only) The Remote Heart Module and Heart Rate Transmitter are features on the TC5000 only. You may use the TC5000 Heart Rate Transmitter or any other Heart Rate Transmitter that is compatible with the TreadClimber® TC5000 to help keep yourself within your target fat-burning heart rate zone during your workout. Note: A Heart Rate Strap with a non-replaceable battery is included. It will work with Polar® watches.
Getting Started Information About Heart Rate Calculations Your maximum heart rate generally declines with age from about 220 Beats Per Minute (BPM) in childhood to about 160 BPM at age 60. This fall in heart rate is fairly linear, decreasing by approximately one BPM per year. There is no strong evidence to suggest that training influences the decline in maximum heart rate. It should be remembered that individuals of the same age might have quite different maximum heart rates.
Getting Started TC3000 Features 0/7%2 -/$5,% É 4/ 34!24 0RESS *"7 , TC3000 Displays -- • CLIMB/TOTAL STEPS – This displays the total steps you have taken since starting your workout. • CALORIES/CALORIES PER MINUTE: This screen toggles between the total calories burned (whole number) and calories per minute (to one decimal place). • TIME – Counts up the total time of your workout in minutes and seconds (e.g. 24:22 minutes).
Getting Started Setting English or Metric Measurement Units (TC3000 and TC5000) You can configure the TC5000 and TC3000 Consoles to display in Miles or Kilometers: 1. Turn the Main Power Switch on the Bowflex® TreadClimber® base to ‘On’. 2. Remove the Safety Key. 3. Press and hold the START/STOP button. 4. Insert the Safety Key while holding down the START/STOP button. 5. Console will power up and show “EngL” text in the TIME display. 6.
Getting Started Walking Belt Adjustment If either of the walking belts seem to be tracking excessively to one side or the other, adjustments can be made at the front roller of each treadle. Misalignment Test and Resolution Visual Test – Standing beside the unit, set the speed at 2 mph. Standing in front of the unit you will see adjustment bolts on each end of each front roller.
Workout Instructions Determining Your Fitness Level Endurance is an important way to determine your fitness level. Before you begin exercising on your Bowflex® TreadClimber® exercise machine, you will want to benchmark your current endurance level, based on how well you feel after you take these quick tests on your TreadClimber® machine. To do these tests, you’ll need to use your TreadClimber® machine in all exercise modes (TreadClimber®, treadmill and stair-stepper modes).
Workout Instructions Test 2 1. Change over to Treadmill mode (see Locking the Treadles section in this manual) and begin a workout at 0.7 MPH (0.5 for TC1000), gradually increasing your speed for the next 30 seconds, raising speed until you reach 2 MPH or until you feel that you are at your personal maximum exertion. 2. Continue for another 15 seconds at that speed, then step off the treadles onto the Side Foot Support Platforms and press START/STOP to stop the belts. 3.
Workout Instructions Treadmill Workout Treadles Each Bowflex® TreadClimber® treadle is a separate treadmill with its own belt, however both treadles are driven by the same axle and motor. This assures that each belt travels at the same speed. Further, the treadles are interconnected, which provides a balanced relationship between the left and right sides during the workout to give the most cushioned effect to your joints.
Workout Instructions Starting a Treadmill Workout (TC3000 and TC5000) 1. Make sure you have locked the treadles, following the guidelines in the Locking the Treadles section in this manual. 2. Push POWER to turn on the Console. The console will NOT power up if the Safety Key is not properly inserted into the Safety Keyhole. 7!2.).' To avoid injury, do not stand on the treadles while starting or stopping the walking belts. 3. Input your weight.
Workout Instructions Stair-Stepper Workout Starting a Stair-Stepper Workout (TC3000 and TC5000) 1. Push POWER to turn on the Console (the console will NOT power up if the Safety Key is not properly inserted into the Safety Keyhole). 2. Input your weight. For first time use, follow the weight-input instructions for Starting a Bowflex® TreadClimber® Workout on Page 47. 3. When your weight is displayed accurately, push START/STOP one time. 4. Input your Workout Level Setting.
Workout Instructions Bowflex® TreadClimber® Workout A TreadClimber® workout combines stair-stepping with moving belts and gently supported resistance, providing you a workout that burns calories faster than almost any cardiovascular exercise machine you have ever experienced. While you may use your TreadClimber® machine in treadmill and stair-stepping modes in addition to the TreadClimber® mode, you will experience the best calorie and fat-burning when working out in TreadClimber® mode.
Workout Instructions 6. Press FASTER to start the belts. Starting belt speed is 0.7 MPH (1.1 KPH). Note: Belts may take two to three seconds to start. 7. Once the belts have started, you may step onto the treadles at any time. Note: I f you are new to the Bowflex® TreadClimber® machine, make sure to start your workout at a slower speed, gradually increasing belt speed as your endurance and fitness levels increase. 8. Press FASTER or SLOWER to increase or decrease belt speed as needed.
Workout Instructions Preliminary TreadClimber® Workout First 4 Weeks Based on your Perceived Exertion Level (see the Determining Your Fitness Level section at the beginning of the Workout Instructions section of this manual), follow the Preliminary Workout guidelines to ease yourself into a weekly Bowflex® TreadClimber® regimen.
Workout Instructions Beginner Level Week 1 •3 x per week – treadmill workout with treadles locked at 2 MPH pace for 30 minutes Intermediate Level Week 1 •3 x per week, perform a TreadClimber® workout at steady, constant pace for 30 minutes Once this has become easier, retest your Fitness Level to determine if you are ready to progress to Week 2 – your perceived exertion should have improved at least one point.
Fast Fat Loss Now! The Bowflex® TreadClimber® Body Leanness Program By Dr.
Body Leanness Program The following dietary program was created for use with the Bowflex® TreadClimber® exercise machine by Dr. Ellington Darden. Please consult your physician or health care professional before beginning any fitness or dietary program. Introduction control the number and quality of calories you consume and drink plenty of ice-cold water. The TreadClimber® Body Leanness Program Before starting the exercise routine, you must be familiar with your TreadClimber® machine.
Body Leanness Program Eating Guidelines You will be following a reduced-calorie nutrition program which is divided into three two-week segments. The program is a proven method for achieving maximum fat loss over a six-week period. It consists of a carbohydrate-rich, descendingcalorie eating plan and a super-hydration routine. Follow a Carbohydrate-Rich, Descending-Calorie Eating Plan: Approximately 60 percent of your daily calories should be from carbohydrates.
Body Leanness Program The Eating Plan Week 1 & 2: The menus in the Body Leanness Program eating plan are designed for maximum fat-loss effectiveness and nutritional value. For best results, follow them exactly. Men – 1500 calories per day. Every attempt has been made to utilize current popular brand names and accurate calorie counts, which are listed in the menus. But, as you probably realize, products are sometimes changed or discontinued.
Body Leanness Program The Eating Plan Breakfast = 300 calories. Choice of bagel, cereal or shake: Bagel: 1 plain bagel, Sarah Lee® (frozen) (210) 3/4 ounce light cream cheese (45) 1/2 cup orange juice, fresh or frozen (55) Non-caloric beverage: any beverage without calories, caffeine or sodium, such as decaffeinated coffee or tea. Lunch = 300 calories.
Body Leanness Program Dinner = 500 or 300 calories.
Body Leanness Program Shopping List Quantities for listed items will depend on your specific selections. Review your choices and adjust the shopping list accordingly. It may be helpful for you to photocopy this list each week before doing your shopping. Staples Orange juice, skim milk, whole-wheat bread, Promise® Ultra Vegetable Oil Spread, Italian fatfree dressing, Dijon mustard, safflower oil, noncaloric beverages (tea, decaffeinated coffee, diet soft drinks, water).
Body Leanness Program Questions & Answers Q. I often get headaches when I eat only 1000 calories a day. What should I do? A. Your headaches may be caused by going longer than three hours between meals or snacks. Try spacing your meals and snacks where there are fewer hours between them. Some people who are used to drinking regular coffee with caffeine notice headaches when they stop consuming coffee for several days. If this is the case with you, you might want to ease off the coffee more gradually. Q.
Body Leanness Program Q. I’m a 40-year-old woman with a teenage son and daughter. My husband and I both want to lose 10 pounds and the children would also like to lose some weight. Can I put the whole family on the program? A. It would be great if you could, but you cannot. The number of calories per day is the problem. Teenagers require significantly more calories each day than 1500, which is the highest level. Check with a registered dietician (RD) for appropriate recommendations. Q.
Repairs/Maintenance The following information contained in the Repairs/Maintenance section is provided as a tool to make owning your TreadClimber® machine an exceptional experience. Contacting Customer Service TreadClimber® Representatives are able to assist you with service questions and ordering replacement parts. Contact them at: 1-800-NAUTILUS (1-800-628-8458). Ordering Replacement Parts 7!2.).
$!.'%2 Repairs/Maintenance !4 4 % . 4 ) / . Never attempt to make any diagnostic repairs on your own – always call a Bowflex® TreadClimber® Representative at 1-800-NAUTILUS (1-800-628-8458) and allow them to guide you through the diagnostic process. 7!2.).' To avoid electrical shock or burn, disconnect power cord and wait five minutes before servicing this machine! TC5000 and TC3000 Diagnostics How to access the TC5000/TC3000 LED Board $!.
Parts Ordering Replacement Parts Call a Bowflex® TreadClimber® Representative at 1-800-NAUTILUS (1-800-628-8458) to order replacement parts and get assistance with your specific replacement or service requirements.
Parts Walking Belts R. Rear Belt Guide (L. Rear Belt Guide Not Shown) Deck Front Roller Keeper R. Outer Treadle Skin Front Roller Bracket Front Roller Front Roller Bracket Foot Platform Inner Treadle Skin (L & R) L.
Main Frame Wheels Left Drive Cover Left Frame Cover Base Cover Safety Plate Red Cap TC Foot Plugs Cord Bracket Plugs Latch Offset Bracket Latch Slide Brackets Lever Latch Bracket Latch Arm Latch Stop Blocks Motor Right Drive Cover Motor Base Motor Tension Kit Rear Cover Right Frame Cover Motor Controller Parts
Important contact numbers If you need assistance, please have both the serial number of your machine and the date of purchase available when you contact the appropriate Nautilus office listed below. For technical assistance and a list of distributors in your area, please call or fax one of the following numbers. OFFICES IN THE UNITED STATES: INTERNATIONAL CUSTOMER SERVICE: • TECHNICAL/CUSTOMER SERVICE Nautilus, Inc.
Customer Service 1.800.NAUTILUS (800.628.8458) www.BowflexTreadClimber.com ©2006. Nautilus, Inc. All Rights Reserved. Nautilus, Inc., World Headquarters, 16400 S.E. Nautilus Drive, Vancouver, Washington, USA 98683. TreadClimber, Bowflex, and the Bowflex Logo are either registered trademarks or trademarks of Nautilus, Inc. All marks not listed above are either registered trademarks or trademarks of their respective companies. Printed in China. P/N: FF2922 Rev.