
User Manual
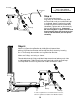
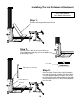
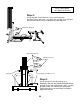

Step 7:
Locate the "T" Piece with the attached Pulleys.
Insert the "T" into the top end of the Upper Main Frame as
pictured. Insert two 3/8" x 3 1/2" Hex Head Bolts into the
two corresponding holes, through the main frame and the
"T" Piece.
Tighten with the provided Nylon Lock Nuts. Make sure the
"T" Piece is level before tightening nuts all the way.
Locate Plastic Bumper and #10 Screw. Place Bumper over
Lower and Upper Main Frame connection. Use #10 Screw
to hold Bumper in place.
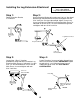
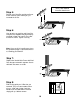
Step 6:
Locate Upper Main Frame. Slide upper half onto lower half.
Insert the 1/4" x 3 1/2" Hex Head Bolts through holes and
tighten with 1/4" Lock Nuts.
21
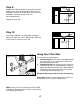
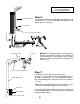
NOTICE:
For shipping purposes, the Lat Bar Rest
brackets have been turned to the sides. Notice their
correct positioning in the diagram to the left. Rotate
brackets to their correct positions and tighten nuts
before using.
1/4" x 3 1/2" Hex Head Bolts
1/4" Lock Nuts
Upper Main Frame
Upper Main Frame
"T" Piece
3/8" x 3 1/2" Hex Head Bolts
Plastic Bumper
#10 Screw
Main Frame Lower Half
3/8” Nylon Locknut
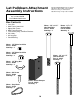
Components for this assembly
are in a box labeled
Lat Pulldown Attachment