
Specifications


Chapter 3 – Operation
17
OPERATION
Setting Up the Projector
Follow these tips when setting up the projector.
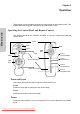
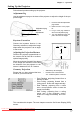
Adjustment Peg
Use the adjustment peg on the base of the projector to adjust the height of the pro-
jected image.
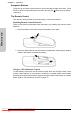
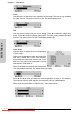
Keystone Correction
Choose the keystone function in the
Geometry submenu to adjust the image
shape when the projector is at an angle
to the screen.
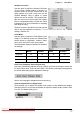
Adjusting the Projection Distance
Position the projector perpendicular to
the screen with all feet flat to achieve
optimal image quality.
Move the projector forward if the edges
of the image are distorted. Ensure that
the distance from the projector to the
screen is between 0.9 to 10.6 meters.
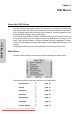
Geometry Projection
Ensure that you have selected the best
mode for your environment.
This concludes this chapter. The next chapter covers the On-Screen Display (OSD)
menus.
Adjustment
peg
Adjustment peg
release
1. Push and hold the adjustment
peg release.
2. Raise the front of the projec-
tor.
3. Let go of the peg release to
secure the adjustment peg.
4. Turn the adjustment peg foot
pad to fine tune the height.
• Slide Shot (Left and Right)
• Provides ±40° horizontal and
±14° vertical keystone correction.
±14°
±40°
• Front Desktop: projecting forward from a
desktop or table.
• Front Ceiling: projecting forward from a
ceiling mount. Inverts the image vertically.
• Rear Tabletop: projecting from a table
onto a rear projection screen. Inverts the
image Horizontally.
• Rear Ceiling: projecting from a ceiling
mount onto a rear projection screen.
Inverts the image horizontally and verti-
cally.
Downloaded From projector-manual.com Boxlight Manuals