CD850mCOVER.qxd 7/24/02 1:10 PM Page 1 CD-850m CD-850m Boxlight 19332 Powder Hill Place Poulsbo, WA 98370-7407 USA www.boxlight.com U.S.A.
Declaration of Conformity Manufacturer: BOXLIGHT, 19332 Powder Hill Place, Poulsbo, Washington USA We declare under our sole responsibility that the CD-850m projector conforms to the following directives and norms: EMC Directive 89/336/EEC, Amended by 93/68/EEC EMC: EN 55022 EN 55024 EN 61000-3-2 EN 61000-3-3 Low Voltage Directive 73/23/EEC, Amended by 93/68/EEC Safety: EN 60950: 2000 July, 2002 Trademarks Apple, Macintosh, and PowerBook are trademarks or registered trademarks of Apple Computer, Inc.
If you are experienced in setting up presentation systems, use the Quick Set Up card that was included in the carry case. For assistance, call BOXLIGHT at 1-800-762-5757 or 1-360-779-7901.
Included items Introduction Your new digital projector is easy to connect, easy to use, easy to maintain and has XGA 1024x768 resolution. video cable The projector comes in a carry case that offers ample room for BOXLIGHT accessory items such as the projector remote, color-coded cables, and documentation. The color-coded cable straps and cables they contain make your setup experience quick and easy, while the case’s design helps you find and put away all items without the fear of anything becoming lost.
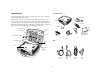
Projector components and features remote control receiver (IR) computer monitor s-video audio video in computer 1&2 keypad video computer 1 audio in remote control receiver (IR) R Y computer 2 monitor out s-video network R speakers audio in Pb audio in L computer in audio out serial control L remote control receiver (IR) elevator foot release air intake vent carrying handle focus Pr power connector zoom heat vent connectors remote control receiver (IR) heat vent leveling foot
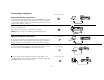
Connecting a computer connect computer cable video Required computer connections R Y audio in computer 1 computer 2 monitor s-video network R Pr audio in audio in L computer in serial control audio out L Pb Connect the black end of the computer cable to the Computer 1 connector on the projector. Connect the blue end to the video port on your computer. If you are using a desktop computer, you first need to disconnect the monitor cable from the computer’s video port.
If you prefer connecting your computer to the projector with an optional VESA cable, connect one end of the cable to the VESA port on your computer, and connect the other end of the cable to the blue Computer 2 connector on the projector.
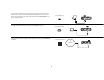
Displaying a computer image remove lens cap Remove the lens cap. press Power Press the Power button on the top of the projector or the remote. The LED flashes green and the fans start to run. When the lamp comes on, the startup screen is displayed and the LED is steady green. It can take a minute for the image to achieve full brightness. ? No startup screen? Get help on page 15. turn on computer Turn on your computer. The computer’s image should appear on the projection screen.
First-time projector use with Windows 98 a The first time you connect a computer running Windows 98 to the projector, the computer recognizes the projector as “new hardware” and the Add New Hardware Wizard appears. Follow these instructions to use the Wizard to load the correct driver (which was installed with your Windows operating system). If you are running Windows 2000, Windows ME, or Window XP, skip these steps and go to “Adjusting the image” on page 10.
Skip this page if you did not connect a USB mouse cable For Windows 98: • If you connected the USB cable, the Add New Hardware Wizard appears again. Drivers must be installed to use the USB functionality. • The Wizard launches three times. The first time it detects a USB Composite Device. The second time a USB Human Interface Device (for the keyboard). The third time it detects a USB Human Interface Device (for the mouse).
Adjusting the image adjust height Adjust the height of the projector, if necessary, by pressing the release button to extend the elevator foot. rotate leveling foot Rotate the leveling foot, if necessary. elevator foot Position the projector the desired distance from the screen at a 90 degree angle to the screen. adjust distance See page 39 for a table listing screen sizes and distances. Adjust the zoom or focus rings by rotating them until the desired image size and sharpness are produced.
Connecting a video device connect video cable Standard video connections video audio in computer 1 R Y computer 2 monitor s-video network R Pr audio in audio in L computer in serial control audio out L Pb Plug the video cable’s yellow connector into the video-out connector on the video device. Plug the other yellow connector into the yellow Video connector on the projector.
Displaying a video image remove lens cap Remove the lens cap. press Power Press the Power button on the top of the projector. The LED flashes green and the fans start to run. When the lamp comes on, the startup screen is displayed and the LED is steady green. It can take a minute for the image to achieve full brightness. ? No startup screen? Get help on page 14. Plug in and turn on the video device. turn on video device The video device’s image should appear on the projection screen.
Adjust the zoom or focus rings by rotating them until the desired image size and sharpness are produced. adjust zoom and focus zoom focus If the image is not square, adjust the keystone using the buttons on the keypad. Press the upper Keystone button to reduce the upper part of the image, and press the lower Keystone button to reduce the lower part. adjust keystone Adjust the volume on the keypad or remote. adjust volume Adjust the Contrast, Brightness, Color, or Tint in the Picture menu.
Shutting down the projector Troubleshooting your setup The projector automatically displays a black screen after no active source is detected for 30 minutes. This black screen helps preserve the life of the projector. The image returns when an active source is detected or a remote or keypad button is pressed. If your image appears correctly on the screen, skip to the next section (page 23). If it does not, troubleshoot the setup.
Source troubleshooting Problem Solution Result No startup screen Plug power cable in and remove lens cap press power button Correct image Start Logo Up Computer image projected Only startup screen appears Press the Computer button Activate laptop’s external port A Start Logo Up A or restart laptop 15 A
No computer image, just the words “Signal out of range” A Adjust computer refresh rate in Control Panel>Display>Settings>Advanced> Adapter (location varies by operating system) Signa l rang out of e Computer image projected A You may also need to set a different resolution on your computer, as shown in the following Problem, “Image fuzzy or cropped” 16 A
Image fuzzy or cropped AA A Set your computer’s display resolution to the native resolution of the projector (Start>Settings>Control Panel>Display>Settings tab, select1024x768) Image clear and not cropped A For a laptop, disable laptop monitor or turn-on dualdisplay mode Remote control not controlling my computer’s mouse Connect computer cable (page 5), then, load USB drivers, if needed (page 8) video computer 1 audio in See page 23 for information on the remote R Y computer 2 monitor s-video
Projector troubleshooting Problem Solution Result Image not square Adjust keystone on keypad Square image Edges of image distorted Turn Overscan on in the Picture>Advanced menu Correct image AB AB Adjust Sharpness in the Picture>Advanced menu Image not sharp Correct image AB AB 18
Image does not fit 16:9 screen Change aspect ratio to 16:9 in Picture>Aspect ratio menu Correct image Image upside down Turn off Ceiling in Settings>System menu Correct image BA Image reversed left to right AB Turn off Rear in Settings>System menu A Correct image AB 19
Video image “torn” and fragmented Change Video Standard in Picture>Advanced menu Correct image AB Projected colors don’t match source AB Adjust color, tint, color temperature, brightness, contrast in the menus COLOR Lamp won’t turn on, LED blinking red (page 14) Correct image COLOR Make sure vents aren’t blocked; allow projector to cool for one minute Unplug projector; wait one minute; plug in projector and turn it on: lamp lights Start Logo Up blinks red Check lamp hours: should be less than 2,00
Lamp won’t turn on, LED blinking red (page 14) Lamp must be replaced (page 35) Lamp turns on blinking red Image not centered on screen Start Logo Up Move projector, adjust zoom, adjust height zoom adjust horizontal or vertical position in Picture>Advanced menu 21 Correct image
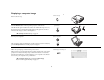
Regarding this projector Using the keypad buttons For assistance, call BOXLIGHT at 1-800-762-5757 or 1-360-779-7901. Most buttons are described in detail in other sections, but here is an overview of their functions: This product is backed by a limited two-year warranty. An extended warranty plan may be purchased from BOXLIGHT. power–turns the projector on (page 7) and off (page 12).
the PowerPoint Tools menu, click the View Tab, de-select the “Popup Menu on Right Mouse Click” option in the Slide Show section, then click OK. Then, when you’re in PowerPoint’s Slide Show mode, a left click advances to the next slide and a right click returns to the previous slide (other PowerPoint modes are not affected). Using the remote control The remote uses two (2) provided AAA batteries.
Using the audio connect audio cable To play sound from the projector, connect your source to the Audio In connector on the projector. video computer 1 audio in R Y computer 2 monitor out s-video network R audio in Pb audio in L computer in audio out serial control L Pr To adjust the volume, use the buttons on the keypad or remote. To mute the sound, press the Mute button. Troubleshooting audio If there is no sound, check the following: • Make sure the audio cable is connected.
Optimizing computer images Presentation features After your computer is connected properly and the computer’s image is on the screen, you can optimize the image using the onscreen menus. For general information on using the menus, see page 27. Several features are provided to make giving presentation easier. The following is an overview, details are found in the menu section on page 27. • Adjust the Keystone, Contrast, or Brightness in the Picture menu. • Change the Aspect Ratio.
Optimizing video images Customizing the projector After the video device is connected properly and the image is on the screen, you can optimize the image using the onscreen menus. For general information on using the menus, see page 27. You can customize the projector for your specific setup and needs. See page 31 to page 34 for details on these features. • For rear projection, turn Rear mode on in the Settings>System menu.
Using the menus Dot To open the menus, press the menu button on the keypad or remote. (The menus automatically close after 60 seconds if no buttons are pressed.) The Main menu appears. Use the arrow buttons to move up and down to highlight the desired submenu, then press the Select button. Menu button To change a menu setting, highlight it, press Select, then use the up and down arrow buttons to adjust the value, select an option using radio buttons, or turn the feature on or off using check boxes.
Picture menu To adjust the following five settings, highlight the setting, press Select, use the up and down arrows to adjust the values, then press select to confirm the changes. increasing keystone Keystone: adjusts the image vertically and makes a squarer image. You can also adjust keystone from the keypad. Contrast: controls the degree of difference between the lightest and darkest parts of the picture and changes the amount of black and white in the image.
Presets: The provided Presets optimize the projector for displaying computer presentations, photographs, film images, and video images. (Film input is material originally captured on a film camera, like a movie; video input is material originally captured on a video camera, like a TV show or sporting event.) You can use the preset as a starting point, then further customize the settings for each source. The settings you customize are saved in the preset for each source.
Advanced settings Sharpness: (video sources only) changes the clarity of the edges of a video image. Select a sharpness setting. Sharpness Color Space: This option applies to computer and component video sources (it won’t appear in the menu for S-video or composite video sources). It allows you to select a color space that has been specifically tuned for the video input. When Auto is selected, the projector automatically determines the standard.
Settings menu Audio: allows adjustments to the sound Balance between speakers and speaker Volume. The Internal speakers and projector startup Chime can be turned on or off by placing or removing a check in the respective checkboxes. Audio Sources>Power-up Source: this determines which source the projector checks first for active video during power-up. Sources: allows you to assign a particular input to a specific source key as an optional full-featured remote.
Screen Save: automatically blanks the screen with a black color after no signals are detected for a preset number of minutes. The image returns when an active source is detected or a remote or keypad button is pressed. Screen Save is disabled when Power Save is enabled. Screen Save Startup Logo: allows you to display a blank Black, White, or Blue screen instead of the default screen at startup and when no source is detected.
Network: The projector has an RJ45 Ethernet connector that supports network connections and TCP/IP protocols. This will allow for the control and management of the projector over a corporate network. The following fields are accessible when DHCP is not checked and available for manual entry of data. Network Network Info IP Address: Identifies the projector on the network. Subnet mask: Separates the network address part of the IP address. Default gateway: The IP address of the local router.
Maintenance clean the lens with a soft dry cloth and non-abrasive cleaner Cleaning the lens 1 Apply a non-abrasive camera lens cleaner to a soft, dry cloth. Avoid using an excessive amount of cleaner, and don’t apply the cleaner directly to the lens. Abrasive cleaners, solvents or other harsh chemicals might scratch the lens. 2 Lightly wipe the cleaning cloth over the lens in a circular motion. If you don’t intend to use the projector immediately, replace the lens cap.
Replacing the projection lamp The lamp hour timer in the About menu counts the number of hours the lamp has been in use. After 1,980 hours, the message “Change lamp” briefly appears on the screen at each startup. When the timer reaches 2,000 hours, the lamp will no longer light. You can order new lamp modules from BOXLIGHT. See “Accessories” on page 38 for information.
WARNINGS: • To avoid burns, allow the projector to cool for at least 60 minutes before you replace the lamp. • Do not drop the lamp module. The glass may shatter and cause injury. • Do not touch the glass lamp screen. Fingerprints can obscure projection sharpness. • Be extremely careful when removing the lamp housing. In the unlikely event that the lamp ruptures, small glass fragments may be generated. The lamp module is designed to contain most of these fragments, but use caution when removing it.
Using the security lock video The projector has a security lock for use with a PC Guardian Cable Lock System. See “Accessories” on page 38 for ordering information. Refer to the information that came with the lock for instructions on how to use it.
Accessories Appendix Specifications Standard Accessories (ship with the projector) Carrying Case Temperature Operating 50 to 95° F (10 to 35° C) at 0 - 10,000 feet Shipping Box (with packaging) Non-operating -4 to 158° F (-20 to 70° C) at 0 -20,000 feet Computer Cable 6 ft (1.8 m) Audio/Video Cable 6 ft (1.
Projected image size Table 2: Range of distance to the screen for a given screen size for CD-850m Optional Accessories Shipping Case (ATA approved) Distance to screen Deluxe Travel Case Diagonal Screen Size (inches/m) 40/1.0 50/1.3 60/1.5 100/2.5 150/3.8 200/5.
Drivers 8 USB 9 Windows 98 9 Numerics 1024x768 resolution 3 A E About 32 altitude limits 38 Aspect Ratio 32 audio 24 Audio In connector 5, 11 audio volume 13 Auto Image 32 Auto Power 31 Effect Key 32 elevator foot 10 F FCC warning 1 first time use driver installation 8 focus 10, 13 Freeze 32 fuzzy image 17 B Blank 32 blinking green 14 blinking red 14 Brightness 10 I image display video 12 image display computer 7 image does not fit screen 19 image edges distorted 18 image not centered 21 image not s
remote’s mouse buttons 23 presentation features 25 projector customizing 26 optional accessories 39 shutdown 14 standard accessories 38 troubleshooting problems 14 projector height 10, 12 projector positioning 10, 12 projector specifications 38 L lamp replacement 35 lamp won’t turn on 20, 21 Language 33 laptop external video port 7 LED blinking green 14 blinking red 20 solid green 14 solid red 21 LED behavior 14 Lens cleaning 34 leveling foot 10 Low Power 31 R Rear 31 remote control 23 not working 17 Remo
T temperature limits 38 Tint 13 Troubleshooting 14, 15 U USB, using your mouse 5 V VESA port 6 Video button 12 video connections optional 11 standard 11 Video connector 11 video images optimizing 26 W warranty 22 Windows 2000 9 Windows 98 8 Windows ME 9 Windows XP 9 X XGA 3 Z zoom 10, 13, 32 42
LIMITED WARRANTY DISCLAIMER OF UNSTATED WARRANTIES BOXLIGHT (“BOXLIGHT”) warrants that the CD-850m (“the Product”) sold hereunder THE WARRANTY PRINTED ABOVE IS THE ONLY WARRANTY APPLICABLE TO will conform to and function in accordance with the written specifications of BOX- THIS PURCHASE. ALL OTHER WARRANTIES, EXPRESS OR IMPLIED, INCLUD- LIGHT.
CD850mCOVER.qxd 7/24/02 1:10 PM Page 1 CD-850m CD-850m Boxlight 19332 Powder Hill Place Poulsbo, WA 98370-7407 USA www.boxlight.com U.S.A.