Copyright © 1999 by Boxlight Poulsbo, Washington. All rights reserved. Downloaded From projector-manual.
FCC Warning This equipment has been tested and found to comply with the limits for a Class A digital device, pursuant to part 15 of the FCC Rules. These limits are designed to provide reasonable protection against harmful interference when the equipment is operated in a commercial environment. This equipment generates, uses, and can radiate radio frequency energy and, if not installed and used in accordance with the instruction manual, may cause harmful interference to radio communications.
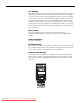
Declaration of Conformity Manufacturer: Boxlight 19332 Powder Hill Place, Poulsbo, Washington, USA We declare under our sole responsibility that the MP-355m projector conforms to the following directives and norms: Directive 89/336/EEC, Amended by 93/68/EEC EMI: EN 55022 (1992) Class A EMC: EN 50082-1 (1992) Directive 73/23/EEC, Amended by 93/68/EEC Safety: EN 60950: 1992 + A1 + A2 + A3: 1995 October, 1999 Trademarks Apple, Macintosh, and PowerBook are trademarks or registered trademarks of Apple Computer,
Downloaded From projector-manual.
TABLE OF CONTENTS Safety Instructions iii Introduction Image Resolution Compatibility Unpacking the Projector Usage Guidelines If You Need Assistance Warranty 1 1 1 1 3 4 4 Setting up the Projector Connecting the CablePro™III to the Projector Preparing to Connect Your Equipment to the Projector Connecting a Laptop Computer Connecting a Desktop Computer Connecting a Computer Using a VESA cable Connecting a Video Player Connecting an External Speaker Powering up the Projector and Adjusting the Image Turn
T a b l e o f C o n t e n t s Maintenance & Troubleshooting Cleaning the Lens Cleaning the Fan Intake Filter Replacing the Projection Lamp Replacing the Batteries in the Remote Control Using the Kensington Lock Troubleshooting Solutions to Common Problems 37 37 37 39 41 41 42 43 Appendix Specifications Accessories Portable and Laptop Activation Chart Using Video Mirroring with a PowerBook Computer Projected Image Size 49 49 51 53 57 58 Index 61 ii Downloaded From projector-manual.
SAFETY INSTRUCTIONS Please read and follow all safety instructions provided BEFORE using your new projector. Failure to comply with safety instructions may result in fire, electrical shock, or personal injury and may damage or impair protection provided by equipment. Please save all safety instructions. Safety Definitions: • Warning: Statements identify conditions or practices that could result in permanent personal injury.
S a f e t y I n s t r u c t i o n s • Caution: For ceiling mount installations, please use the ceiling mount recommended in this User’s Guide and follow all instructions provided with it. Safety Symbols: Attention: For information about usage of a feature, please refer to the User’s Guide. Warning: Hot surface. Do not touch. An arrow pointing to the lamp door of the projector. Warning: Laser radiation. Do not stare into laser beam.
INTRODUCTION The Boxlight MP-355m™ lightweight multimedia projector combines powerful and sophisticated features with easy-to-use, intuitive controls. Built-in multimedia features include audio, a palette of 16.7 million colors and active matrix liquid crystal display (LCD) technology. It delivers crisp, clear XGA 1024x768 images. The projector is ideal for high-performance business, training and imaging applications that demand exceptional color quality.
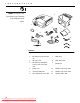
I n t r o d u c t i o n NOTE: The contents of your 2 shipping box may vary depending on the configuration you’ve ordered. 1 4 6 3 5 7 9 12 11 8 10 FIGURE 1 Shipping box contents 1. MP-355m projector and lens cap 7. VESA cable 2. Soft carry case 8. VESA audio cable 3. MP-355m documentation: User’s Guide, Quick Start card 9. CablePro III 4. power cord 10. CablePro USB mouse cable 5. remote and batteries 11. CablePro PS/2 mouse cable 6. RCA audio/video (A/V) cable 12.
remote control receiver keypad speaker connector panel zoom ring focus ring elevator button power cord connector FIGURE 2 Projector Usage Guidelines • Do not look directly into the projection lens when the projector is turned on. The bright light may harm your eyes. • Do not block the grills on the projector. Do not place the projec- tor on cloth table coverings, as they may get sucked up to the vents. Restricting the air flow can cause it to overheat and turn off.
I n t r o d u c t i o n If You Need Assistance The first place to look for help is in this manual. Be sure to check the guidelines in “Troubleshooting” on page 42. If this manual doesn’t answer your question, call Boxlight at 1-800-762-5757 or 360-779-7901. Warranty This product is backed by a limited two-year warranty. The details of the warranty are printed at the back of this manual. 4 Downloaded From projector-manual.
SETTING UP THE PROJECTOR 1 Place the projector on a flat surface. • The projector must be within 10 feet (3 m) of your power source and within 8 feet (2.4 m) of your computer. • If you want to project from behind a translucent screen, set up the projector behind your screen. See “Rear Projection” on page 32 to reverse the image. • If you are installing the projector on the ceiling, refer to the Ceiling Mount Installation Guide that comes with the Ceiling Mount Kit for more information.
S e t t i n g u p t h e P r o j e c t o r Connecting the CablePro™III to the Projector CAUTION: Turn off the computer, monitor and projector whenever you connect or disconnect cables. The CablePro III (referred to as “CablePro” in this manual for brevity) simplifies the connection process by providing a central hub for all the connections between the projector and your computer. The connectors on the CablePro are labeled with icons.
Preparing to Connect Your Equipment to the Projector Now you’re ready to connect your equipment. Computers are connected to the CablePro. Video players and other equipment, such as external speakers, are connected directly to the projector. NOTE: Before you continue, Steps for connecting the different types of equipment are given on the pages listed below. equipment are turned off.
S e t t i n g u p t h e P r o j e c t o r Connecting a Laptop Computer NOTE: Many laptop computers end of the CablePro cable into the video connec1 Plug the tor on your laptop. do not automatically turn on their external video port when a secondary display device such as a projector is connected. Refer to your computer manual for the command that activates the external video port. Activation commands for some laptop computers are listed in the Appendix.
audio cable mouse cable FIGURE 7 Connecting the CablePro audio and mouse cables to a laptop computer If your computer has a USB connector and is running Windows 98, use the USB cable end of the CablePro mouse cable into the 1 Plug the mouse connector on your computer. end of the CablePro mouse cable into the 2 Plug the connector on the CablePro. NOTE: The USB mouse is supported for use with Windows 98 only. You must have the appropriate USB drivers installed on you computer to use the USB feature.
S e t t i n g u p t h e P r o j e c t o r Connecting a Desktop Computer 1 Locate the cable that connects your monitor to your computer. Unplug it from the computer. end of the CablePro cable into the monitor con2 Plug the nector on your computer.
Do you want to control your computer’s mouse from the projector’s remote or keypad? If your computer has a PS/2 connector, use the PS/2 cable 1 Unplug the mouse cable from your computer. end of the CablePro mouse cable into the mouse 2 Plug the connector on your computer. end of the CablePro mouse cable into the 3 Plug the connector on the CablePro. NOTE: The USB mouse is supported for use with Windows 98 only.
S e t t i n g u p t h e P r o j e c t o r Connecting a Computer Using a VESA cable The supplied VESA cable connects to the High Density 15-pin connector (HD 15) on the projector. This input is designated Computer 2. 1 Plug one end of the VESA cable into the video connector on your computer. Plug the other end into the HD 15 connector on the projector. 2 If you want audio with your presentation, plug the supplied audio cable into the audio connector on your computer.
Connecting a Video Player 1 If your video player uses a round, one-prong composite video connector, you’ll need only the A/V cable that shipped with the projector. • If your video player uses a round, four-prong S-video con- nector, you’ll need an S-video cable in addition to the A/V cable. The S-video cable is sold separately. (See “Optional Accessories” on page 52.) 2 Plug the A/V cable’s yellow connector into the “video-out” port on your video player (Figure 11). This port may be labeled “To Monitor.
S e t t i n g u p t h e P r o j e c t o r S-video cable A/V cable FIGURE 12 Connecting the projector to a video player using an S-video cable and the audio connectors on the standard A/V cable 4 Plug the A/V cable’s white connector into the left “audio out” port on your video player. Plug the cable’s red connector into the right “audio out” port on the video player (Figure 11 and Figure 12).
Connecting an External Speaker To connect one or two external speakers, plug the speaker cable into the (audio out) connector on the projector. FIGURE 13 Connecting an external speaker Powering up the Projector and Adjusting the Image 1 Remove the lens cap. 2 Plug the power cord into the side of the projector, then plug it into your electrical outlet. A surge-protected power strip is recommended if power surges are common in your area. NOTE: Always use the power cord that shipped with the projector.
S e t t i n g u p t h e P r o j e c t o r • If you don’t want to hear the sound from your video player, press the mute button. 5 If you connected any external speakers, turn them on. 6 If you connected your monitor, turn it on. 7 Turn on your computer. • The computer image should display on the projection screen. (If a video source is active, press the comp button to display your computer’s image.
USING THE PROJECTOR This section describes how to use and make adjustments to the projector. It also provides a reference to the keypad and remote buttons and the options available from the on-screen menus. Basic Image Adjustment 1 Make sure you have powered up your equipment in the right order (page 15). 2 If the image doesn’t display completely, adjust the height and tilt of the projector (page 19), zoom the image (page 19), or center the image by adjusting its horizontal or vertical position (page 30).
U s i n g t h e P r o j e c t o r laser pointer disk mouse right mouse button left mouse button (on underside of remote) FIGURE 14 Remote control NOTE: To control the computer’s mouse from the projector’s remote or keypad, you must connect the mouse cable to the CablePro. See page 7 for details. Press anywhere on the edge of the disk mouse to move the cursor on the screen. You can move the cursor at any angle by pressing the corresponding edge of the disk.
Adjusting the Projector To focus the image, rotate the focus ring (Figure 15) until the image is clear. To zoom the image, rotate the zoom ring. This adjusts the image size without affecting focus. zoom ring focus ring elevator button FIGURE 15 Focus ring, zoom ring, and elevator button The projector is equipped with a self-locking, quick-release elevator foot and button (Figure 15) and a leveling knob (Figure 16). FIGURE 16 Leveling knob 19 Downloaded From projector-manual.
U s i n g t h e P r o j e c t o r To raise the projector: 1 Press and hold the elevator button (Figure 15). 2 Raise the projector to the height you want, then release the button to lock the elevator foot into position. 3 If necessary, use the leveling knob (Figure 16) to adjust the angle of the projected image. FIGURE 17 Adjusting the height of the projector To lower the projector: 1 Press the elevator button. 2 Lower the projector.
Using the Remote and Keypad Buttons This section provides an alphabetical reference to the remote and keypad buttons. lamp LED power LED standby LED FIGURE 18 Keypad FIGURE 19 Remote 21 Downloaded From projector-manual.
U s i n g t h e P r o j e c t o r Brightness + or - Adjusting the brightness lightens or darkens the image. • To darken the image, press -. • To lighten the image, press +. Computer When you have more than one source (computer and video) connected to the projector, select between them by pressing the button for the source you want. Press computer to display your computer image. Freeze The freeze button halts, or “freezes” the projected image.
Power The Power button turns the projector on and off. When you plug the projector in, the fan runs on low speed and the Power LED lights after the projector has initialized. When the Power LED is lit, you can press the Power button to turn the lamp on. When you press the Power button while the projector is on, the lamp stays on for 15 seconds before shutting off. If you press power again within 15 seconds, the projector returns to normal operation immediately.
U s i n g t h e P r o j e c t o r Using the On-Screen Menus The projector has six drop-down menus that allow you to make image adjustments and change a variety of settings. Most of these adjustments aren’t available directly from the keypad or remote. To open the on-screen menus, press the menu button on the keypad or remote. Press menu again when you want to close the menus and save any changes.
Display Menu Functions FIGURE 21 Display menu Brightness Adjusting the brightness changes the intensity of the image. • Press the left mouse button to darken the image. • Press the right mouse button to lighten the image. Tint The tint adjusts the red-green color balance in the projected image. Changing the Tint setting has no effect on PAL or SECAM video sources. • Press the left mouse button to increase the amount of green in the image.
U s i n g t h e P r o j e c t o r Color The color setting adjusts a video image from black and white to fully saturated color. • Press the left mouse button to decrease the amount of color in the image. • Press the right mouse button to increase the amount of color in the image. Color Temperature This setting adjusts the amount of red in the projected image. • Press the left mouse button to decrease the amount of red in the image.
Audio Menu Functions FIGURE 22 Audio menu Volume • Press the left mouse button to decrease the volume. • Press the right mouse button to increase the volume. Volume adjustments you make are saved for each source. NOTE: Changing the volume from the menu is the same as changing it using the keypad or Treble The treble setting controls the higher frequencies of your audio source. remote. • Press the left mouse button to decrease the treble. • Press the right mouse button to increase the treble.
U s i n g t h e P r o j e c t o r Balance The balance setting controls the balance between the left and right external speakers. It appears gray and won’t highlight if you haven’t connected external speakers. Balance applies to all sources you have connected. • Press the left mouse button to increase the amount of sound coming from the left external speaker. • Press the right mouse button to increase the amount of sound coming from the right external speaker.
Image Menu Functions FIGURE 23 Image menu Auto Image The projector automatically adjusts tracking, signal synchronization and vertical and horizontal position for most computers. If you want to adjust these features manually, you must turn off Auto Image first by highlighting Auto Image in the Image menu and clicking either mouse button to select “off”. NOTE: Some screen savers interfere with the operation of Auto Image.
U s i n g t h e P r o j e c t o r Manual Tracking NOTE: The Manual Sync, Manual Tracking, Horiz. Position and Vert. Position buttons are available only for computer sources. The projector sets these options automatically for a video source. The tracking function adjusts the projector to match the video signal from your computer. The projector usually adjusts the tracking automatically when you connect your computer.
Controls Menu Functions FIGURE 24 Controls menu Video Standard When Auto is on, the projector attempts to pick the video stan- dard (NTSC, NTSC 4.43, PAL, PAL-M, PAL-N, or SECAM) automatically based on the input signal it receives. (The video standard options may vary depending on your region of the world.) The input signals for SECAM, PAL-M, and PAL-N video cannot be automatically detected, therefore they must be chosen manually.
U s i n g t h e P r o j e c t o r Rear Projection When you select Rear Projection, the projector reverses the image so you can project from behind a translucent screen. Default Source Default Source toggles between Computer and Video. This determines which source the projector checks first for active video during power-up. Click the button to toggle between the options. Auto Source Select This setting toggles between On and Off.
Display Startup Screen This setting toggles between On and Off. When this feature is On, the startup screen appears when the projector starts up and remains until an active source is detected. Click the either mouse button to turn this feature off and display a plain black or blue screen instead of the startup screen. Auto startup This setting toggles between On and Off. When this feature is On, the lamp turns on automatically when you power on the projector.
U s i n g t h e P r o j e c t o r Language menu FIGURE 25 Language menu You can display the on-screen menus in English, French, German, and Spanish. The default is English. • Move the cursor to the language you want, then click the either mouse button. The menus redraw immediately. Status menu This is a read-only menu for informational purposes. To display the status window, select Show status from the menu, then click either mouse button. To remove the window, click either mouse button.
Lamp hours used Indicates how many hours the current lamp has been in use. The counter starts at zero hours and counts each hour the lamp is in use. When the counter reaches 3000 hours, the lamp monitor light turns on. For optimum results, the lamp should be replaced at this time. See “Replacing the Projection Lamp” on page 39 for details. Computer resolution Shows your computer’s resolution setting. To change this, go to your computer’s Control Panel and adjust the resolution in the Display tab.
Downloaded From projector-manual.
MAINTENANCE & TROUBLESHOOTING This section describes how to: • clean the lens • clean the fan intake filter • replace the projection lamp • replace the batteries in the remote control • use the Kensington lock feature • troubleshoot the projector Cleaning the Lens Follow these steps to clean the projection lens: 1 Apply a non-abrasive camera lens cleaner to a soft, dry cloth. • Avoid using an excessive amount of cleaner. • Abrasive cleaners, solvents or other harsh chemicals might scratch the lens.
M a i n t e n a n c e & T r o u b l e s h o o t i n g FIGURE 27 Removing the lamp and filter doors 3 Using a screwdriver or your hand, push the tab on the filter door forward and lift the door out. 4 Clean the filter. • Use a vacuum cleaner set on low power to remove the dust and dirt. FIGURE 28 Cleaning the air filter 5 Replace the filter. • First, insert the side with the tabs, then press the other end in place. 38 Downloaded From projector-manual.
Replacing the Projection Lamp The lamp hour counter on the status bar at the top of the menus counts the number of hours the lamp has been in use. After 3000 WARNING: To avoid burns, hours of use, the lamp monitor LED, marked allow the projector to cool for at on the top of the projector near the keypad, lights yellow. For optimum results, the lamp should be replaced at this time. You can order new lamp modules from Boxlight. See “Accessories” on page 51 for information.
M a i n t e n a CAUTION: Never operate the projector with the lamp cover open n c e & T r o u b l e s h o o t i n g 5 Loosen the two non-removable screws on the outside of the module (Figure 30). 6 Remove the module (Figure 30). or removed. This disrupts the air flow and causes the projector to overheat. FIGURE 30 Removing the lamp module 7 Align the new lamp module in the correct direction.
Replacing the Batteries in the Remote Control The life of the batteries depends on how often and how long you use the remote. Symptoms of low battery charge include erratic responses when using the remote and a reduced range of operation. Follow these steps to replace the batteries: 1 Turn the remote face down in your hand. 2 Slide the battery cover off the end of the remote by pressing on it with the heel of your hand. 3 Remove the old batteries. 4 Install two new AA alkaline batteries.
M a i n t e n a n c e & T r o u b l e s h o o t i n g Troubleshooting If you’re experiencing trouble with the projector, follow these steps to make sure everything is properly connected before you call Technical Support for assistance. 1 Check cable connections. Verify that all computer, CablePro and power cables are properly connected. 2 Verify that all power is switched on. 3 Verify that the projector has not been switched off with the standby button on the keypad.
Solutions to Common Problems Problem: Nothing on projection screen • Make sure that the power cord is properly connected to a func- tional AC electrical outlet. Make sure that the power cord is also properly connected to the projector. • If the projector is plugged into a power strip, make sure the power strip is turned on. • Make sure you have removed the lens cap from the projection lens at the front of the projector. • Make sure the projector is switched on.
M a i n t e n a n c e & T r o u b l e s h o o t i n g Problem: Only the start-up screen displays • Verify that the cables are connected correctly. Check to see that the CablePro computer cable is correctly connected to the monitor connector on the computer (this is the connector where your monitor cable usually goes.) See page 6 for connection procedures. • Verify that the proper input source is connected. See “Com- puter” on page 22 or “Video” on page 23.
Problem: Image is too wide or narrow for screen • You might need to manually adjust the tracking to reduce or enlarge the projected image. Refer to “Manual Tracking” on page 30. • Adjust the resolution of your monitor if it’s greater than 1280x1024. Only this resolution at 75 Hz or less will display on the projector. Problem: Image is out of focus • Turn the projection lens to focus the image. • Make sure the projection screen is at least 4 feet (1.2m) from the projector.
M a i n t e n a n c e & T r o u b l e s h o o t i n g Problem: Image is “noisy” or streaked Try these steps in this order. 1 Deactivate the screen saver on your computer. 2 Turn Auto Image off and then back on again. See “Auto Image” on page 29. 3 Adjust the synchronization and tracking manually to find an optimal setting. See “Manual Sync” on page 29 and “Manual Tracking” on page 30.
Before calling Boxlight for assistance, please have the following information available: •the projector’s serial number (located on the bottom label) •the resolution of your computer. Call Boxlight at 1-800-762-5757. 47 Downloaded From projector-manual.
Downloaded From projector-manual.
APPENDIX Specifications The projector must be operated and stored within the temperature and humidity ranges specified. Temperature Operating 10 C to 40° C Non-operating -20 to 70° C Humidity Operating and non-oper. 5% to 95% relative humidity, non-condensing Dimensions 5.2 x 11.7 x 14.7 inches (13 x 29.5 x 36.7 cm) Weight unpacked 9.7 pounds (4.4kg) Altitude Operating Non-operating 0 to 10,000 feet (3048 meters) 0 to 40,000 feet (12,192 meters) Optics Focus Range 4-40 feet (1.
A p p e n d i x Video Audio Input Input Impedance Maximum Input Voltage Sensitivity Connector Type CablePro Audio Input Input Impedance Maximum Input Voltage 5K ohm DC coupled (LIN + RIN)PEAK < 4.5 V for THD ≤ 0.3% LIN or RIN < 2.0 Vrms for THD ≤ 0.3% 100 mV at 1 KHz for 88 dB SPL at 1 meter RCA jack 10K ohm nominal, AC coupled (LIN + RIN)PEAK < 4.5 V for THD ≤ 0.3% LIN or RIN < 2.0 Vrms for THD ≤ 0.3% Sensitivity Connector Type 100 mV at 1 KHz for 88 dB SPL at 1 meter 3.
Accessories Standard Accessories (ship with the projector) MP-355m Quick Start card MP-355m User’s Guide Shipping Box CablePro and Cables CablePro Audio Cable CablePro USB Mouse Cable CablePro PS/2 Mouse Cable VESA Cable (HD 15 to HD15, 6 ft) VESA Audio Cable (6 ft) Projection Lamp Module Lens Cap Audio/Video Cable Remote Control and 2 Batteries Power Cords (one ships with projector, type depends on country) NOTE: Use only Boxlight- North American Power Cord approved accessories.
A p p e n d i x Optional Accessories Easy Carry Case Soft Case Hard Travel Case Deluxe Travel Case ATA Shipping Case CablePro Lite, 6.5 ft (2 m) Mac Adapter CablePro Extension Cable, non-plenum rated, 60.7 ft (18.5 m) CablePro Extension Cable, plenum-rated, 60.7 ft (18.5m) CablePro Installation Extension Cable, 70.
Portable and Laptop Activation Chart Many laptop computers do not automatically turn on their external video port when a secondary display device such as a projector is connected. Activation commands for some laptop computers are listed in the following table. (If your computer is not listed or the given command does not work, refer to the computer’s documentation for the appropriate command.
A p p e n d i x Computer Key command to activate port Key command to de-activate port Compaq* ** Ctrl-Alt-< Ctrl-Alt-> FN-F4 FN-F4 automatic automatic mode/? (for setup option) mode/? (for setup option) automatic automatic Alt-F for screen setup option Alt-F for screen setup option Data General Ctrl-Alt-Command Ctrl-Alt-Command Data General Walkabout 2 CRT/X at DOS prompt reboot Datavue Ctrl-Shift-M Ctrl-Shift-M Dell** Ctrl-Alt-< Ctrl-Alt-> Ctrl-Alt-F10 Ctrl-Alt-F10 FN-
Computer Key command to activate port Key command to de-activate port IBM ThinkPad** reboot, enter setup menu FN-F2 FN-F7, select choice from setup menu FN-F1, select choice FN-F5, select choice PS/2 SC select choice (CRT, LCD, etc.
A p p e n d i x Computer Key command to activate port Key command to de-activate port Packard Bell** FN-F2 FN-F2 Ctrl-Alt-< Ctrl-Alt-> Panasonic FN-F2 FN-F2 Samsung* setup screen option setup screen option Sanyo setup screen option setup screen option Sharp dip switch to CRT dip switch to LCD Sun SPARCDataview Ctrl-Shift-M Ctrl-Shift-M Tandy** Ctrl-Alt-Insert Ctrl-Alt-Insert setup screen option setup screen option Texas Instruments* setup screen option setup screen opti
Using Video Mirroring with a PowerBook Computer When you turn video mirroring on (called SimulScan in newer PowerBooks-see below), the projector displays the same information that appears on your PowerBook’s built-in screen. When video mirroring is off, the projector acts like a separate display. To turn on video mirroring for the first time: 1 Open the Monitors control panel; click on Monitor 2. 2 Set the number of colors you want. 3 Open the Control Strip; click on the monitor icon.
A p p e n d i x Projected Image Size Use the chart below and the tables on the next page to help you determine projected image sizes. FIGURE 32 Projected image size 58 Downloaded From projector-manual.
Table 1: Image Size, Width and Height for Lens at Maximum Image Size Distance to Screen (feet) 4 10 15 20 25 30 35 40 Diagonal (inches) 31 77 115 154 192 230 269 307 Width (inches) 25 62 92 123 154 184 215 246 Height (inches) 19 46 69 92 115 138 161 184 Table 2: Image Size, Width and Height for Lens at Minimum Image Size Distance to Screen (feet) 4 10 15 20 25 30 35 40 Maximum Diagonal (inches) 24 59 88 118 147 176 206 235 Maximum Width (inches) 19 47 70 94 118 141 165 188 Maximum Height (inches) 14
Downloaded From projector-manual.
B INDEX balance, adjusting 28 bass, adjusting 27 A Blank Screen 26 accessories, ordering 51, 52 Brightness buttons 22 activation commands for laptop com- brightness, adjusting 22, 25 puters 53 buttons on keypad Brightness 22 adjusting balance 28 Computer 22 bass 27 Freeze 22 brightness 22, 25 Help 22 color 26 Menu 22 contrast 25 Mute 22 fade 28 Power 23 tint 26 Standby 23 treble 27 Video 23 Volume 23 volume 23, 27 adjusting the height of the projector 19 buttons on keypad and rem
I n d e x color, adjusting 26 D colors Default Source 32 don’t match monitor colors 46 Display menu 25 not displayed 43 Display menu options Blank Screen 26 compatibility IBM-compatible 1 Brightness 25 Macintosh 1 Color 26 Color temperature 26 composite video cable connecting 13 Contrast 25 ordering (A/V cable) 51 Reset All 26 Tint 26 Computer button 22 computers, compatible 1 Display Messages 32 connecting Display Startup Screen 33 external speakers 15 displaying on-screen help in
I L IBM-compatible computers lamp compatibility 1 LED 39 connecting 8–11 ordering 51 icons replacing 39 on CablePro 6 on the projector 3, 7 image turns off unexpectedly 46 lamp hour counter 35 Language menu 34 adjusting 15, 17 language, selecting for menus 34 centering 17, 30 laptop computers colors don’t match computer’s 46 activation sequence to allow focusing 19 secondary display 53 fuzzy lines 17, 30 connecting IBM-compatible 8 has lines or spots 45 laser pointer 22 not centered
I n d e x N external 15, 22, 52 NTSC video 31 internal 22 muting 22 O specifications 49 on-screen menus Standby button 23 Audio menu 27 Standby Time 31 changing language of 34 start-up screen 15, 44 Controls menu 31 Status menu 34 Display menu 25 S-video displaying 24 connecting 13 Image menu 29 ordering cable 52 making changes to menu functions 24 removing from the screen 24 T Technical Support information to have on hand P before you call 47 PAL video 25, 31 things to try bef
LIMITED WARRANTY Boxlight (“Boxlight”) warrants that each MP-355m (“the Product”) sold hereunder will conform to and function in accordance with the written specifications of Boxlight. Said limited warranty shall apply only to the first person or entity that purchases the Product for personal or business use and not for the purpose of distribution or resale. The product may contain recycled components that are in new condition.
Part Number 010-0224-00 Downloaded From projector-manual.