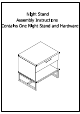
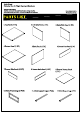
Night Stand Contains One (1) Night Stand and Hardware IMPORTANT NOTE: Carefully remove all the parts from the box, Arrange on a flat TOOLS REQUIRED: surface and verify you have all of the following parts and hardware -Phillips Screwdriver 1.Top Panel (1 PC) 2.Left Side Panel (1 PC) 3.Right Side Panel (1 PC) 4.Bottom Panel (1 PC) 5.Back Panel (1 PC) 6.Drawer Front Panel (1 PC) 7.Drawer Side Panel (2 PCS) 8.Drawer Back Panel (1 PC) 9.Drawer Bottom Panel 10.Metal Frame Legs (2 PCS) 11.
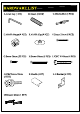
HARDWARE LIST A.Allen Key (1 PC) B.Dowel (8 PCS) C. Minifix Bolt (4 PCS) ~~ SN D. Minifix House (4 PCS) E. Minifix Cap (4 PCS) F.Screw 32mm (6 PCS) mE TT G.Screw 16mm (22 PCS) H.Screw 50mm (8 PCS) LJCBC W 40mm (4 PCS) {om J.JCBC Screw 50mm K.Handle (1 PC) L.L Bracket (4 PCS) (6 SET) M.
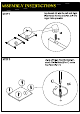
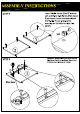
ASSEMBLY INSTRUCTIONS STEP 1 Tap Dowels (B) into the Left and Right Side Panels (Part 2) and (Part 3) in the larger holes provided. STEP 2 Using a Phillips Head Screwdriver, attach Mini fix Bolts ({Part C) to the Top Panel (Part 1).
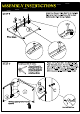
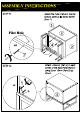
ASSEMBLY INSTRUCTIONS STEP 3 Insert Mini fix House (Part E) into the Left and Right Side Panels (Part 2 and 3) as shown.Ensure the open side of the Mini fix House is facing the opening on the left and right side Attach the Drawer Slider (Part M) to the Left Side Panel (Part 2) using Screw 16mm (Part the Pilot Hole as marked.
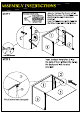
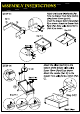
ASSEMBLY INSTRUCTIONS STEP 5 Attach the Drawer Slider (Part M) to the Right Side Panel (Part 3) using Screw 16mm (Part the Pilot Hole as marked. STEP 6 This is how a mini fix works... The head of the mini fix ET housing goes into the open mouth of the mini fix bolt. You then turn the mini fix 4 housing so it tightens 5 over the mini fix bolt. *Without edging/veneer facing Upward Attach the Top Panel (Part 1) to the Right Side Panel (Part 3) as shown.
ASSEMBLY INSTRUCTIONS STEP 7 This is how a mini fix works... The head of the mini fix #7 housing goes into the open ‘mouth of the mini fix bolt. ‘You then tum the mini fix $i housing so it tightens over the mini fix bolt. Attach the Top Panel (Part 1) to the Left Side Panel (Part 2) as shown. Turn the Mini fix House (Part D) to tighten using the Allen Key or screwdriver. Cover the Mini fix House using the Mini fix Cap {Part E) by pressing it into the Mini fix House.
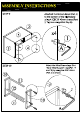
ASSEMBLY INSTRUCTIONS STEP 9 Attached the Bottom Panel (Part 4) to the bottom of the Nightstand using 4 CBC W 40mm screws (Part ). Tighten using Allen Key (A). STEP 10 Attach the Metal Frame Legs (Part 10) to Metal Support Legs (Part 11 and 12) by using the CBC 50mm (Part J} as shown.
ASSEMBLY INSTRUCTIONS STEP 11 Attach the metal frame to the the bottom panel using Screw 32mm (Part F).
ASSEMBLY INSTRUCTIONS STEP 13 Attach the Drawer Side Panels (Part 7) to the Drawer Front Panel (Part 6) using Screw 50mm (part H). Insert the Drawer Bottom Panel (Part 9) as shown. Attach the Drawer Back Panel (Part 8) by using Screw 50mm (Part H) as shown. Attach the slider (Part M) to the bottom of the drawer sides using Screw 16mm (Part G) as shown.