ESP0023 – EL455 EL455 OWNER’S MANUAL PLEASE CAREFULLY READ THIS ENTIRE MANUAL BEFORE OPERATING YOUR NEW ELLIPTICAL!
Table of Contents Product Registration…………………………………………………………………………. .2 Important Safety Instructions…………………………………………………………………3 Important Electrical Information………………………………………………………………4 Important Operation Instructions……………………………………………………………..4 Assembly Instructions………………………………………………………………………….5 Features……………………………………………………………………………………….. 11 Operation of Your New Elliptical……………………………………………………………..
CONGRATULATIONS ON YOUR NEW ELLIPTICAL AND WELCOME TO THE SPIRIT FAMILY! Thank you for your purchase of this quality elliptical trainer. Your new elliptical was manufactured by one of the leading fitness manufacturers in the world and is backed by one of the most comprehensive warranties available. Please take a moment at this time to record the name of the dealer and the date of purchase below to make any future, needed contact easy.
Important Safety Instructions WARNING - Read all instructions before using this appliance. ■ Do not operate the elliptical on deeply padded, plush or shag carpet. Damage to both the carpet and elliptical may result. Set the elliptical up on a hard, even surface. ■ Keep children away from the elliptical. There are obvious pinch points and other caution areas that can cause harm. ■ Keep hands away from all moving parts. ■ Never operate the elliptical if it has a damaged cord or plug.
Important Electrical Information WARNING! remove any cover without first disconnecting AC power supply. A.C. voltage varies by ten percent (10%) or more, the performance of your elliptical may be affected. Such conditions are not covered under your warranty. If you suspect the voltage is low, contact your local power company or a licensed electrician for proper testing. ● NEVER expose this elliptical to rain or moisture.
Assembly Instructions ASSEMBLY PACK CHECK LIST Step 1 #96 - 3/8" Split Washer (1pc) #84 - 3/8" x 23mm Curved Washer (2pcs) #103 - 3/8" x 3/4" Hex Head Bolt (2pcs) #66 - M5 x 10mm Phillips Head Screw (4pcs) #60 - 3/8" x 2-1/4" Hex Head Bolt (1pc) Step 2 #79 - 5/16" x 23mm Flat Washer (2pcs) #83 – 17mm Wave Washer (2pcs) #59 - 5/16" x 15mm Hex Head Bolt (2pcs) Step 3 #80 - 5/16" x 20mm Flat Washer (2pcs) #104 - 5/16” x 1-1/4” Hex Head Bolt (2pcs) 5 #71 - 5/16" Nylon Nut (2pcs) EL455 Elliptical
ASSEMBLY PACK CHECK LIST Step 4 #87 - 3.
STEP 1: CONSOLE MAST ASSEMBLY • • • • Locate the console mast (12) and console mast cover (41) and slide the cover onto the mast as far as it will go. Make sure the cover is facing the correct way. At the top opening of the main body of the elliptical is a wire harness (31). Unravel and straighten out the wire harness and feed it into the bottom of the console mast tube and out of the top opening.
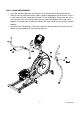
STEP 2: SWING ARM ASSEMBLY • Install the two Wave Washers (83) onto the Left and Right sides of the Swing Arm axle. • Slide the Left and Right Swing Arms (10&11) onto the appropriate side of the axle. There is a small sticker on each swing arm that shows L (Left) or R (Right). Do not force the swing arms onto the axles, they should slip on but may need to be jiggled a little to align them properly. The swing arms have been installed at the factory during testing so they should fit properly.
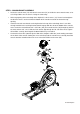
STEP 3: CONNECTING ARM ASSEMBLY • Align the hole in the rod end bearings at the ends of the Connecting Arms (8&9) with the hole in the bracket at the bottom of the Swing Arms (10&11). There is a sleeve spacer already installed in the rod ends and held in place with a twist tie; make sure these spacers do not fall out during assembly. The rod end bearing should be positioned to the inside of the swing arm brackets.
STEP 4: BEAUTY COVERS ASSEMBLY • Install the Connecting Arm Covers (57 & 58) over the connection of the rod end and Swing Arms with four M5 Phillips Head Screws (105) and two Self Tapping Screws (87). • Install the two Wheel Covers (52) on the pedal arms above the Wheels with four M5 Phillips Head Screws (105). • Install the Front Handle Bar Covers (54 & 55) and Rear Handle Bar Covers (54-1 & 55-1) over the Swing Arm axle connections with six Self Tapping Screws (87).
Features Adjustable foot pedals and orthopedically correct foot pads. Through research performed with a leading sports scientist and physical rehabilitation expert, Spirit engineering has developed a breakthrough in pedal design. No other elliptical, at any price, offers these unique features. The history of elliptical use over the past few years tells us that many users suffer from numb toes while working out on elliptical trainers. Many other users complain of ankle, Achilles tendon, knee and/or hip pain.
Operation of Your Elliptical Getting familiar with the control panel Console Operation Quick Start This is the quickest way to start a workout. After the console powers up you just press the Start key to begin, this will initiate the Quick Start mode. In Quick Start the Time will count up from zero and the workload may be adjusted manually by pressing the Up or Down buttons. The dot matrix display will have only the bottom row lit at first.
Basic information The Message Window will initially be displaying Speed information. Each time the Enter button is pressed the next set of information will appear, four windows in all. In order: Speed in RPM and MPH, Work Level and Watts. If the Enter button is pressed during the Level and Watts display the Scan light will come on and the message window will show each set of data for four seconds then switch to the next set of data in a continuous loop.
HILL The Hill program simulates going up and down a hill. The resistance in the pedals will steadily increase and then decrease during the program. Work Profile FATBURN The Fat Burn program is designed, as the name implies, to maximize the burning of fat. There are many schools of thought on the best way to burn fat but most experts agree that a lower exertion level that stays at a steady workload is the best.
Strength The Strength program is designed to increase muscular strength in your lower body. This program will steadily increase in resistance to a high level and then keeps you there. This is designed to strengthen and tone your legs and glutes. Work Profile Interval The Interval program takes you through high levels of intensity followed by periods of low intensity. This program increases your endurance by depleting your oxygen level followed by periods of recovery to replenish oxygen.
picture on the screen will not change. The reason for this is so that you can see the entire profile at all times. If the profile picture is changed, it also would be distorted and not a true representation of the actual profile. When you make a change to the workload, the message window will show the current column and program maximum levels of work. 8. During the program you will be able to scroll through the data in the message window by pressing the Enter key. 9.
Heart Rate programs Before we get started, a word about Heart Rate: The old motto, “no pain, no gain”, is a myth that has been overpowered by the benefits of exercising comfortably. A great deal of this success has been promoted by the use of heart rate monitors. With the proper use of a heart rate monitor, many people find that their usual choice of exercise intensity was either too high or too low and exercise is much more enjoyable by maintaining their heart rate in the desired benefit range.
Rate of Perceived Exertion Heart rate is important but listening to your body also has a lot of advantages. There are more variables involved in how hard you should workout than just heart rate. Your stress level, physical health, emotional health, temperature, humidity, the time of day, the last time you ate and what you ate, all contribute to the intensity at which you should workout. If you listen to your body, it will tell you all of these things.
Heart Rate Control Program operation You must have your hands in contact with the hand pulse sensors at all times for the heart rate program to work. To start the HRC program follow the instructions below or just select the HRC program then the Enter button and follow the directions in the message window. 1. Select the HRC program then press the Enter key. 2. The message window will ask you to enter your Weight.
Maintenance: 1. Wipe down all areas in the sweat path with a damp cloth after each workout. 2. If a squeak, thump, clicking or rough feeling develops the main cause is most likely one of two reasons: i. The hardware was not sufficiently tightened during assembly. All bolts that were installed during assembly need to be tightened as much as possible. It may be necessary to use a larger wrench than the one provided if you cannot tighten the bolts sufficiently.
ESP0023 –EL455 Parts List NO.
NO. 40~1 40~2 41 42 43 44 45 46 47 48 49 50 51 52 53 54 54~1 55 55~1 56 57 58 59 60 61 62 63 64 65 66 67 68 69 70 71 72 73 74 75 76 77 78 79 80 81 82 83 84 DESCRIPTION 3/8" × 2"_Flat Head Socket Bolt Ø35 × 10m/m_Rubber Foot Console Mast Cover Side Case(L) Side Case(R) Round Disk Round Disk Cover Ø31.8 × 3T × 420m/m_Handgrip Foam Pedal Arm Cover (L) Pedal Arm Cover (R) Front Stabilizer Cover Pedal (L) Pedal (R) Slide Wheel Cover Ø32(1.
NO. 85 86 87 88 89 90 92 93 94 95 96 98~1 98~2 98~3 99 100 102 103 104 105 106 107 108 109 113 114 115 116 117 118 125 133 134 135 136 138 139 140 141 146 147 148 DESCRIPTION 5 × 16m/m_Tapping Screw 4 × 15m/m_Sheet Metal Screw Ø3.5 × 12m/m_Sheet Metal Screw 4 × 19m/m_Sheet Metal Screw 5 × 16m/m_Tapping Screw Bushing Ø4.5 × Ø25 × 15T_Rubber Foot Pad Steel Cable 1/4" × 19m/m_Flat Washer M8 × 20m/m_ Carriage Bolt 3/8" × 2T_Split Washer Drink Bottle Drink Bottle Holder M5 × 12m/m_Phillips Head Screw Ø17 × Ø23.
ESP0023 –EL455 Explode Drawing 24 EL455 Elliptical
WARRANTY, SAFETY AND ASSEMBLY INFORMATION ESP0023- EL455 IMPORTANT Please read and retain this manual as it will assist with identification for parts and service. -----------------------------------------------------------------------------------------------------------BOYLES FITNESS warrants their exercise bikes to be free from defects in material and workmanship under normal use and service conditions.