
Service Manual

SERVICE PROCEDURE ACE-IX
Heating Element Removal
and Replacement
Heating Element Removal
1. STOP, DANGER! Turn power “OFF” to water heater.
2. Open control box door.
3. Turn off cold water supply to heater. Connect hose to drain
spigot of water heater and route to an open drain. Open
a nearby hot water faucet to vent heater for draining. Open
drain spigot of water heater and allow heater to drain
to a point below the heating element(s).
4. Close drain spigot and remove hose.
5. Disconnect wires from heating element terminals.
6. Remove heating element from tank using 2-1/8"
deep well socket or appropriate wrench. Unscrew
element counter-clockwise to remove from tank.
7. Be sure to remove old element gasket from the tank. It is not recommended to be re-used.
Heating Element Replacement
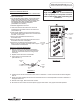
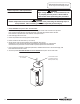
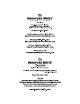
1. Check new heating element terminal block for proper electrical rating. NOTE: Some heating elements have dual
ratings, be sure to check all surfaces of the heating element terminal block (see illustration 14).
2. Apply new gasket to the new heating element. Be sure gasket is seated flat against heating element flange without
rolls or gaps (see illustration 14).
3. Clean any debris from tank fitting where heating element is to be installed. Lubricate heating element threads as
needed with thread lubricant.
4. Thread new heating element clockwise into tank fitting. Tighten heating element using 2-1/8" deep well socket or
appropriate wrench. Do not over tighten, over tightening may damage gasket.
5. Reconnect wires to heating element, be sure connections are snug and corrosion free. Do not over tighten, doing so
may damage terminal block.
6. Resume water supply to heater, be sure tank is full of water and check for leaks.
7. To resume operation, BE SURE TANK IS FULL OF WATER and restore power to water heater. Verify proper heater
operation.
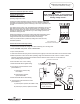
WARNING
Heater components and stored water may be
HOT when performing the following steps in
this procedure. Take necessary precaution to
prevent personal injury.
Page 23
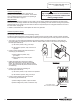
DANGER
High voltage exposure. To avoid hazard to
Life or property, be sure power is turned OFF
to water heater while performing this
procedure.
2-1/8" Hex
Screw-in Flange
Terminal Block
Screw
Terminal Block
Zinc Plated Copper or
Incoloy Sheath
Element Rating Ink Stamped
on face of Terminal Block.
Element Gasket Seated Flat Against
Element Flange Without Rolls or Gaps
Illustration 14
23
23