
Installation / Operation Instruction Manual


13
Electrical Connections
Before any electrical connections are attempted, be sure the water heater is
full of water and that the manual shut-off valve in the cold water supply line is
open. Heating elements, which have been energized for a very short period
of time, can be damaged (burned-out) if they are not completely immersed in
water. This warranty does not cover burned-out heating elements. Check the
rating plate and wiring diagram before proceeding. This electric water heater
was manufactured and wired in accordance with the Underwriters
Laboratories testing approvals requirements. The temperature-limiting
device is of the manual reset, trip-free type and has been factory installed to
interrupt all ungrounded power supply conductors in the event of thermostat
failure. The plumbing supplier in your area ordered this water heater wired at
the factory to comply with existing area codes, but local utility codes may
require or allow other circuitry. Consult your local power company to
determine the correct electrical hook-up in order to meet local utility and
building codes and in order to obtain the most economical rates. All electrical
connections to elements, thermostats, contactors, fuses (certain models),
and transformer have been made at the factory. DO NOT alter any of the
internal wiring. Wiring connections may loosen during shipment. Check all
connections for tightness.
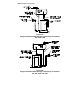
To make the wiring connections to a power supply, follow the steps below.
A) Open the cover door of the control box.
B) Bring the power leads from an adequately fused disconnect switch (not
furnished with the water heater due to varying state and local codes) and
connect to the terminal block. Local ordinances and/or utility company
may require an increase in the gage size of the wiring for conditions
where long wiring lengths exist.
C) This water heater must be properly grounded. A ground lug is
provided within the electrical control box for connection to a properly
sized ground. (See wiring diagram for minimum required ground size. The
wiring diagram is located on the inside door of the control box)
D) Close the cover door of the control box.
Heating Elements
To replace heating elements, disconnect power to the water heater, drain
tank and replace element. To remove a heating element, use a screw type
element wrench (1 1/2” or 2 3/8”) available from most supply houses. Do not
over-tighten the new element, as this will cause distortion in the new element
gasket. Once the element has been replaced, follow the instructions “To Fill
The Water Heater”. It is imperative that the water heater is full before power
is restored to the heating elements.