
Installation / Operation Instruction Manual


5
Clearances
1. Minimum clearance to combustible material is 0 in for the top, sides, front,
and rear of this water heater. However, it is recommended that there is at
least 18 in (45.7 cm) from the top and 24 in (61 cm) from the front.
Clearance for servicing may be reduced down to minimum clearance to
combustible material, but service time and effort may be greatly
increased.
2. Increase distances to provide clearances for servicing.
This water heater MUST be installed indoors out of the wind and
weather.
To comply with NSF requirements this water heater is to be sealed to the
floor with sealant, in a smooth and easily cleanable way.
Note: For California installation this water heater must be braced,
anchored, or strapped to avoid falling or moving during an earthquake.
See instructions for correct installation procedures. Instructions may
be obtained from the DSA Headquarters Office: 1102 Q Street, Suite
5100, Sacramento, CA 95811.
Water Connections
NOTE: BEFORE PROCEEDING WITH THE INSTALLATION, CLOSE THE
MAIN WATER SUPPLY VALVE.
After shutting the main water supply valve, open a faucet to relieve the water
line pressure in order to prevent water from leaking out of the pipes while
making the water connections to the water heater. After the pressure has
been relieved, close the faucet. The cold water inlet line connects to the inlet
nipple at the base of the water heater. The hot water outlet line connects to
the nipple on top of the water heater. The fittings at the cold water inlet and
hot water outlet are dielectric waterway fittings with tapered male threads.
Make the proper
plumbing connections between the water heater and the
plumbing system in the structure. Install a manual shut-off valve in the cold
water supply line.
CAUTION
If sweat fittings are to be used, DO NOT apply heat to the nipples
on top of the water heater. Sweat the tubing to the adapter before
fitting the adapter to the water connections. It is imperative that
heat is not applied to the nipples containing a plastic liner.
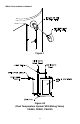
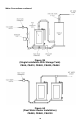
This water heater may be provided with an optional pressure and
temperature gauge. See Figure 1 for proper installation. If this water heater is
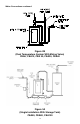
installed in a closed water supply system, such as one having a back-flow
preventer in the cold water supply, provisions must be made to control
thermal expansion. DO NOT operate this water heater in a closed system
without a provision for controlling thermal expansion. Contact your water
supplier or local plumbing inspector regarding how thermal expan
sion can be
controlled.