
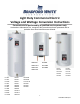
Conversion Kit


Page5of8
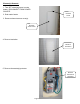
2. Apply new gasket(s) to new element(s) from
conversion kit.
Note: Make sure gasket is seated flat against
element flange without rolls or gaps.
Gasket
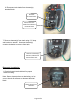
3. Thread new element(s) clockwise into tank. Tighten
element(s) with a 1 ½" deep well socket or wrench. Do
not over tighten. Over-tightening may damage gasket.
Note: Clean any debris from element(s) fitting to tank.
Lubricate element(s) threads as needed with thread
lubricant.
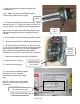
4. Be sure tank is filled with water and check for leaks.
5. Reconnect wire leads to element(s) terminal block.
6. When converting from 208, 240, or 480 volt to 120
or 270 volt it is acceptable to tag the red wire with white
electrical tape to identify wire. It is also acceptable to
tag the white wire with red electrical tape when
converting from 120 or 270 volt to 208, 240, or 480 volt.
7. Replace thermostat(s) protector and insulation.
Element
flange
Thread
element(s)
clockwise
intotank
8. Replace access cover(s).
9. Restore electrical power.
Reconnectwires
leadstoelement(s)
terminalblock
10. Place appropriate label (supplied
with kit) so it covers electrical
information on water heater rating
plate.
Note: Be certain not to cover model
number, serial number and capacity
information.
Coverelectricalinformationonly
withappropriateoverlay
Waterheaterratingplate