
Options & Accessories

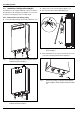


6
Cascading operation
6720811759 (2019/07)
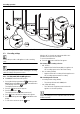
2.2 Installation of Intelligent Cascading Kit
Each appliance comes equipped with two connectors inside for
the installation of the intelligent cascading kit. The connectors
are labeled 'cascading input' and 'cascading output'.
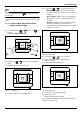
2.2.1 Remove Front cover and ring sealing
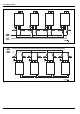
▶ Loosen two Phillips head screws located on bottom of cover
Fig. 5 Loosen two Philips head screws (for models RTG-K-
199N/X2 and RTG-K-160N/X2)
Fig. 6 Loosen two Philips head screws (for models RTG-K-
199N/X1 and RTG-K-160N/X1)
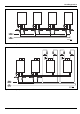
▶ Lift the front cover to remove from the appliance [1].
▶ Disconnect the wire from the HMI (display) [2].
Fig. 7 Open front cover (for models RTG-K-199N/X1 and
RTG-K-160N/X1)
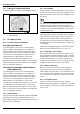
▶ After removing front cover, remove ring sealing’s to access/
connect the cascading cables between appliances.
Fig. 8 Remove ring sealings (for models RTG-K-199N/X1,
RTG-K-160N/X1, RTG-K-199N/X2 and RTG-K-160N/
X2)