SOLAR WATER HEATER WITH ELECTRIC BACKUP A Spanish language version of these instructions is available by contacting the manufacturer listed on the rating plate. La version espanola de estas instruccions se puede obtener al escribirle a la fábrica cuyo nombre aparece in la placa de especificaciones.
CONGRATULATIONS! You have just purchased one of the finest water heaters on the market today! This installation, operation, and instruction manual will explain in detail the installation and maintenance of your new solar water heater. We strongly recommend that you contact a plumbing professional for the installation of this water heater. We require that you carefully read this manual, as well as the enclosed warranty, and refer to it if questions arise.
SECTION I IMPORTANT INFORMATION -READ CAREFULLYThe equipment must be installed in accordance with those installation regulations required in the area where the installation is to be made. These regulations must be carefully followed in all cases. Authorities having jurisdiction shall be consulted before installations are made.
Important Information continued- DANGER DO NOT store or use gasoline or other flammable, combustible, or corrosive vapors and/or liquids in the vicinity of this or any other appliance. IF YOU SMELL GAS: DO NOT try to light any appliance. DO NOT touch any electric switch; do not use any telephone in your building. Immediately call your gas supplier from a telephone in another building. Follow the gas supplier’s instructions.
Important Information continued- WARNING It is the responsibility of the installing contractor to see that all controls are correctly installed and are operating properly when the installation is complete. DO NOT operate the water heater with jumpered or absent controls or safety devices. DO NOT tamper with or alter the water heater and/or controls. DO NOT operate the water heater if any external part or control has been submerged in water.
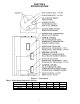
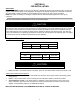
SECTION II SPECIFICATIONS Figure 1 – Tank Layout Table 1: Water Heater Dimension (Inches) MODEL 60-Gal. 75-Gal. 115-Gal.
Specifications continued- Table 2: Single-wall Exchanger Solar Water Heater Capacities MODEL Tank Capacity (Gal) Coil Volume (Gal) 60 75 115 2.5 2.5 2.5 60-Gal. 75-Gal. 115-Gal. Coil Heat Transfer Area (Sq Ft) 14.2 14.2 14.2 Approximate Dry Weight (Lbs) 212 236 340 Approximate Wet Weight (Lbs) 697 832 1248 Table 3: Double-wall Exchanger Solar Water Heater Capacities Tank Capacity (Gal) MODEL 60-Gal. 75-Gal. 115-Gal. Coil Volume (Gal) 2.5 2.5 2.5 60 75 115 Coil Heat Transfer Area (Sq Ft) 14.
SECTION III GENERAL INFORMATION FEATURES This water heater contains the following features: HEAT EXCHANGER – The heat exchanger (coil) is made of porcelain coated carbon steel tubing and female fittings. If a confirmed leak occurs, contact the plumbing professional who installed the water heater or the manufacturer listed on the rating plate, for additional guidance.
General Information continuedTHERMOSTATICALLY ACTIVATED MIXING VALVE – An ASSE approved thermostatic mixing valve is supplied with the water heater. The solar heating system may transfer heat into the water heater above the temperature limits set by the thermostats. This may create the potential for scald injury.
SECTION IV PRE-INSTALLATION UNPACKING INSPECT SHIPMENT carefully for any signs of damage. If damage is noted, do not install the product. Contact the shipper or manufacturer listed on the rating plate. All equipment is carefully manufactured, inspected, and packed. Our responsibility ceases upon delivery of the packaged water heater to the carrier in good condition. NOTE: Any claims for damage or shortage in shipment must be filed immediately against the carrier by the consignee.
Pre-installation continued- NOTICE For California installation this water heater must be braced, anchored, or strapped to avoid falling or moving during an earthquake. See instructions for correct installation procedures. Instructions may be obtained from the DSA Headquarters Office: 1102 Q Street, Suite 5100, Sacramento, CA 95811. SOLAR WATER HEATING WITH ELECTRIC BACKUP FUNDAMENTALS When hot water is taken from the tank, cool water is delivered to the tank bottom by means of a diptube.
SECTION V WATER CONNECTIONS INSTALL TEMPERATURE AND PRESSURE RELIEF VALVE (if not factory installed) WARNING FAILURE TO INSTALL AND MAINTAIN A NEW, LISTED TEMPERATURE AND PRESSURE RELIEF VALVE WILL RELEASE THE MANUFACTURER FROM ANY CLAIM WHICH MIGHT RESULT FROM EXCESSIVE TEMPERATURE AND PRESSURES. Hydrogen gas can be produced in an operating water heater that has not had water drawn from the tank for a long period of time. HYDROGEN GAS IS EXTREMELY FLAMMABLE.
Water Connections continued- INSTRUCTIONS FOR SOLAR CONNECTIONS The solar water heater connection labeled “TO SOLAR COLLECTOR” should be piped to the solar return piping. The use of a union and a shut-off valve is recommended. Pipe and fittings between the solar system and the water heater should be 3/4” diameter or larger. CAUTION Maximum solar collector water supply temperature to the solar heat exchanger must not exceed 250°F (121°C).
Water Connections continued2. For a drainback solar heating system, refer to Figure 4. The solar water heater connection labeled “FROM SOLAR COLLECTOR” should be piped to the solar collector supply piping. Mount the pump making sure the flow arrow points toward the water heater. The use of shut-off valves and unions are recommended for future service convenience. Pipe and fittings between the solar collector and solar water heater must be 3/4” diameter or larger.
Water Connections continued- TWO-TANK SYSTEM INSTALLATION THE TYPICAL TWO-TANK SYSTEM A typical two-tank system is provided in Figure 5. This system holds two separate volumes of water. The cold water supply is delivered to the solar water heater. If solar energy is available, the water in the solar heater is heated. This heated water is delivered into the backup water heater.
Water Connections continued- Figure 6 – Replacing the Solar Water Heater in a Two-tank Installation To replace the previous solar water heater with the new solar water heater with electric backup, remove the previous solar water heater. The external heat exchanger and pump can also be removed. The new solar water heater with electric backup has an internal heat exchanger allowing direct heat transfer to the water.
Water Connections continued- Figure 7 – Replacing the Backup Water Heater in a Two-tank Installation To replace the previous backup water heater with the new solar water heater with electric backup, remove the backup water heater. The new solar water heater with electric backup has an internal heat exchanger allowing direct heat transfer to the water. For installation of the new solar water heater with electric backup, refer to Figure 7 and “INSTRUCTIONS FOR POTABLE CONNECTIONS” earlier in this section.
Water Connections continued- Figure 8 – Piping in a Boiler Application (Winter/Summer) The solar water heater with dual heating element also has the capability to function as an indirect water heater with electric backup as shown in Figure 8. In this application, the boiler water heats the potable water. The boiler water is routinely hot in winter when heating the home.
SECTION VI ELECTRICAL CONNECTIONS Install electric wiring in accordance with the National Electric, ANSI/NFPA 70, and /or the CSA C22.1 Electric Code, latest editions. DANGER Positively assure all electrical connections are unpowered before attempting installation or service of electrical components or connections of the water heater or building. Lock out all electrical boxes with padlock once power is turned off.
Electrical Connections continued- NOTICE A solar control and thermistors are not supplied with this water heater. The Tekmar 156, when installed according to manufacturer’s instructions, is an acceptable controller. Other solar controller manufacturers such as Steca and Resol provide controllers appropriate for use with this water heater. Thermistors are not included with the water heater. Thermistors must be purchased with the solar controller to ensure capability with the selected control.
SECTION VII OPERATING INSTRUCTIONS SYSTEM START-UP Follow the solar collector installation instructions to place the collector in operation. Ensure that solar fluid flow operation is established for the installed system. SEQUENCE OF HEATING OPERATIONS -SOLAR AND ELECTRIC BACKUP 1. The solar controller senses a large enough temperature difference between the lower tank and the solar collector to transfer heat into the tank.
Operating Instructions continued- CAUTION Before adjusting the thermostat, turn off all power supplied to the solar water heater. The minimum potable water temperature can be changed by adjusting the thermostat. Before any work is done on the water heater, disconnect all power to the water heater and heat source (solar collector) by opening the switch(s) at the main electrical circuit breaker or fuse box. Remove the cover and fold the insulation outward away from the control.
SECTION VIII MAINTENANCE This solar water heater is intended to provide a service life of many years. Components that require service, however, may be subject to failure. Failure to use the correct procedures or parts in these circumstances may make the water heater unsafe. The owner should arrange to have the following inspections and simple maintenance procedure performed by qualified service personnel at the frequencies suggested. 1.
Maintenance continued4. Sediment (Annual, but harsh water quality may dictate more frequent service) - Depending on water conditions, a varying amount of sediment may collect in the tank. Levels requiring service are indicated by a small temperature difference in the supply and return lines (See also “Scale” below). Repeated flushing usually clears such material. As a preventive measure, water should be drawn from the tank at the drain valve until it runs clear. 5.
PROBLEM No hot water at faucet SECTION IX TROUBLESHOOTING GUIDE CAUSE SOLUTION ECO on thermostat tripped Improper thermostat setting or calibration Circulator does not pump fluid through solar collector Electrical problem (Control, wiring, etc.) Clogged cold water filter Thermostat set too high Check circuit breaker and reset (if applicable). Check power supply. If solar controller, collectors, circulator, and tank are operating satisfactorily, coil may have scale coating.
SECTION X PARTS LIST 1 2 1 3 10 4 7 5 6 6 7 11 13 12 14 15 16 8 9 17 18 19 20 16 17 8 21 13 11 22 16 PART NAME & DESCRIPTION 1. Hole Closure 2. Hex Head Anode 3. ASSE Approved Mixing Valve 4. Hot Water Outlet/Anode 5. Cold Water Inlet Diptube 6. Electrical Outlet Cover 7. Conduit Grounding Cover 8. Escutcheon 9. T&P Relief Valve 10. 3/4” Plug 11. Element Gasket 12. Thermostat with ECO (89T33) 13. Thermostat/Solar Mounting Bracket 14. Upper Heating Element 15. Thermostat Protector (Large) 16.
Contact your supplier or plumbing professional for replacement parts or contact the company at the address given on the rating plate of the water heater. Provide the part name, model, and serial numbers of the water heater when ordering parts. READ THE WARRANTY FOR A FULL EXPLANATION OF THE LENGTH OF TIME THAT PARTS AND THE WATER HEATER ARE WARRANTED. Manufactured under one or more of the following U.S.
SECTION XI —NOTES— 28