Modelo TDB3108 con control infrarrojo Modelo infantil TDB3108 con control infrarrojo A TDB3108 Enfant avec commande à infrarouge M TDB3108 avec commande à infrarouge CO TDB3108 Juvenile with Infrared Control A TDB3108 with Infrared Control D Installation Installation Instalación PL IA NT TDB3108 ® Terreon 54" Circular Deep Bowl Washfountain with Infrared Control ® Terreon Lavabo fontaine 1372 mm (54") à cuvette profonde circulaire avec commande à infrarouge Fuente de lavado circular con pala
TDB3108, WF3208 Terreon® 54" Circular Installation Table of Contents Pre-Installation Information . . . . . . . . . . . . . . . . . . . . . . . . . . . . . . . . . . . . . . . . . . . . . . . . . . . . . . . .2 Model TDB3108 Dimensions . . . . . . . . . . . . . . . . . . . . . . . . . . . . . . . . . . . . . . . . . . . . . . . . . . . . 3-5 Model WF3208 Dimensions . . . . . . . . . . . . . . . . . . . . . . . . . . . . . . . . . . . . . . . . . . . . . . . . . . . . . . .6 Washfountain Rough-Ins . . . .
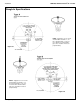
TDB3108, WF3208 Terreon® 54" Circular Installation Model TDB3108 - 54" Circular 54" (1372) 47-1/4" (1200) 43-3/4" (1111) 10" (254) 34" (864) 23-1/2" (597) Model TDB3108 is ADA compliant.
TDB3108, WF3208 Terreon® 54" Circular Installation Circular Washfountain Dimensions (TAS intermediate) Model TDB3108 54" Circular - TAS Height 54" (1372) 44-5/8" (1133) 41-1/8" (1045) 12" (305) 32" (813) 25-1/2" (648) TAS 19-1/2" (495) Figure 1c 35-1/2" (902) Model TDB3108 54" Circular - TAS Height with optional accessories Adjust to towel dispenser mounting holes 6" (152) 61" (1549) WITH SOAP 52-1/2" (1334) WITHOUT SOAP 53-1/4" (1353) 44-5/8" (1143) 41-1/8" (1045) 32" (813) 12" (305) 25-1/
TDB3108, WF3208 Terreon® 54" Circular Installation Circular Washfountain Dimensions (juvenile height) Model TDB3108 54" Circular - Juvenile Height 54" (1372) 42-5/8" (1083) 39-1/8" (994) 10" (254) 30" (762) 23-1/2" (597) A DA PLIA N T •CO M 19-1/2" (495) Figure 1e 35-1/2" (902) Model TDB3108 54" Circular - Juvenile Height with optional accessories Adjust to towel dispenser mounting holes 6" (152) 50-5/8" (1286) WITHOUT SOAP 51-1/4" (1303) 42-5/8" (1033) 39-1/8" (994) 30" (762) 10" (254)
TDB3108, WF3208 Terreon® 54" Circular Installation Circular Washfountain Dimensions 54" (1372) Model WF3208 - 54" Circular 47-1/4" (1200) 43-3/4" (1111) 10" (254) 34" (864) 23-1/2" (597) 19-1/2" (495) Figure 1g Model WF3208 is not ADA compliant.
Installation TDB3108, WF3208 Terreon® 54" Circular Rough-In Specifications Figure 2a NOTE: Supply lines for one to two washfountains should be 1"; for three washfountains, 1-1/4". For more than three washfountains, pipe sizes should be increased proportionately. NOTE: Supply lines for one to two washfountains should be 1"; for three washfountains, 1-1/4". For more than three washfountains, pipe sizes should be increased proportionately. Figure 2b Bradley Corporation • 215-1187 Rev.
TDB3108, WF3208 Terreon® 54" Circular Installation Rough-In Specifications continued . . . NOTE: Supply lines for one to two washfountains should be 1"; for three washfountains, 1-1/4". For more than three washfountains, pipe sizes should be increased proportionately. Figure 2c NOTE: Supply lines for one to two washfountains should be 1"; for three washfountains, 1-1/4". For more than three washfountains, pipe sizes should be increased proportionately.
TDB3108, WF3208 Terreon® 54" Circular Installation 1 Installing the drain NOTE: A ROUGH IN SUPPLY AND DRAIN PIPING AS REQUIRED FOR YOUR INSTALLATION (SEE PAGES 7-8 FOR ROUGH-INS OF OPTIONAL INSTALLATIONS) B ASSEMBLE THE DRAIN TO THE DIMENSION SHOWN IN FIGURE 3 FOR THE BOWL YOU ARE INSTALLING. All piping shown in dotted lines to be supplied by installer.
TDB3108, WF3208 Terreon® 54" Circular 2 A Installation Bowl/pedestal mounting and assembly POSITION THE PEDESTAL AT DESIRED LOCATION AND MARK THE POSITION OF THE (4) MOUNTING LOCATIONS (SEE FIGURE 4A). TAS OPTION: PLACE TAS SPACER ON FLOOR OVER THE MOUNTING HOLES. PLACE PEDESTAL ON TOP OF THE SPACER. B SECURE PEDESTAL TO FLOOR WITH SUITABLE FASTENERS, 1/2" ANCHORS AND BOLTS (SUPPLIED BY INSTALLER). DO NOT OVERTIGHTEN.
TDB3108, WF3208 Terreon® 54" Circular Installation 3 Installing drain spud in bowl NOTE! A LOOSELY ATTACH THE DRAIN SPUD TO THE BOWL WITH THE LOCKNUT AND WASHER AS SHOWN IN FIGURE 5. B TRAP OPTION: ATTACH B TRAP TO DRAIN SPUD. TIE PIPE OPTION: ATTACH TIE PIPE BRACKET TO DRAIN SPUD. B C D Seal between drain spud and drain hole with plumber’s putty (supplied by installer). TIGHTEN THE SPUD AND LOCK NUT AGAINST THE BOWL. SECURE THE STRAINER TO DRAIN SPUD WITH THE SCREWS PROVIDED.
TDB3108, WF3208 Terreon® 54" Circular 4a Installation Adaptive infrared assembly for A drain and O drain units without Tie Pipe option A INSTALL HEMMED END (NOT SHARP END) OF SUPPORT TUBE WITH GASKET ONTO BOWL (SEE FIGURE 6). B CONNECT 1/2" SUPPLY TUBING TO SPRAYHEAD WITH 3/8" NPT TO 1/2" TUBE CONNECTOR AND PLACE SPRAYHEAD ONTO SUPPORT TUBE. RUN THE TUBING DOWN THROUGH THE SUPPORT TUBE AND CONNECT TO VALVE TUBE CONNECTOR.
TDB3108, WF3208 Terreon® 54" Circular Installation Installation Instructions continued . . . D PLACE THE INFRARED MODULE ASSEMBLY ON TOP OF SPRAYHEAD. ROTATE UNTIL INFRARED MODULE LOCKS IN WITH TIE BAR. DROP TWO INFRARED MODULE WIRES DOWN TO VALVE ASSEMBLY. NOTE! • E F Skip to step E for units without soap. FOR UNITS WITH SOAP OPTION, INSTALL THE SPACER, SOAP DISPENSER AND COVER USING THE THIRD TIE ROD (8-5/8" LONG) AND SECOND COUPLING NUT AS SHOWN (SEE FIGURE 7).
TDB3108, WF3208 Terreon® 54" Circular 4b Installation Adaptive infrared assembly for B drain and H drain units with Tie Pipe option A INSTALL HEMMED END (NOT SHARP END) OF SUPPORT TUBE WITH GASKET ONTO BOWL (SEE FIGURE 8). B CONNECT 1/2" SUPPLY TUBING TO SPRAYHEAD WITH 3/8" NPT TO 1/2" TUBE CONNECTOR AND PLACE SPRAYHEAD ONTO SUPPORT TUBE. RUN THE TUBING DOWN THROUGH THE SUPPORT TUBE AND CONNECT TO VALVE TUBE CONNECTOR.
TDB3108, WF3208 Terreon® 54" Circular Installation Installation Instructions continued . . . D PLACE THE INFRARED MODULE ASSEMBLY ON TOP OF SPRAYHEAD. ROTATE UNTIL INFRARED MODULE LOCKS IN WITH TIE BAR. DROP TWO INFRARED MODULE WIRES DOWN TO VALVE ASSEMBLY. NOTE! • Skip to step E for units without soap. FOR UNITS WITH SOAP OPTION, SLIDE THE SPACER AND SOAP DISPENSER OVER THE 1-1/2" PIPE.
TDB3108, WF3208 Terreon® 54" Circular 5 Installation Valve and tubing connections NOTE: Flush supply lines before making connections. Do not apply pipe sealant to compression fittings. A • CONNECT 1/2" DIA. TUBING TO TEE AND SOLENOID ASSEMBLY, TWO PLACES. THE MALE CONNECTOR (FIGURE 10B) FOR THE VALVE ASSEMBLY WILL REMAIN TIGHT AND LEAKPROOF WHEN TUBING IS CUT AND INSTALLED PROPERLY. FOLLOW THE PROCEDURES BELOW WHEN INSTALLING TUBING TO ENSURE THAT YOU ACHIEVE A LEAKPROOF SEAL.
TDB3108, WF3208 Terreon® 54" Circular Installation Installation Instructions continued . . . VALVE AND TUBING CONNECTIONS - ADAPTIVE INFRARED OPTION NOTE: FLUSH SUPPLY LINES BEFORE MAKING CONNECTIONS. 1/2" TUBE FROM SPRAYHEAD PEDESTAL VALVE BRACKET VOLUME CONTROL CHECK/STOP VALVE FILTER WASHER COLD SUPPLY HOT SUPPLY Figure 11 Bradley Corporation • 215-1187 Rev.
TDB3108, WF3208 Terreon® 54" Circular 6 Installation Electrical connections for Adaptive Infrared START-UP NOTE: Do not use for two minutes after making power connection. The sensors will take up to eight minutes (without being used) to adapt to the bowl if another object is detected during the two-minute start-up period. A B C D E CONNECT THE THREE WIRES FROM THE INFRARED MODULE ASSEMBLY TO THE VALVE ASSEMBLY. ATTACH TWO OF THE FEMALE CONNECT WIRES TO THE SOLENOIDS AS SHOWN IN FIGURE 12.
TDB3108, WF3208 Terreon® 54" Circular Installation Vernatherm Ajustment Instructions NOTE: The Vernatherm TMA valve is NOT factory preset. Upon installation, the temperature of this valve must be checked and adjusted to ensure delivery of a safe water temperature. Water in excess of 110°F (43°C) may cause scalding. F CHECK THE TEMPERATURE AND ADJUST IF NECESSARY (THE RANGE OF THE VALVE IS 95°F–115°F (35°C–43°C).
TDB3108, WF3208 Terreon® 54" Circular Installation Cleaning/Maintenance Instructions for Terreon® Material Description: Terreon® is a NAHB Certified densified solid surface material composed of polyester resin and is resistant to chemicals, stains, burns and impact. Surface damage can be easily repaired with everyday cleansers or fine grit abrasives. Routine Cleaning: Clean daily or as often as conditions require using a standard commercial or household cleaner such as Formula 409® or Windex®.
Installation TDB3108, WF3208 Terreon® 54" Circular Cleaning and Maintenance Instructions for Stainless Steel Material Description: Stainless steel is extremely durable, and maintenance is simple and inexpensive. Proper care, particularly under corrosive conditions, is essential. Always start with the simplest solution and work your way toward the more complicated. Routine Cleaning: Daily or as often as needed use a solution of warm water and soap, detergent, or ammonia.
TDB3108, WF3208 Terreon® 54" Circular Installation Soap Valve — Liquid — S09-007S Parts List 3 Attaching Parts S09-007S Item 1 2 3 4 5 * * * Part No. Description 118-025 110-007 135-001L 125-001BU 119-028 161-014 124-001D 142-002AH Valve Body Packing Nut Spring Washer Plunger Nut Washer Washer - Stainless Steel 1 Qty 4 1 1 1 1 1 1 2 1 5 2 * Not Illustrated This valve delivers a measured amount of soap with each upward stroke.
TDB3108, WF3208 Terreon® 54" Circular Installation Soap Valve — Powdered — S09-010A Parts List Item Part No. Qty Description 1 160-069 1 Screw, 1/4-20 RD 2 142-002X 1 Washer, 1/4 Split-Lock 3 S62-002 1 Agitator / Slide Assy. 4 192-004 1 Lever - Powdered Soap 1 2 3 NOTE: Reducer plugs are available for use with fine granulated soap to reduce the flow.
TDB3108, WF3208 Terreon® 54" Circular Installation Soap Maintenance Tips SOAP RECOMMENDATIONS Quality soap dispensers require good quality soap and periodic maintenance to properly operate. Bradley soap dispensers will provide dependable, consistent operation over the long term when soap with reasonable viscosity and pH levels are used and when a minimal amount of periodic maintenance is performed on the valves. Soap thickness is determined by a measurement called viscosity.
TDB3108, WF3208 Terreon® 54" Circular Installation Sprayheads — Standard w/Neoprene Spray Ring Grommet NOTE: Repair kit does not include sprayhead grommet. Order as a separate item. 1 2 4 5 3 9 7 10 6 8 Parts List Sprayhead Assembly S05-054B Item 1 2 3 4 5 6 7 8 9 10 Part No.
TDB3108, WF3208 Terreon® 54" Circular Installation Mixing Valve — Manual — S01-038 4 5 3 6 2 1-1/16 - 14 NPT 7 1 1/2 - 14 NPT Manual Mixing Valve Parts List Valve Assembly S01-038 Item 1 1 2 3 4 5 6 6 7 7 * * * * * * 26 Part No.
TDB3108, WF3208 Terreon® 54" Circular Installation Volume Control Valve Repair Parts — S02-045 Volume Control Valve Parts List Brass Valve S02-045 Item 1 2 3 3 4 5 6 6 Part No. 125-001BC 152-038 121-016 121-016A 124-001BD 119-060 118-033 118-033B Description O-Ring Roll Pin Bonnet Bonnet Fiber Washer Valve Core Valve Body Valve Body Bradley Corporation • 215-1187 Rev.
TDB3108, WF3208 Terreon® 54" Circular Installation Thermostatic Mixing Valve Troubleshooting NOTE: Before attempting to troubleshoot the valve or disassemble the components, check for the following conditions: • If stop/check valves are used, make sure that they are fully open. • Make sure that the hot and cold inlet pipes are connected properly, and that there are no crossconnections or leaking stop/check valves.
TDB3108, WF3208 Terreon® 54" Circular Installation Vernatherm Thermostatic Mixing Valve (S01-525) Parts List — Repair Kit S65-259 Parts List Item Part No. S65-259 Qty Valve Repair Kit 10 Nut 3/8-24 Hex Jam Description 5 S39-413 1 Thermostat 7 125-001BX 1 O-Ring 8 125-157 1 O-Ring 9 Cap 8 O-Ring 7 O-Ring 6 Stem 5 Thermostat 4 Piston 3 Spring 2 Seal Cup 1 Valve Body Figure 14 Bradley Corporation • 215-1187 Rev.
TDB3108, WF3208 Terreon® 1372 mm (54") Circulaire Installation Sommaire Informations sur la pré-installation . . . . . . . . . . . . . . . . . . . . . . . . . . . . . . . . . . . . . . . . . . . . . . . . .30 Modèle TDB3108 Dimensions . . . . . . . . . . . . . . . . . . . . . . . . . . . . . . . . . . . . . . . . . . . . . . . . . 31-33 Modèle WF3208 Dimensions . . . . . . . . . . . . . . . . . . . . . . . . . . . . . . . . . . . . . . . . . . . . . . . . . . . . . .
TDB3108, WF3208 Terreon® 1372 mm (54") Circulaire Installation Modèle TDB3108 - 1372 mm (54") Circulaire 1372 mm 54" (54") (1372) 1200 mm 47-1/4" (47-1/4") (1200) 1111 mm 43-3/4" (43-3/4") (1111) Le modèle TDB3108 est conforme ADA.
TDB3108, WF3208 Terreon® 1372 mm (54") Circulaire Installation Dimensions du lavabo fontaine circulaire (TAS intermédiaire) Modèle TDB3108 1372 mm (54") Circulaire - Hauteur TAS 1372 mm 54" (54") (1372) 1133 mm 44-5/8" (44-5/8") (1133) 41-1/8" 1045 mm (41-1/8") (1045) 305 mm 12" (12") (305) 32" 813 mm (813) (32") 25-1/2" 648 mm (25-1/2") (648) TAS 495 mm 19-1/2" (19-1/2") (495) Figure 1c 902 mm 35-1/2" (35-1/2") (902) Modèle TDB3108 1372 mm (54") Circulaire - Hauteur TAS avec accessoires en opti
TDB3108, WF3208 Terreon® 1372 mm (54") Circulaire Installation Dimensions du lavabo fontaine circulaire (hauteur enfant) Modèle TDB3108 1372 mm (54") Circulaire - Hauteur enfant 1372 54"mm (54") (1372) 1083 mm 42-5/8" (42-5/8") (1083) 994 mm 39-1/8" (39-1/8") (994) 76230" mm (30") (762) 254 mm 10" (10") (254) 23-1/2" 597 mm (23-1/2") (597) A DA PLIA N T •CO M 495 mm 19-1/2" (19-1/2") (495) Figure 1e 902 mm 35-1/2" (35-1/2") (902) Modèle TDB3108 1372 mm (54") Circulaire Hauteur enfant avec acces
TDB3108, WF3208 Terreon® 1372 mm (54") Circulaire Installation Dimensions du lavabo fontaine circulaire Modèle WF3208 1372 mm (54") Circulaire 54" 1372 mm (1372) (54") 1200 mm 47-1/4" (47-1/4") (1200) 1111 mm 43-3/4" (43-3/4") (1111) 86434" mm (34") (864) 10" 254 mm (10") (254) 23-1/2" 597 mm (23-1/2") (597) 19-1/2" 495 mm (19-1/2") (495) Figure 1g Le modèle WF3208 n’est pas conforme ADA 37-1/2" 953 mm (37-1/2") (953) Modèle TDB3208 - 1372 mm (54") Circulaire avec accessoires en option RÉGLAGE DES
TDB3108, WF3208 Terreon® 1372 mm (54") Circulaire Installation Spécifications de mise en place des tuyauteries Type A Aération hors canalisation avec alimentations de dessous.
TDB3108, WF3208 Terreon® 1372 mm (54") Circulaire Installation Spécifications de mise en place des tuyauteries suite . . . Type H Aération montante centralement avec alimentations de dessous.
TDB3108, WF3208 Terreon® 1372 mm (54") Circulaire Installation 1 Installation du drain REMARQUE : A METTRE EN PLACE CANALISATIONS D’ALIMENTATION ET DE DRAIN TEL QUE REQUIS POUR L’INSTALLATION (VOIR PAGES 35-36 POUR MISES EN PLACE DES TUYAUTERIES DES INSTALLATIONS EN OPTION). B ASSEMBLER LE DRAIN À LA DIMENSION INDIQUÉE À LA FIGURE 3 POUR LA CUVETTE À INSTALLER. Toutes les canalisations indiquées en lignes discontinues doivent être fournies par l’installateur.
TDB3108, WF3208 Terreon® 1372 mm (54") Circulaire 2 Installation Montage de l’ensemble cuvette et socle A POSITIONNER LE SOCLE À L’EMPLACEMENT SOUHAITÉ ET MARQUER LA POSITION DES (4) EMPLACEMENTS DE MONTAGE (VOIR FIGURE 4A). OPTION TAS : PLACER L’ENTRETOISE TAS SUR LE SOL SUR LES TROUS DE FIXATION. PLACER LE SOCLE SUR L’ENTRETOISE. B FIXER LE SOCLE AU SOL À L’AIDE DE FIXATIONS ADÉQUATES, DE DISPOSITIFS D’ANCRAGE DE 1/2" ET DE BOULONS (FOURNIS PAR L’INSTALLATEUR). NE PAS SERRER EXCESSIVEMENT.
TDB3108, WF3208 Terreon® 1372 mm (54") Circulaire Installation 3 A Installation de l’ergot de drain dans la cuvette REMARQUE ! ATTACHER SANS SERRER L’ERGOT DE DRAIN À LA CUVETTE À L’AIDE DU CONTRE-ÉCROU ET DE LA RONDELLE COMME L’INDIQUE LA FIGURE 5. OPTION SIPHON B : ATTACHER LE SIPHON B À L’ERGOT DE DRAIN. OPTION CANALISATION DE LIAISON : B C D Appliquer du mastic (fourni par l’installateur) entre l’ergot de drain et l’orifice de drain.
TDB3108, WF3208 Terreon® 1372 mm (54") Circulaire 4a Installation Ensemble à infrarouge Adaptive pour unités à drain A ou à drain O sans option de canalisation de liaison A INSTALLER L’EXTRÉMITÉ OURLÉE (NON TRANCHANTE) DU TUBE-SUPPORT AVEC LE JOINT DANS LA CUVETTE (VOIR FIGURE 6). B CONNECTER LA TUBULURE D’ALIMENTATION DE 1/2" AU BEC DIFFUSEUR AVEC UN CONNECTEUR DE 3/8" NPT AU TUBE DE 1/2" ET PLACER LE BEC DIFFUSEUR SUR LE TUBE-SUPPORT.
TDB3108, WF3208 Terreon® 1372 mm (54") Circulaire Installation Instructions relatives à l’installation suite . . . D PLACER L’ENSEMBLE DU MODULE À INFRAROUGE SUR LE BEC DIFFUSEUR. FAIRE TOURNER JUSQU’À CE QUE LE MODULE À INFRAROUGE SE BLOQUE AVEC LE FER DE LIAISON. FAIRE GLISSER DEUX FILS DU MODULE À INFRAROUGE DANS L’ENSEMBLE DU ROBINET. REMARQUE ! • E F Passer à l’étape E pour les unités sans savon.
TDB3108, WF3208 Terreon® 1372 mm (54") Circulaire 4b Installation Ensemble à infrarouge Adaptive pour unités à drain B ou à drain H avec option de canalisation de liaison A INSTALLER L’EXTRÉMITÉ OURLÉE (NON TRANCHANTE) DU TUBE-SUPPORT AVEC LE JOINT DANS LA CUVETTE (VOIR FIGURE 8). B CONNECTER LA TUBULURE D’ALIMENTATION DE 1/2" AU BEC DIFFUSEUR AVEC UN CONNECTEUR DE 3/8" NPT AU TUBE DE 1/2" ET PLACER LE BEC DIFFUSEUR SUR LE TUBE-SUPPORT.
TDB3108, WF3208 Terreon® 1372 mm (54") Circulaire Installation Instructions relatives à l’installation suite . . . D PLACER L’ENSEMBLE DU MODULE À INFRAROUGE SUR LE BEC DIFFUSEUR. FAIRE TOURNER JUSQU’À CE QUE LE MODULE À INFRAROUGE SE BLOQUE AVEC LE FER DE LIAISON. FAIRE GLISSER DEUX FILS DU MODULE À INFRAROUGE DANS L’ENSEMBLE DU ROBINET. REMARQUE ! Passer à l’étape E pour les unités sans savon.
TDB3108, WF3208 Terreon® 1372 mm (54") Circulaire 5 Installation Connexions de robinets et de tubulures REMARQUE : Vidanger les conduites d’alimentation avant d’effectuer les connexions. Ne pas appliquer de produit d’étanchéité sur les raccords de compression. A CONNECTER LA TUBULURE DE 1/2" DE DIAMÈTRE À L’ENSEMBLE TÉ ET SOLÉNOÏDE, À DEUX ENDROITS. LE CONNECTEUR MÂLE (FIGURE 10B) POUR L’ENSEMBLE DE BOUTON-POUSSOIR RESTERA SERRÉ ET ÉTANCHE LORSQUE LA TUBULURE EST COUPÉE ET INSTALLÉE CORRECTEMENT.
TDB3108, WF3208 Terreon® 1372 mm (54") Circulaire Installation Instructions relatives à l’installation suite . . . CONNEXIONS DES ROBINETS ET DES TUBULURES - OPTION INFRAROUGE ADAPTIVE REMARQUE : RINCER CONDUITES D’ALIMENTATION AVANT D’EFFECTUER TOUTE CONNEXION.
TDB3108, WF3208 Terreon® 1372 mm (54") Circulaire 6 Installation Connexions électriques pour infrarouge Adaptive REMARQUE CONCERNANT LA MISE EN MARCHE : Ne pas utiliser pendant deux minutes après avoir effectué les connexions électriques. Il faudra huit minutes maximum pour que les détecteurs (sans être utilisés) s’adaptent à la cuvette si un autre objet est détecté durant la période de mise en marche de deux minutes.
TDB3108, WF3208 Terreon® 1372 mm (54") Circulaire Installation Instructions de réglage Vernatherm REMARQUE : Le robinet Vernatherm TMA N’est PAS pré-réglé en usine. Lors de l’installation, la température de ce robinet doit être vérifiée et ajustée pour assurer une température d’eau sans danger. Une température d’eau supérieure à 43 °C (110 °F) risque de provoquer un échaudage. F VÉRIFIER LA TEMPÉRATURE ET AJUSTER LE CAS ÉCHÉANT (LA PLAGE DU ROBINET VA DE 35 °C À 43 °C (95 °F À 115 °F).
TDB3108, WF3208 Terreon® 1372 mm (54") Circulaire Installation Instructions de nettoyage/d’entretien pour Terreon® Description du matériau : Terreon® est un matériau de surface massif densifié certifié NAHB composé de résine de polyester et résistant aux produits chimiques, aux taches, aux brûlures et à l’impact. Les dommages de surface peuvent être facilement réparés à l’aide de produits nettoyants ordinaires ou d’abrasifs à grains fins.
Installation TDB3108, WF3208 Terreon® 1372 mm (54") Circulaire Instructions concernant le nettoyage et l’entretien de l’acier inoxydable Description du matériau : L’acier inoxydable est extrêmement durable, et son entretien est simple et peu onéreux. Il est essentiel de l’entretenir correctement, particulièrement dans des conditions corrosives. Toujours commencer par la solution la plus simple et continuer par une solution plus compliquée.
TDB3108, WF3208 Terreon® 1372 mm (54") Circulaire Installation Bouton-poussoir de savon — liquide — S09-007S Nomenclature 3 Pièces de fixation S09-007S Repère 1 Référence 118-025 Désignation Corps de bouton-poussoir 2 110-007 Écrou de presse-garniture 1 3 135-001L Ressort 1 4 125-001BU Rondelle 1 5 119-028 Piston 1 * 161-014 Écrou 1 * 124-001D Rondelle 2 * 142-002A Rondelle - Acier inoxydable 1 1 Qté 1 4 5 2 * Non illustré Ce bouton-poussoir distribue une quantité dos
TDB3108, WF3208 Terreon® 1372 mm (54") Circulaire Installation Bouton-poussoir de savon — en poudre — S09-010A Nomenclature Repère Référence Qté Désignation 1 160-069 1 Vis, 1/4-20 RD 2 142-002X 1 Rondelle, 1/4 Split-Lock 3 S62-002 1 Ensemble agitateur/coulisse 4 192-004 1 Levier - Savon en poudre 1 2 3 REMARQUE : Des bouchons réducteurs sont disponibles pour utiliser avec du savon granulé fin pour diminuer le débit.
TDB3108, WF3208 Terreon® 1372 mm (54") Circulaire Installation Conseils d’entretien pour le savon RECOMMANDATIONS DE SAVON Les distributeurs de savon de qualité nécessitent du savon de bonne qualité et un entretien périodique pour fonctionner correctement.
TDB3108, WF3208 Terreon® 1372 mm (54") Circulaire Installation Becs diffuseurs — Standard avec anneau de pulvérisation en néoprène REMARQUE : Le kit de réparation n’inclut pas l’anneau du bec. Commander en article séparé.
TDB3108, WF3208 Terreon® 1372 mm (54") Circulaire Installation Robinet mélangeur — Manuel — S01-038 4 5 3 6 2 1-1/6 – 14- NPT 1-1/16 14 NPT 7 1 1/2-–14 14 NPT 1/2 NPT Nomenclature du robinet mélangeur manuel Ensemble de boutonpoussoir S01-038 Repère Référence Désignation 1 118-034 Corps de robinet mélangeur - Laiton * 54 Ensemble de boutonpoussoir S01-038S Ensemble de boutonpoussoir S01-038A Ensemble Kit de de boutonréparation poussoir S45-197 S01-038AS Qté 1 1 — — — 1 118-034A Corps de
TDB3108, WF3208 Terreon® 1372 mm (54") Circulaire Installation Pièces de réparation de soupape régulatrice de débit — S02-045 2 3 1 4 5 1/2 – 14 NPT femelle 6 1/2 – 14 NPT mâle Nomenclature de soupape régulatrice de débit Soupape en laiton S02-045 Repère 1 Soupape en chrome S02-045A Kit de réparation S45-198 Qté Référence 125-001BC Désignation Joint torique 1 1 1 2 152-038 Goupille cylindrique 1 1 1 3 121-016 Chapeau 1 — 1 3 121-016A Chapeau — 1 — 4 124-001BD Rondelle en
TDB3108, WF3208 Terreon® 1372 mm (54") Circulaire Installation Dépannage du robinet mélangeur thermostatique REMARQUE : Avant d’essayer de dépanner le robinet ou de démonter les composants, vérifier les conditions suivantes : • Si la robinetterie arrêt/non-retour est utilisée, s’assurer qu’elle soit complètement ouverte. • S’assurer que les canalisations d’arrivée chaude et froide sont correctement raccordées et qu’il n’existe ni de raccordements croisés ni de fuite de robinetterie arrêt/non-retour.
TDB3108, WF3208 Terreon® 1372 mm (54") Circulaire Installation Robinet mélangeur thermostatique Vernatherm (S01-525) Nomenclature — Kit de réparation S65-259 Nomenclature S65-259 Kit de réparation de robinet Repère Référence Qté Contre-écrou 10 Nut 3/8-243/8-24 Hex hexagonal Jam Désignation 5 S39-413 1 Thermostat 7 125-001BX 1 Joint torique 8 125-157 1 Joint torique 9 Capuchon Cap Joint torique 8 O-Ring 7 Joint torique O-Ring Tige 6 Stem Thermostat 5 Thermostat Piston 4 Piston R
TDB3108, WF3208 Terreon® circular de 1372 mm (54") Instalación Índice Información previa a la instalación . . . . . . . . . . . . . . . . . . . . . . . . . . . . . . . . . . . . . . . . . . . . . . . . .58 Dimensiones del modelo TDB3108 . . . . . . . . . . . . . . . . . . . . . . . . . . . . . . . . . . . . . . . . . . . . . . 59-61 Dimensiones del modelo WF3208 . . . . . . . . . . . . . . . . . . . . . . . . . . . . . . . . . . . . . . . . . . . . . . . . . .
TDB3108, WF3208 Terreon® circular de 1372 mm (54") Instalación Modelo TDB3108 - Circular de 1372 mm (54") 1372 mm 54" (54") (1372) 1200 mm 47-1/4" (47-1/4") (1200) 1111 mm 43-3/4" (43-3/4") (1111) El modelo TDB3108 cumple las normas de ADA.
TDB3108, WF3208 Terreon® circular de 1372 mm (54") Instalación Dimensiones de fuente de lavado circular (Intermedia según TAS) Modelo TDB3108 Circular de 1372 mm (54") Altura según TAS 1372 mm 54" (54") (1372) 1133 mm 44-5/8" (44-5/8") (1133) 41-1/8" 1045 mm (41-1/8") (1045) 305 mm 12" (12") (305) 32" 813 mm (813) (32") 25-1/2" 648 mm (25-1/2") (648) TAS 495 mm 19-1/2" (19-1/2") (495) Figura 1c 902 mm 35-1/2" (35-1/2") (902) Modelo TDB3108 AJUSTE PARAAdjust LOS ORIFICIOS MONTAJE to towelDE dispe
TDB3108, WF3208 Terreon® circular de 1372 mm (54") Instalación Dimensiones de la fuente de lavado circular (altura para niños) Modelo TDB3108 Circular de 1372 mm (54") Altura para niños 1372 54"mm (54") (1372) 1083 mm 42-5/8" (42-5/8") (1083) 994 mm 39-1/8" (39-1/8") (994) 76230" mm (30") (762) 254 mm 10" (10") (254) 23-1/2" 597 mm (23-1/2") (597) A DA PLIA N T •CO M 495 mm 19-1/2" (19-1/2") (495) Figura 1e 902 mm 35-1/2" (35-1/2") (902) Modelo TDB3108 Circular de 1372 mm (54") Altura para niñ
TDB3108, WF3208 Terreon® circular de 1372 mm (54") Instalación Dimensiones de la fuente de lavado circular Modelo WF3208 - Circular de 1372 mm (54") 54" 1372 mm (1372) (54") 1200 mm 47-1/4" (47-1/4") (1200) 1111 mm 43-3/4" (43-3/4") (1111) 86434" mm (34") (864) 10" 254 mm (10") (254) 23-1/2" 597 mm (23-1/2") (597) 19-1/2" 495 mm (19-1/2") (495) Figura 1g El modelo WF3208 no cumple con las normas de ADA.
TDB3108, WF3208 Terreon® circular de 1372 mm (54") Instalación Especificaciones técnicas para instalación de tuberías empotradas Tipo A Ventilación fuera de línea con suministros desde abajo SUMINISTROS DE 1" NPT A TRAVÉS DEL PISO: TOPE DE HASTA 64 mm (2-1/2") SOBRE EL PISO 194 mm 194 mm (7-5/8") (7-5/8") CALIENTE 102 mm (4") 102 mm (4") UBICACIÓN DEL TOMACORRIENTE ELÉCTRICO QUE SE RECOMIENDA FRÍO 64 mm (2-1/2") NOTA: Las tuberías de suministro para una o dos fuentes de lavado deben ser de 1"; para
TDB3108, WF3208 Terreon® circular de 1372 mm (54") Instalación Especificaciones técnicas para la instalación de tuberías empotradas continuación . . .
TDB3108, WF3208 Terreon® circular de 1372 mm (54") Instalación 1 Instalación de desagüe NOTA: A TUBERÍAS DE SUMINISTRO Y DESAGÜE EMPOTRADAS NECESARIAS PARA LA INSTALACIÓN (CONSULTE LAS PÁGINAS 63 Y 64 PARA VER LAS ESPECIFICACIONES DE INSTALACIÓN OPCIONALES DE TUBERÍAS EMPOTRADAS). B ENSAMBLE EL DESAGÜE PARA LA DIMENSIÓN QUE SE MUESTRA EN LA FIGURA 3 DE LA PALANGANA QUE ESTÉ INSTALANDO.
TDB3108, WF3208 Terreon® circular de 1372 mm (54") 2 A Instalación Montaje y ensamblaje de palangana/pedestal COLOQUE EL PEDESTAL EN EL LUGAR QUE DESEE Y MARQUE LA POSICIÓN DE LAS (4) UBICACIONES DE MONTAJE (CONSULTE LA FIGURA 4A). OPCIÓN SEGÚN TAS: UBIQUE EL ESPACIADOR TAS EN EL PISO SOBRE LOS ORIFICIOS DE MONTAJE. PONGA EL PEDESTAL EN LA PARTE SUPERIOR DEL ESPACIADOR.
TDB3108, WF3208 Terreon® circular de 1372 mm (54") Instalación 3 Instalación del embudo de desagüe en la palangana ¡NOTA! A CONECTE LEVEMENTE EL EMBUDO DE DESAGÜE A LA PALANGANA CON LA CONTRATUERCA Y LA ARANDELA COMO SE MUESTRA EN LA FIGURA 5. OPCIÓN DE SIFÓN B: OPCIÓN DE TUBO DE CONEXIÓN: B C D CONECTE EL SIFÓN B AL EMBUDO DE DESAGÜE. Selle entre el embudo y el orificio de desagüe con masilla para tuberías (proporcionada por el instalador).
TDB3108, WF3208 Terreon® circular de 1372 mm (54") 4a Instalación Conjunto del dispositivo infrarrojo Adaptive para unidades de desagüe tipo A y tipo O sin opciones de tubos de conexión A INSTALE EN LA PALANGANA, EL EXTREMO GUARNECIDO (NO EL EXTREMO AFILADO) DEL TUBO DE SOPORTE CON LA EMPAQUETADURA (CONSULTE LA FIGURA 6). B CONECTE LA TUBERÍA DE SUMINISTRO DE 1/2" A LA BOQUILLA ROCIADORA CON UN CONECTOR DE TUBOS DE 3/8" NPT A 1/2" Y COLOQUE LA BOQUILLA ROCIADORA EN EL TUBO DE SOPORTE.
TDB3108, WF3208 Terreon® circular de 1372 mm (54") Instalación Instrucciones de instalación continuación . . . D PONGA EL CONJUNTO DEL MÓDULO INFRARROJO EN LA PARTE SUPERIOR DE LA BOQUILLA ROCIADORA. GIRE HASTA QUE EL MÓDULO INFRARROJO SE FIJE EN LA BARRA DE CONEXIÓN. BAJE LOS DOS CABLES DEL MÓDULO INFRARROJO HACIA EL CONJUNTO DE LA VÁLVULA. ¡NOTA! • E F Vaya hasta el paso E para las unidades sin jabón.
TDB3108, WF3208 Terreon® circular de 1372 mm (54") 4b Instalación Conjunto de dispositivo infrarrojo Adaptive para unidades de desagüe tipo B y tipo H con opciones de tubos de conexión A INSTALE EN LA PALANGANA, EL EXTREMO GUARNECIDO (NO EL EXTREMO AFILADO) DEL TUBO DE SOPORTE CON LA EMPAQUETADURA (CONSULTE LA FIGURA 8). B CONECTE LA TUBERÍA DE SUMINISTRO DE 1/2" A LA BOQUILLA ROCIADORA CON UN CONECTOR DE TUBOS DE 3/8" NPT A 1/2" Y COLOQUE LA BOQUILLA ROCIADORA EN EL TUBO DE SOPORTE.
TDB3108, WF3208 Terreon® circular de 1372 mm (54") Instalación Instrucciones de instalación continuación . . . D PONGA EL CONJUNTO DEL MÓDULO INFRARROJO EN LA PARTE SUPERIOR DE LA BOQUILLA ROCIADORA. GIRE HASTA QUE EL MÓDULO INFRARROJO SE FIJE EN LA BARRA DE CONEXIÓN. BAJE LOS DOS CABLES DEL MÓDULO INFRARROJO HACIA EL CONJUNTO DE LA VÁLVULA. ¡NOTA! • E F Vaya hasta el paso E para las unidades sin jabón.
TDB3108, WF3208 Terreon® circular de 1372 mm (54") 5 Instalación Conexiones de válvulas y tuberías NOTA: Lave las tuberías de suministro antes de realizar las conexiones. No aplique sellante de tuberías en los accesorios de compresión. A CONECTE LA TUBERÍA DE 1/2" DE DIÁ. CON EL CONJUNTO EN T Y SOLENOIDE EN DOS LUGARES. EL CONECTOR MACHO (FIGURA 10B) DEL CONJUNTO DE VÁLVULA PERMANECERÁ APRETADO Y HERMÉTICO CUANDO SE CORTE E INSTALE CORRECTAMENTE LA TUBERÍA.
TDB3108, WF3208 Terreon® circular de 1372 mm (54") Instalación Instrucciones de instalación continuación . . . CONEXIONES DE VÁLVULAS Y TUBERÍAS: OPCIÓN DE DISPOSITIVO INFRARROJO ADAPTIVE NOTA: LAVE LAS TUBERÍAS DE SUMINISTRO ANTES DE REALIZAR CONEXIONES.
TDB3108, WF3208 Terreon® circular de 1372 mm (54") Instalación Conexiones eléctricas para el dispositivo infrarrojo Adaptive 6 NOTA INICIAL: No lo use durante dos minutos después de realizar la conexión eléctrica. Los sensores demoran hasta ocho minutos (sin que se usen) en adaptarse a la palangana si se detecta otro objeto durante el período inicial de dos minutos. A B C D E CONECTE LOS TRES CABLES DEL CONJUNTO DE MÓDULO INFRARROJO AL CONJUNTO DE VÁLVULA.
TDB3108, WF3208 Terreon® circular de 1372 mm (54") Instalación Instrucciones de ajuste de Vernatherm NOTA: La válvula TMA Vernatherm NO viene ajustada de fábrica. En la instalación, debe verificarse y ajustarse la temperatura de esta válvula para garantizar la entrega de una temperatura segura del agua. El agua que tenga una temperatura mayor que 43° C (110° F) puede provocar escaldado.
TDB3108, WF3208 Terreon® circular de 1372 mm (54") Instalación Instrucciones de limpieza/mantenimiento de Terreon® Descripción del material: Terreon® es un material de superficie sólida densificada con certificación NAHB compuesto de resina poliéster y que es resistente a los productos químicos, las manchas, las quemaduras y los golpes. Los daños a las superficies se pueden reparar fácilmente con productos de limpieza de uso diario o abrasivos de polvo fino.
Instalación TDB3108, WF3208 Terreon® circular de 1372 mm (54") Instrucciones de limpieza y mantenimiento del acero inoxidable Descripción del material: El acero inoxidable es extremadamente duradero y su mantenimiento es sencillo y económico. El cuidado adecuado es fundamental, en especial bajo condiciones corrosivas. Siempre comience con la solución más sencilla y trabaje hacia las más complicadas.
TDB3108, WF3208 Terreon® circular de 1372 mm (54") Instalación Válvula para jabón — líquido — S09-007S Lista de piezas 3 Piezas de conexión S09-007S Artículo 1 Nº de pieza 118-025 Descripción Cuerpo de la válvula 2 110-007 Tuerca de presión 1 3 135-001L Resorte 1 4 125-001BU Arandela 1 5 119-028 Émbolo 1 * 161-014 Tuerca 1 * 124-001D Arandela 2 * 142-002A Arandela de acero inoxidable 1 1 Cant.
TDB3108, WF3208 Terreon® circular de 1372 mm (54") Instalación Válvula de jabón — en polvo — S09-010A Lista de piezas Artículo Nº de pieza Cant. 1 Descripción 1 160-069 1 Tornillo, 1/4-20 RD 2 142-002X 1 Arandela, 1/4 cierre dividido 3 S62-002 1 Conjunto de agitador/deslizante 4 192-004 1 Palanca de jabón en polvo 2 3 NOTA: Contamos con tapones reductores para usarlos con jabón granulado fino para reducir el flujo.
TDB3108, WF3208 Terreon® circular de 1372 mm (54") Instalación Consejos para el mantenimiento del jabón RECOMENDACIONES SOBRE EL JABÓN Los dispensadores de jabón de calidad requieren jabón de buena calidad y mantenimiento periódico para funcionar en forma apropiada.
TDB3108, WF3208 Terreon® circular de 1372 mm (54") Instalación Boquillas rociadoras — estándares con arandelas aislantes de anillo con rociador de neopreno NOTA: El equipo de reparación no incluye arandela aislante de boquilla rociadora. Pídala como un artículo separado. 1 2 4 5 3 9 7 10 6 8 Lista de piezas Conjunto de boquilla rociadora S05-054B Artículo 1 Equipo de reparación S45-051 Cant.
TDB3108, WF3208 Terreon® circular de 1372 mm (54") Instalación Válvula mezcladora — manual — S01-038 4 5 3 6 2 1-1/6 – 14- NPT 1-1/16 14 NPT 7 1 1/2-–14 14 NPT 1/2 NPT Lista de piezas de la válvula mezcladora manual Conjunto Conjunto Conjunto Conjunto Equipo de de válvula de válvula de válvula de válvula reparación S01-038 S01-038S S01-038A S01-038AS S45-197 Artículo Nº de pieza Descripción 1 118-034 Cuerpo de la válvula mezcladora de bronce * 82 Cant.
TDB3108, WF3208 Terreon® circular de 1372 mm (54") Instalación Repuestos de la válvula de control de volumen — S02-045 2 3 1 4 5 1/2-14 NPT hembra 6 1/2-14 NPT macho Lista de piezas de la válvula de control de volumen Válvula de bronce S02-045 Artículo 1 Válvula de cromo S02-045A Equipo de reparación S45-198 Cant.
TDB3108, WF3208 Terreon® circular de 1372 mm (54") Instalación Localización de fallas de la válvula mezcladora termostática NOTA: Antes de intentar de localizar la falla de la válvula o desarmar los componentes, verifique las siguientes condiciones: • Si se usan las válvulas de cierre/retención, asegúrese de que estén totalmente abiertas.
TDB3108, WF3208 Terreon® circular de 1372 mm (54") Instalación Lista de piezas de la válvula mezcladora termostática Vernatherm (S01-525) — Equipo de reparación S65-259 Lista de piezas S65-259 Equipo de reparación de la válvula Artículo Nº de pieza Cant.