
Installation manual


SS-2N/AST/STD, SS-2N/AST/WH Installation
10 10/24/11 Bradley Corporation • 215-1498 Rev. F; ECM 11-08-011
7
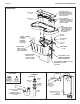
Connect Supply and Tubing
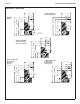
Loosen the compression nuts.
Push the matching color ¹⁄₈" tubes firmly
into the tube connectors until they are fully
seated.
Tighten the compression nuts by hand.
B
Loosen the compression nuts.
Push the sprayhead supply tubes firmly
into the tube connectors until they are fully
seated.
Tighten the compression nuts by hand.
A
Red Supply
Tubing
GreenSupply
Tubing
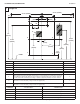
Reinstall the valve bracket. Turn on the water supply to the Express
®
and check for leaks. Push the operating buttons of each
station until all the air is purged from the lines and water is flowing smoothly. Reinstall the access panel.
C
H
C
A
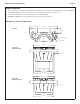
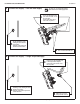
Loosen the cap screw
about ¼" (4–6 turns)
and lift up the cover
(do not remove).
B
Using the cover, turn the
cartridge gently until
desired water temperature
is reached. Do not turn past
stops as this may damage
the unit. Push the cover
down and tighten the screw.
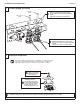
This valve is NOT factory preset. Upon installation, the temperature of this
valve must be checked and adjusted to ensure delivery of a safe water
temperature. Water in excess of 110°F (43°C) may cause scalding.
8
Adjust the Temperature