
Installation manual
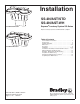


Installation SS-2N/AST/STD, SS-2N/AST/WH
Bradley Corporation • 215-1498 Rev. F; ECM 11-08-011 10/24/11 7
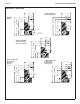
SCUFF PANEL
STANDARD HEIGHT
FRAME ONLY
SCUFF BASE FRAME
STANDARD HEIGHT
FRAME ONLY
2
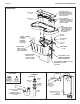
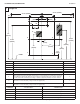
Mount Frame to Wall
Anchoring the frame to a wall that is not
flat may cause the frame to bend, making
it difficult to reinstall the access panels. If
necessary, use shims to compensate for
wall distortion.
Once you have positioned the frame such that
it is level and flat against the wall or shimmed ,
mount the frame to the wall at four places using
³⁄₈" bolts and 1” min. O.D. washers.
NOTE: When mounting the standard height frame,
mount the scuff base to the wall at the same time
using two additional ³⁄₈" bolts and washers.
B
A
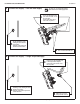
Using a T20 torx key, remove
the fasteners securing the
access panel to the main
frame, and remove the panel.
SCUFF BASE FRAME
AND DRAIN ASSEMBLY
NOT SHOWN FOR CLARITY
3
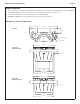
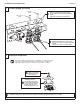
Install Bowl
The sprayhead body has slotted holes for adjusting the fit-up with the bowl and wall.
The tailpiece on the waste tee has been rotated upward for shipping purposes. Turn
the tailpiece down to its proper position before installing the bowl.
Secure the bowl to the
wall anchors with ³⁄₈"
bolts and 1" min. O.D.
washers, two places.
Do not overtighten.
B
Attach the bowl to the frame with
¼"-20 x ½" pan-head screws and
washers. Do not tighten.
A
Tighten the pan-head screws
Do not overtighten.
C