
Operator`s manual

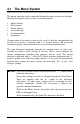

22
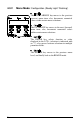
3.4 Loading Ribbon
Note: Always use ribbon slightly wider than the media backing material;
this helps protect against printhead wear.
To produce an image on the label, thermal transfer media requires ribbon.
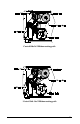
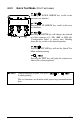
Ribbon types are available with the ‘ink’ layer on the outside (coating side out)
or with the ‘ink’ layer on the inside (coating side in). These types cannot be
interchanged in the printer. Arrows on the Ribbon Supply Hub are used to
indicate the correct direction of ribbon travel (see the next page for examples).
To load a ribbon:
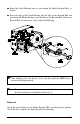
Raise the Access Cover.
Rotate the Printhead Latch forward and raise the printhead.
Depending upon the directional arrows of the Ribbon Supply Hub (see the
next page for examples), mount the ribbon so that it is dispensed in the
appropriate direction for the ribbon type.
Slide the ribbon on completely to rest against the flange.
Route the ribbon under the Ribbon Roller then out the front of the printer.
Continue routing the ribbon up to and around the Ribbon Take-Up Hub, as
shown. Wind the ribbon around several times in a clockwise direction to
secure it in place.
Lower the printhead and rotate the Printhead Latch back to the locked
position. Close the Access Cover.
With the printer ‘On’ press and hold the FEED button for three seconds to
position the media for printing; see Section 5.2 for details.
Removal:
Pull the empty core from the Ribbon Supply Hub and discard it. Next, grasp
the used ribbon on the Ribbon Take-Up Hub, while gently pulling out on the
hub, compress the hub to pull off the used ribbon.