
User guide


LabelMark 3 User Guide
76 Working With Objects - LabelMark Plus
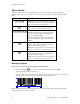
Object Toolbar
The Object toolbar allows you to manipulate objects (text, barcodes, images, rectangles and lines) in
LabelMark Plus. First select the object you want to modify and then select the appropriate Object toolbar
button.
Icon Description
Symbology – Allows you to change the symbology
(e.g. Code 39, Code 128, etc.) for a barcode object
(menu equivalent: Object Properties…)
Properties – Displays information about selected
object (menu equivalent: Object Properties…)
Alignment – Six icons that allow you to line up
multiple selected objects in relation to each other –
left, center, right, top, middle or bottom (menu
equivalent: Object Align)
Note: Items are aligned to the last item selected.
Icons are disabled if one object or no objects are
selected.
Center Horizontally – Moves the selected
object(s) to the middle (side-to-side) of the label
(menu equivalent: Object Align)
Note: This is a one-time action. If you resize, add
text, etc., you will have to re-center the object.
Center Vertically – Moves the selected object(s)
to the middle (top-to-bottom) of the label (menu
equivalent: Object Align)
Note: This is a one-time action. If you resize, add
text, etc., you will have to re-center the object.
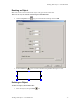
Moving an Object
There are two ways to move the selected object in LabelMark Plus:
• Click the Properties icon, type your desired Left and Top values and click OK.
Note: The top-left corner of a label is 0, 0.
• Place the cursor over the selected object(s) until the cursor turns into a 4-headed arrow. Click and
drag the object to the new location and release the mouse button to place it.
Note: LabelMark Plus will not allow you to move an object beyond the printable boundaries of the label.
See Making Data Fit on a Label for details.