Helpful Tips for Using the ProImage Plus3000/ProImage XL3000 PosterPrinter Interface
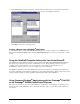
Welcome Congratulations on your purchase of the ProImage Plus3000/XL3000 PosterPrinter System Interface Kit! Installing the interface board in your printer gives you the ability to print high-quality posters and banners directly from your PC to your ProImage Plus3000 or ProImage XL3000 PosterPrinter system. This document provides useful information about creating posters and banners on the ProImage Plus3000 and the ProImageXL3000 PosterPrinter systems.
Creating Banners with the ProImagePlus3000/XL3000 PosterPrinter System You can create banners with your PosterPrinter using a variety of software, such as the GalaRio™ Template Gallery application. To print a banner of a specific size, you need to first set up that size in the Plus3000/XL3000 print driver. Once you set up a size, it is stored in the custom size list—when you want to use the size in the future, you just need to select it from the list in the driver before printing.
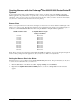
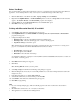
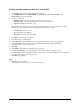
3. On the FujiFilm PP3000/PP3000WIDE properties sheet, select the Paper tab. 4. Click the Edit button next to the Print Paper Size field. In the Edit Print Paper Size List dialog box that appears, click the User Custom Size button to display the dialog box shown below. 5. Select options as follows: • Choose the paper width from the Roll Paper Size list. • Type a name for the banner size in the Paper Name field. You can enter any name you’d like.
8. In the Edit Print Paper Size List dialog box, select the name of the banner size you set up in the User Custom Size List. Click the Add button next to the list to move the entry to the Paper Size list area. 9. Click OK to close the two open dialog boxes. Printing a Banner from a Windows Application To print a banner, first be sure the Plus3000/XL3000 is selected as your system’s printer. Choose Print from the File menu and click the Properties button.
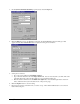
Before You Begin We recommend that you change the Document Size option for your printer before using the printer with a Windows application. Some unusual print errors may occur if you do not make this change. Follow these steps: 1. 2. 3. 4. Click the Start button on the Windows taskbar, highlight Settings and select Printers. Right click the FujiFilm PP3000 or the PP3000WIDE printer icon and choose Properties from the menu that appears. The FujiFilm PP3000 or the PP3000WIDE properties sheet displays.
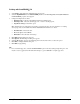
Printing with CorelDRAW 7.0 1. 2. 3. Select Print from the File menu. The Print dialog box appears. Select the FujiFilm PP3000 or the PP3000WIDE print driver and click Properties. The FujiFilm PP3000 or the PP3000WIDE properties sheet appears. Configure the Paper tab as follows: • Roll Paper Size: Select the roll width that matches the installed paper. • Print Paper Size: Select the standard page size or create a custom page size. • Gaps Between Pages: Check this option.
Printing with CorelDRAW 8.0 1. 2. 3. Select Print Setup from the File menu. The Print Setup dialog box appears. Select FujiFilm PP3000 or the PP3000Wide and click Properties. The FujiFilm PP3000 or the PP3000Wide properties sheet appears. Configure the Paper tab as follows: • Roll Paper Size: Select the roll width that matches the installed paper. • Print Paper Size: Select the standard page size or create a custom page size. • Gaps Between Pages: Check this option.
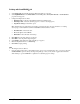
Printing with Microsoft PowerPoint 95, 97 and 2000 1. 2. 3. Select Print from the File menu. The Print dialog box appears. Select FujiFilm PP3000 or the PP3000WIDE and click Properties. The FujiFilm PP3000 or the PP3000WIDE properties sheet appears. Configure the Paper tab. • Roll Paper Size: Select the roll width that matches the installed paper. • Print Paper Size: Select the standard page size or create a custom page size. • Gaps Between Pages: Check this option.
Printing with Microsoft Excel 95, 97 and 2000 1. 2. 3. Select Print from the File menu. The Print dialog box appears. Select FujiFilm PP3000 or the PP3000WIDE and click Properties. The FujiFilm PP3000 or the PP3000WIDE properties sheet appears. Configure the Paper tab: • Roll Paper Size: Select the roll width that matches the installed paper. • Print Paper Size: Select the standard page size or create a custom page size. • Gaps Between Pages: Check this option.
Printing with Print Artist The Print Artist application has its own detailed user’s guide that explains how to create output on a standard printer. The following section provides additional information about optimizing printing on your ProImage Plus3000 or ProImage XL3000 PosterPrinter System. Any questions regarding the operation of Print Artist should be directed to the Technical Support Department at Sierra On-Line. Call 425.644.4343 or visit this Web site: http://www.sierra.com.
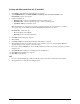
Editing a Standard Layout Modify the text, graphics or shapes that are on the selected poster or add text, graphics and shapes yourself. Refer to the Print Artist user’s guide or on-line help for complete instructions. Setting Up the Printer You need to set up the printer correctly before you select print. Do the following: 1. Check your printer to ensure that the roll width of the installed paper matches that of the file you intend to print and that the printer is powered on. 2. 3.
the width. The opposite would hold true if you were printing a vertically-oriented banner. Additionally, the width and height should match the Custom Page Size (excluding the margins) that will be selected in the printer setup. Example: For a Custom Page Size of 23" x 96" you would enter a length of 93.5" and a width of 21.5". The length should be reduced by 2.5" and height by 1.5". 7. Click OK to close the printer setup dialog box.
Recommended Print Option Settings Print Artist allows you to modify numerous options when setting up your poster or banner.
ProImage Plus3000/XL3000 PosterPrinter Helpful Tips Page 14
2001 Brady Worldwide, Inc. All Rights Reserved www.varitronicsystems.com 15138-01 Rev.