
Operator`s manual


12
You now have the option to:
- Check-out a previously analyzed patient using the current patient list box.
- Check-out a previously analyzed patient using the patient directory (icon)
- Start a new analysis
- Change the way you work using profiles
1.1 Main Menu toolbar
1.1.1 Checking-out a patient
This toolbar button gives access to the patient and archive directories (the patient database). Here you can
review all saved and archived patients, check-in or check-out a patient, delete a patient, archive a patient,
restore an archived patient or change the way a patient is archived or restored.
Note that there can only be one patient checked out, so when there is already a patient checked out, you
will be prompted to check this patient in first.
1.1.2 Setting up your profiles
This button gives access to the profile dialog with all 5 profile screens:
-The analysis profile screen sets up the way you want to analyze your patient. It defines things like hours to
analyze, critical pause length, SVT rate ….
-The report profile sets up the way your final report needs to be printed.
-The account profile combines analysis and report profile and allows you to setup special fields
only required for the selected account.
- The user profile sets up the way the operator prefers to use the analyzer.
- The recorder profile allows you to create shortcuts for quick recorder/location selection
A fresh installed scanner will have defaults for all those profiles. If you don’t like those, then go to the profile dialog,
change the settings and save them as a new profile.
The currently selected profiles will be shown on top of the screen in a set of list boxes. There you can also quickly go
from one profile to another.
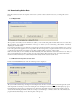
1.1.3 Analyzing a new patient (create)
This button allows you to analyze a new patient and will guide you to all steps in this process.
- Selecting your input device (cassette – flashcard)
- Setting up or reading the patients demographics
- Starting the analyzer