
Operator`s manual


56
7.0 Managing Strips
7.1 Saving Strips
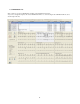
There is a universal save dialog that can be used from nearly every screen. This dialog allows saving strips from different
types and different lengths. It also allows you to preview the strips and print the strips from the preview screen.
The default class label is the label from the beat that was selected when you clicked on the save strip button. It will appear
in the center of the saved strip. The time indicated on the dialog and the saved/printed strip, corresponds also with the
time in the center of the strip. This is so for all types of strips including event strips.
The class label can be changed using the dropdown selection list or by free text.
Comments can be added, but when saving from certain screens, relevant information might already be there. When saving
from the QT screen it will have QT info on the current beat, from RR histograms it will have RR info….
You are free to change this text.
Note that the sizes shown depend on the strip type that is selected.
The following variations are supported:
Strip type
Diagnostic 8 seconds 16 seconds 24 seconds 32 seconds 40 seconds
Event 20s ( 3 chan) 20 seconds 40 seconds 60 seconds 80 seconds 100 seconds
Event 30s ( 3 chan) 30 seconds 60 seconds 90 seconds 120 seconds 150 seconds
Event 60s ( cur chan) 1 minute 2 minutes 3 minutes 4 minutes 5 minutes
12 Lead Strip 10 seconds - - - -
If you want longer strips than those allowed with the standard values, you have to go to page view and select a block of
the required length. Right click to set start and end point – see block marking.