
Operating instructions


ER910/920 and ER910/920 AF Event Monitor
3
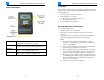
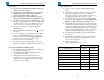
Monitor Components
Batteries
Two 1.5V AAA Alkaline. Insert into battery
compartment observing polarity symbols.
Belt clip
To attach, snap the Monitor into the belt clip with
Patient Cable oriented up and the display facing out.
Necklace
To attach, remove battery cover, insert necklace T’s
into slots in case. Replace battery cover.
Patient Cable
To adjust, move plastic slip rings up or down to keep
leads together. To lengthen, pull leads apart.
ER910/920 and ER910/920 AF Event Monitor
4
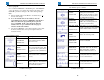
Setup Steps
This manual is designed to allow a technician to follow the instructions
page by page to setup the ER910/920 and ER910/920 AF Monitor. Here
is the general layout:
1. Connect leads and electrodes to patient.
2. Prepare Monitor for recording.
A. Choose/Setup program you want to use.
B. Erase all previous events.
3. Connect Patient Cable to Monitor.
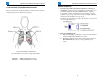
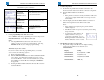
Electrode Application and Placement
For each electrode lead wire:
1. Snap the electrode onto the lead wire.
2. Remove the protective backing from the adhesive side of the
electrode.
3. Apply the electrode to the patient’s skin per Electrode Placement
diagram in this manual or as instructed by the physician.
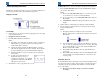
Notes:
A. You must use a Patient Cable that the Monitor is able to
recognize. As an example, you cannot use a 2 channel cable
with a 1 channel Monitor.
B. It is recommended that trained medical personnel instruct the
patient in the proper application of electrodes.
C. Use good quality long term electrodes. Braemar recommends
the use of low impedance Holter electrodes. Instruct patient to
apply fresh electrodes regularly. (Usually on a daily basis.)
D. Proper preparation of the patient's skin is absolutely essential
for obtaining a quality ECG recording. The skin surface where
the electrodes will be placed should be cleaned with alcohol,
allowed to dry, and abraded.
E. Any loose electrode needs to be replaced.