
Operating instructions


ER910/920 and ER910/920 AF Event Monitor
5
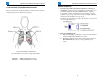
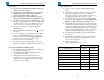
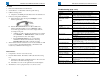
1 and 2 Channel (4 Lead) Electrode Placement
This is a typical electrode placement. Refer to Analysis System software
and the physician for recommended positioning.
1 and 2 Channel Electrode Placement
Use only Channel 1 if you have a single channel cable.
Channel 1
= White and Red (V5 vector)
Channel 2
= Black and Brown (V1 vector)
ER910/920 and ER910/920 AF Event Monitor
6
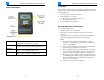
Monitor Preparation
1. General setup: Remove the Patient Cable if it is connected to
the Monitor. Open the battery compartment by sliding battery door
downward. Install two fresh AAA Alkaline batteries. Observe
proper battery polarity. The Monitor will sound rising tones after
completion of power up. After a few seconds, the display will show
the battery level and number of events stored.
The battery level should be near 100%. The number of events stored
does not matter at this point.
2. Enter programming mode:
A. Push and hold both program buttons on the front of the Monitor
for two seconds until an audible tone is heard.
B. The Monitor will then display an information screen. Press the
RECORD/SEND button to get to the programming mode
screen.