
Operating instructions


ER910/920 and ER910/920 AF Event Monitor
7
General notes:
A. To leave the programming mode without saving your
changes, remove the batteries.
B. If you enter the programming mode, events stored in
the Monitor are always erased when the Monitor
restarts and a Patient Cable is connected.
C. All previously stored events and settings are erased
when you select EXIT on the last programming screen.
D. The Monitor always highlights the DEFAULT option when
entering programming mode even if the CUSTOM option
was last used. This is only visual. Whatever option was
used for a previous recording will continue to be used.
E. Previously saved settings are displayed when in the
CUSTOM option.
F. Factory default settings are indicated by a “ )( ” in front of
the setting.
G. Use the program buttons to change the program settings
and press the RECORD/SEND button to confirm the
setting you have chosen. Pressing RECORD/SEND also
advances the screen to the next program setting.
H. Lead loss detection is on all the time.
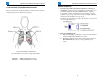
I. The number of channels a Patient Cable contains will
determine the number of channels the Monitor will record.
Note about Arrhythmia and AFIB detection:
A. To change Arrhythmia and AFIB settings you must access
the CUSTOM program option.
B. The Arrhythmia and AFIB algorithms can be used
independently of each other.
C. Although the device detection algorithms are very
sophisticated, there is no guarantee that the device will
catch all episodes of arrhythmia. For maximum efficacy,
use the most sensitive settings.
ER910/920 and ER910/920 AF Event Monitor
8
Notes about sound:
A. Lead loss sound overrides the POST-EVENT SOUND
setting.
B. If the Monitor has lead loss during a recording, the Monitor
will produce an audible sound of the event until the
recording is complete. You can mute this sound by using
the AUDIO setting after the recording is complete.
C. The AUDIO setting can only be accessed before or after
an event is recorded. Trying to access the AUDIO setting
during a recording will cause the recording to stop.
D. The AUDIO setting controls many of the sounds the patient
will hear while wearing the Monitor and may be turned ON
or OFF. The AUDIO screen can be accessed during normal
monitoring conditions (Patient Cable inserted) by pressing
only one of the programming buttons for two seconds. The
AUDIO screen will exit after 10 seconds of inactivity.
E. The AUDIO setting defaults to ON every time the Monitor
is powered up.
F. The AUDIO setting defaults to ON every time the Patient
Cable is removed. This is to enable the Monitor to send
events to the receiving center.
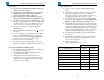
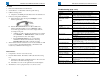
G. Table of sound settings:
(number indicates importance, 1
st
, 2
nd
, 3
rd)
Screen Setting ↓
Monitor Sound ↓
POST-
EVENT
AUDIO
Power on tones NA NA
Cable detect NA NA
Auto event record 2
nd
1
st
Manual event record 2
nd
1
st
Prog button press NA 1
st
Phone ring at end of a recording NA 1
st
Phone ring for memory full NA 1
st
Lead loss during recording LL overrides 1
st