
Operating instructions


ER910/920 and ER910/920 AF Event Monitor
13
Patient Operating Instructions
The Monitor should be ready when you receive it from the technician. If
there are any problems, refer to the Troubleshooting section.
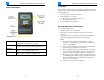
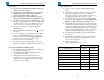
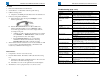
Display overview:
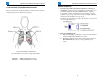
To Hookup:
1. Snap lead wires onto electrodes first, then apply electrodes according
to physician instructions.
2. Reapply fresh electrodes daily.
3. Insert the Patient Cable into the Monitor.
Notes:
A. Depending on the cable, there should be a single or double beep
that indicates a good patient connection. If no beep is heard,
double check cable connections.
B. Viewing the display just after the Patient Cable is connected
will show the signals from each of the channels. There will also
be an accompanying beep for the channel number displayed.
C. The Monitor will not respond to any button presses during the
preview time.
D. A square wave will continue to be
displayed if there is not a good
connection to the patient. A good ECG
signal must be found before the Monitor
will start to look for events.
4. The Monitor is now looping and ready to record.
ER910/920 and ER910/920 AF Event Monitor
14
To Record: Events to be recorded will be described by the physician.
1. Press the RECORD/SEND button for two seconds until an audible
tone is heard, then release.
Notes:
A. There are two RECORD/SEND buttons; you only need to push
one of them for two seconds to activate the Monitor.
B. To stop a recording, press the RECORD/SEND button again for
two seconds.
C. “RECORDING” will flash in the upper left hand corner of the
display.
2.
Hold as still as possible during recording but continue breathing.
3.
The recording is complete and ready to send when a phone ring is
heard from the Monitor.
Notes:
A. The display will also show that an event is stored in the
Monitor. If the memory is full, follow instructions To Send and
Erase Events
B. You can mute many of the sounds from the Monitor by pressing
only one of the programming buttons for two seconds. This will
show a screen that allows you to select whether AUDIO for the
Monitor is turned ON or OFF.
C. The AUDIO setting defaults to ON every time the Monitor is
powered up.
D. The AUDIO setting defaults to ON every time the Patient Cable
is removed. This is to enable the Monitor to send events to the
receiving center.
Automatic Record:
If Arrhythmia Detection is ON and an event is detected, the Monitor will
beep at the start of the recording. The recording is complete and ready to
send when a phone ring is heard from the Monitor. An event will also
show on the display.
A. The last event location is always reserved for a manual
recording.