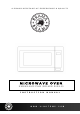
A PROUD HERITAGE OF EXPERIENCE & QUALITY MICROWAVE OVEN EM262AMY-PHB (BR-MW BI22-S) I N S T R U C T I O N M A N U A L W W W . V I N O T E M P .
GENERAL OPERATING INSTRUCTIONS Remove all external and internal packaging from your appliance. Be sure that all parts have been included before discarding any packaging materials. You may want to keep the box and packing materials for use at a later date. Upon receipt and inspection of unit, the supply cord must be replaced if it is damaged. Contact our customer service at 1-800-777-8466 or info@vinotemp.com. Let the unit rest UNPLUGGED for 24 hours once you have it placed in your home.
Table of Contents Important Safety Instructions --------------------- 4-5 Grounding Instructions -------------------------------- 6 Materials Allowance in Microwave Oven --------- 7 Parts and Specifications ----------------------------- 8 Countertop Installation -------------------------------- 9 Operating Instructions -------------------------- 10-13 Menu Chart -------------------------------------------- 14 Maintenance and Troubleshooting ----------------15 Terms & Conditions -----------------------------
PRECAUTIONS TO AVOID POSSIBLE EXPOSURE TO EXCESSIVE MICROWAVE ENERGY a. Do not attempt to operate this oven with the door open since open door operation can result in harmful exposure to microwave energy. It is important not to defeat or tamper with the safety interlocks. b. Do not place any object between the oven front face and the door or allows soil or cleaner residue to accumulate on sealing surfaces. c. Do not operate the oven if it is damaged.
15. When cleaning surfaces of door and oven that comes together on closing the door, use only mild, nonabrasive soaps, or detergent applied with a sponge or soft cloth. 16. To reduce the risk of fire in the oven cavity: a. Do not overcook food. Carefully attend appliance when paper, plastic, or other combustible materials are placed inside the oven to facilitate cooking. b. Remove wire twist-ties from paper or plastic bag before placing bag in oven. c.
GROUNDING INSTRUCTIONS This appliance must be grounded. In the event of an electrical short circuit, grounding reduces the risk of electric shock by providing an escape wire for the electric current. This appliance is equipped with a cord having a grounding wire with a grounding plug. The plug must be plugged into an outlet that is properly installed and grounded.
Materials you can use in microwave oven Utensils Remarks Browning dish Follow manufacturer’s instructions. The bottom of browning dish must be at least 3/16 inch (5mm) above the turntable. Incorrect usage may cause the turntable to break. Dinnerware Microwave-safe only. Follow manufacturer’s instructions. Do not use cracked or chipped dishes. Glass jars Always remove lid. Use only to heat food until just warm. Most glass jars are not heat resistant and may break.
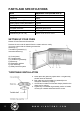
PARTS AND SPECIFICATIONS Model EM262AMY-PHB (BR-MW BI22-S) Voltage 120V Frequency 60Hz Rated Input Power (Microwave): 1700W Rated Output Power (Microwave): 1200W Oven Capacity 62L Turntable Diameter: Ø420mm (Ø16.53 in) Net Weight 19.7 kg (43.43 lbs) Dimensions (W x D x H) 24 2/5 x 19 3/5 x 13 3/5 in SETTING UP YOUR OVEN Names of Oven Parts and Accessories Remove the oven and all material from the carton and oven cavity.
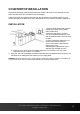
COUNTERTOP INSTALLATION Remove all packaging material and accessories. Examine the oven for any damage such as dents or broken door. Do not install if oven is damaged. Cabinet: Remove any protective film found on the microwave oven cabinet surface. Do not remove the light brown Mica cover that is attached to the oven cavity to protect the magnetron. INSTALLATION 1. Select a level surface that provides enough open space for the intake and/or outlet vents. A minimum clearance of 3 inches (7.
OPERATION 1. Power Level 10 power levels are available. Level Power Display 10 100% PL10 9 90% PL9 8 80% PL8 7 70% PL7 6 60% PL6 5 50% PL5 4 40% PL4 3 30% PL3 2 20% PL2 1 10% PL1 2. Clock Setting (1) Press “Clock” once, and "00:00" will display. (2) Press the number keys and enter the current time. For example, time is 10:12 now, please press "1,0,1,2" in turn. (3) Press “Clock” to finish clock setting. “:” will flash and the clock will be lighted.
Example: When oven is cooking with 50% microwave power for 15 minutes, the screen will display countdown cooking time. You want to set the timer 10 minutes. a. Press “KITCHEN TIMER” once, and the screen will display "00:00". b. Press the number keys and enter the timer time. If there is no entering time in 10 seconds, timer set is cancelled and oven will return to countdown cooking time. c. Press “START/Enter/Add 30 sec.”, and timer is operated. Timer counts down in screen. If the “START/Enter/Add 30 sec.
9. Sensor Cook (1) In waiting state, press "Dinner Plate", "Fresh Vegetable" or "Frozen Vegetable". The screen will display "SC". (2) Press “START/Enter/Add 30 sec.” to start sensor cooking. "SC" will flash in the display. (3) The sensor will sound once when the steaming is emanated. The surplus time will display. 10. MEMORY FUNCTION (1) Press "Favorite" to choose memory 1-3 procedure. The screen will display 1,2,3. (2) If the procedure has been set, press “START/Enter/Add 30 sec.” to use it.
. English/French Mode The default language mode is English Mode. In waiting state, open the door and then press "1" for 3 seconds to switch language mode. There are 2 kinds of language mode you can choose. Text End Door 14. English mode End Door French mode Fin Prte Silent Mode The default mode is OFF Mode, and the buzzer will ring under special circumstances. In waiting state, open the door and then press "2" for 3 seconds to enter to Silence Mode. The buzzer will ring under no circumstance. 15.
Menu Chart Menu Weight Display Fresh Vegetable 4-16 oz SC 1 (Slice) 1 2 2 3 3 1 (8.00 oz) 1 2 2 3 3 4 4 Dinner Plate 8-16 oz SC 1 Beverage 1 cup (about 8.8 oz) 2 cups 1 1 2 2 3 3 4 4 4-16 oz SC 10.00 Oz 10.0 Oz 20.00 Oz 20.0 Oz 1.75 oz 1.75 oz 3.00 oz 3.0 oz 3.30 oz 3.3 oz Pizza Re-heat Baked Potato Soup Frozen Vegetable Frozen Entree Popcorn 2 ! 14 W W W . V I N O T E M P .
MAINTENANCE Troubleshooting Check your problem by using the chart below and try the solutions for each problem. If the microwave oven still does not work properly, contact the nearest authorized service center. TROUBLE POSSIBLE CAUSE POSSIBLE REMEDY Oven will not start a. Electrical cord for oven is not plugged in. b. Door is open. c. Wrong operation is set. a. Plug into the outlet. b. Close the door and try again. c. Check instructions. Arcing or sparking a.
TERMS & CONDITIONS Shipping/Delivery fees are the responsibility of the Purchaser. Seller is not responsible for the carrier’s missed/Non delivery for any reason. Delivery is curbside. Optional upgrades in delivery service is an additional fee. If upgraded delivery service cannot be performed properly, Purchaser agrees to accept delivery curbside and the difference in upgraded cost will not be refunded.
We are a manufacturer not a shipping company, deliveries are done by a 3rd party service. Email us at info@vinotemp.com for a quote or any additional information. Freight discussed is Continental USA (excluding Alaska, Puerto Rico, Hawaii), cost is additional please email info@vinotemp.com for a quote.
stop payment on a check or credit card for any reason, Purchaser agrees to pay for all costs associated with the Seller’s collection or litigation of such a claim, including, without limitation, general and special damages, court costs and attorneys’ fees. Finance charges begin the date of invoice. Title to the goods reverts back to the Seller in the case of nonpayment of goods or services.
Removal or reinstallation of a unit is not included in warranted costs. Purchaser’s exclusive remedy is limited at Seller’s option to repair or replace defective part[s] with either new or reconditioned part[s]. Purchaser is responsible for shipping the unit prepaid to a designated facility and Seller will pay return shipping charges in the continental United States for items repaired under warranty within 12 (twelve) months from date of sale.
after the occurrence of the event giving rise to the dispute. Seller may make nonpayment claims until debt is paid in full. Any dispute or claim relating in any way to these to the Terms and Conditions, the Website, or any products or services sold or distributed by or through this Website, store, or catalog will be resolved by binding arbitration, rather than in court, except that you may assert claims in small claims court if your claims qualify.
necessary service or repair not covered herein. Wine Accessories, Racking Systems and other items not mentioned are not warranted. There is no warranty on parts purchased separately. Removal and re-installation of unit is not included in warranted labor. Purchaser’s exclusive remedy is limited, at Seller’s option; to repair or replace defective part[s] with either new or factory reconditioned part[s].
SERVICE & IMPORTANT NOTICE Upon receipt and inspection of unit, the supply cord must be replaced if it is damaged. Contact our customer service at 1-800-777-8466 or info@vinotemp.com. The manufacturer has a policy of continuous improvement on its products and reserves the right to change materials and specifications without notice. WARNING: Please do not place the unit within reach of children. For adult use only Contact info@vinotemp.com with any questions or visit www.vinotemp.