
User Manual


INSTALL A T ION(INSTR U C TIONS(
6503 Instructions 2-4-14.Doc Page 3 of 8
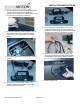
12. Route the supplied Camera Harness through the
pass-through hole in the inner brace of the tailgate.
13. Route Camera Harness through the rectangular hole
in the bottom of the tailgate.
14. Use Masking Tape to affix supplied Template B
above the oval spare tire access slot (located just
right of center on the pickup bed rear edge) and
mark the hole center using a Center Punch.
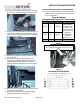
15. Check the area behind the hole you marked for
wiring. If any wiring is present, secure it away from
the area to be drilled.
16. Use a 1/8” drill bit to make a pilot hole at the center
punch mark. Then use a 1” Hole Saw to make the
Camera Harness pass through hole.
17. RECOMMENDED: Use a Cotton Swab or small brush
to apply Corrosion Inhibitor to exposed edges.
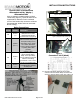
18. Taking care not to damage the Camera Harness,
reinstall tailgate by lifting it into place, rotating it
down about ten degrees, and sliding it to the left.
19. Reinstall both tailgate straps by placing the large
opening of the tailgate strap hangers over the
tailgate strap mounts and pulling down. Proceed to
Step 33.
20. Seat the Camera Harness grommet in the pass
through hole you drilled in the end of the pickup bed
using your fingers.
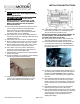
21. Plug in the tailgate power lock harness connector
(removed in Step 2) and slide the red tab to the
locked position. Reinstall the black plastic filler panel
at rear of pickup bed adjacent to the license plate
Install Chassis Harness
22. Remove front driver’s side kick panel/sill plate by
lifting it at the rear and working your way forward
with your hands.