
Owner's Manual


Camera Installation
Mounting hardware installation
Routing the Harness
Part 1
Part 2
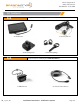
1. Remove the 4 Allen screws that are located on
the sides of the camera and remove the camera
mounting bracket and visor.
2. Find an appropriate place to mount the camera.
Line up the foot bracket to ensure that there is
enough space to attach the camera to the body.
3. Attach the mounting foot using either self-
tapping screws or a bolt and nut.
4. Use a 1” hole saw to drill a hole for the camera
harness`
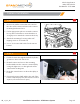
1. Feed the harness through the drilled hole, fit the
grommet to the inside of the hole.
2. Reattach camera and visor to the mounting
bracket. Make sure the camera is oriented UP by
seeing the light sensor on the right side of the
camera when looking at it.
3. Route the camera harness to where the diplay is
located.
4. Connect the 4-pin to RCA cable to the end of the
harness at the display end. (This wont be needed
anymore, all connections are 4 pin)
Camera mounting
Part 2
Vehicle Application:
Utility Task Vehicles
Part Number: SUTV-2010
Installation Instructions - UTV Camera System Page 3/5AR_12_23_20