USB 1200 E REFRIGERATEUR REFRIGERATOR KOELKAST KÜHLSCHRANK MODE D’EMPLOI GEBRUIKSAANWIJZING 2222684-51 INSTRUCTIONS FOR USE BEDIENUNGSANLEITUNG F t N D
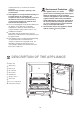
t CONTENTS Instructions for the user Instructions for the installer Important Safety Instructions 18 Technical specifications 25 Description of the appliance Use 19 20 Installation 25 Cleaning the interior Starting-up Temperatur control Fresh food refrigeration Freezing fresh food Storage of frozen food Thawing Ice-cube production Movable shelves Positioning the door shelves Food protection Hints Hints for refrigeration Hints for freezing Hints for storage of frozen food Maintenance Defrosting
IMPORTANT SAFETY INSTRUCTIONS It is most important that this instruction book should be retained with the appliance for future reference. Should the appliance be sold or transferred to another owner, or should you move house and leave the appliance, always ensure that the book is supplied with the appliance in order that the new owner can be acquainted with the functioning of the appliance and the relevant warnings. These warnings are provided in the interest of safety.
■ ■ ■ ■ ventilation must be as shown in the relevant paragraph. Attention: keep ventilation openings clear of obstruction. If the appliance is transported horizontally, it is possible that the oil contained in the compressor flows in the refrigerant circuit. It is advisable to wait at least two hours before connecting the appliance to allow the oil to flow back in the compressor. There are working parts in this product which heat up.
USE Cleaning the interior Fresh food refrigeration Before using the appliance for the first time, wash the interior and all internal accessories with lukewarm water and some neutral soap so as to remove the typical smell of a brand-new product, then dry thoroughly. Do not use detergents or abrasive powders, as these will damage the finish. The refrigerator compartment is suitable for cooling drinks and for normal food storing.
t Ice-cube production This appliance is equipped with one or more trays for the production of ice-cubes. Fill these trays with water, then put them in the freezer compartment. Do not use metallic instruments to remove the trays from the freezer. Movable shelves The walls of the refrigerator are equipped with a series of runners so that the shelves can be positioned as desired.
FOOD PROTECTION Explanation of the cold zone signs The symbol shown here on the left indicates the coldest point inside your refrigerator.
■ ■ ■ water ices, if consumed immediately after removal from the freezer compartment, can possibly cause the skin to be freeze burnt; it is advisable to show the freezing-in date on each individual pack to enable you to keep tab of the storage time; do not put carbonated liquids (fizzy drinks, etc.) in the freezing compartment as they may burst.
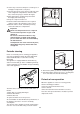
2. remove any stored food, wrap it in several layers of newspaper and put it in a cool place; 3. leave the door open, place a basin on the top shelf of the refrigerator compartment, under the drain hole, remove the plug as shown in the figure; 4. when defrosting is completed, dry the interior thoroughly and refit the plug. 5. Keep the scraper for future use. 6. Turn the thermostat knob back to the required setting or replace the plug in the power socket. 7.
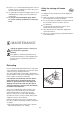
t Interior light The light bulb inside the refrigerator compartment can be reached as follows: 1. unscrew the light cover securing screws; 2. unhook the moving part by pressing it as shown in the figure. If the door is open and the light does not come on, check that the bulb is properly screwed in; if it still does not work, replace the bulb with one of the same power. The maximum rating is shown on the light cover.
+18°C and +38°C (class ST); +16°C and +32°C (class N); +10°C and +32°C (class SN). The class of your appliance is shown on its rating plate. For building-in and door reversibility refer to the relevant instructions. Grid preparation Remove the grid from the appliance pulling it towards you with hands. a Electrical connection Before plugging in, ensure that the voltage and frequency shown on the serial number plate correspond to your domestic power supply. Voltage can vary by ±6% of the rated voltage.
t Inner door reversal 180° Building the appliance in under a worktop The dimensions of the recessed installation area must correspond with those indicated in the figure. 60 0 820 - 870 55 0 600 a 600 b S.I.005 S.I.004 The appliance could be inserted between two units (a) or as an end unit (b). Important It must be possible to disconnect the appliance from the mains power supply; the plug must therefore be easily accessible after installation.
UPPER SUPER. LOWER INFER. B A C D D326 PR266 1. Fasten the side panel to the rear of the appliance with the fixing brackets. UPPER SUPER. 4. Separate parts A, B, C, D as shown in the figure. LOWER INFER. 50mm E E A 20m m D319 PR166 2. Fasten the appliance to the worktop or the sides, applying the sealing strip between the appliance and adjacent cabinet using the fixing brackets (E). 5.
t Fitting the plinth 8mm Important For the efficient operation of the appliance, it is important that the original ventilation grid is used. A B 7. Open the appliance door and the furniture door at 90°. Insert the small square (B) into guide (A). Put together the appliance door and the furniture door and mark the holes as indicated in the figure. Remove the squares and drill holes with Ø 2 mm at 8 mm from the outer edge of the door.