
Installation Guide
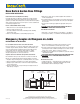

FITTING
Acople
TUBING
Tuberia
HOSE CLAMP
Abrazadera de manguera
HOSE BARB
Racor de manguera
Read All Instructions Carefully Before Installing.
Hose barb and garden hose ttings are intended for use with soft rubber
and exible plastic tubing and are designed for low to medium pressure
systems up to 150 PSI. These ttings can be used in potable and non-potable
water systems. Most often they are used to repair or connect residential and
commercial-grade garden hoses.
Be Sure To Shut Off Water Before Starting.
1. Make sure the hose is cut cleanly and squarely to length.
2. Slide hose clamp onto the hose end.
3. Use a drop of lubricant on the inside of the tubing to make the tting
insertion much easier.
4. Push hose onto tting until hose reaches tting stop ring or hex.
Hose Barb & Garden Hose Fittings
INSTALLATION INSTRUCTIONS
Lea con Cuidado Todas las Instrucciones Antes de Instalar.
El racor de manguera y los acoples de manguera de jardín son para usarse
en tuberías de goma blanda y de plástico exible y están diseñados para
usarse en sistemas de baja a mediana presión, de hasta 150 PSI. Estos
acoples pueden usarse en sistemas de agua potable y no potable.
La mayoría de las veces se usan para la reparación o conexión de
mangueras de jardín de uso comercial y residencial.
Asegúrese de Cerrar el Suministro de Agua Antes de Comenzar.
Para la instalación de acoples de compresión, necesitará un cortador de
tuberías, un escariador/herramienta para eliminar rebabas, y dos llaves.
1. Asegúrese de que la manguera este cortada limpiamente y en escuadra.
2. Deslice la abrazadera de manguera en el extremo de la manguera.
3. Aplique una gota de lubricante en el interior de la tubería para facilitar
la inserción del acople.
4. Empuje la manguera sobre el acople hasta que la manguera alcance el
anillo del tope o hexágono.
Manguera y Acoples de Manguera de Jardín
INSTRUCCIONES DE INSTALACIÓN
5. Align the hose clamp over hose and barb. Tighten with screwdriver or
no-hub coupling wrench.
6. The female garden hose end only requires a hose washer. Insert the hose
washer into the female hose thread end of the connection. Hand tighten
the connection.
7. Check for leaks. If leaks appear, tighten the appropriate clamp or nut
further.
CAUTION: DO NOT OVERTIGHTEN. OVERTIGHTENING CAN LEAD TO
FAILURE AND LEAKING LONG AFTER INSTALLATION.
Tools Needed For Installation:
• Tube Cutter • Non-Toxic Lubricant (or Soapy Water) • Hose Washer
• Screw-Type Hose Clamp • Screw Driver or No-Hub Coupling Wrench
Scan for
more
information
Escanear
para mayor
información
5. Alinee la abrazadera de la manguera sobre la manguera y el racor.
Apriete con un destornillador o una llave para acople sin buje.
6. El extremo hembra de la manguera de jardín requiere sólo una arandela
para manguera. Inserte la arandela de manguera en el extremo roscado
hembra de la conexión. Ajuste la conexión con la mano.
7. Verique que no haya ltraciones. Si hay ltración, apriete más la tuerca
o abrazadera apropiada.
PRECAUCIÓN: NO APRIETE DEMASIADO. APRETAR DEMASIADO PUEDE
OCASIONAR FALLAS Y FILTRACIONES MUCHO DESPUÉS DE LA
INSTALACIÓN.
Herramientas Necesarias:
• Cortador de Tuberías • Lubricante No Tóxico (o Agua Jabonosa)
• Arandela de Manguera • Abrazadera de Manguera Tipo Tornillo
• Destornillador o Una Llave Para Acople Sin Buje
Manufacturer assumes no responsibility for failure due to improper installation.
©2015 BrassCraft Mfg., Novi, MI 48375-5331 U.S.A. All Rights Reserved. www.brasscraft.com
El fabricante no asume ninguna responsabilidad si la instalación no se hace de acuerdo al instructivo.
©2015 BrassCraft Mfg., Novi, MI 48375-5331 Estados Unidos Todos los derechos reservados. www.brasscraft.com
225.04 10/15