IMPORTANT PRODUCT INFORMATION
SPECIFICATIONS AND FEATURES – BRASSTECH MODEL # 5‐036 DIMENSIONS
IMPORTANT SAFETY INSTRUCTIONS PLEASE READ ALL INSTRUCTIONS VERY CAREFULLY When using electrical appliances, basic safety precautions should always be followed including the following: 1. Read all instructions. 2. To protect against electrical shock, do not place cord, plugs, or appliance in water or other liquid. 3. Do not operate any appliance with a damaged cord or plug, or after the appliance malfunctions. Return appliance to the factory for examination, repair or adjustment. See Warranty insert. 4.
HOT WATER CONCEPT Unlike a household water heater, this dispenser tank is not pressurized for safety reasons. For a conventional household water heater, the faucet valve is placed after the heater tank resulting in a pressurized tank. For a hot water dispenser, the faucet valve is placed before the tank, creating an “open vent” style faucet and consequently no pressure is built up inside the tank. OVERVIEW 1. Make sure you have all necessary parts, tools and materials as suggested on manual cover. 2.
INSTALLATION Before You Begin Determine where you will install your hot water dispenser. The faucet can be mounted in an existing hole in the sink (spray hose, etc.), or drill a 11/16” (27 mm) to 13/8” (35 mm) hole in your sink. If you want to use the spray unit or do not have a hole in your sink you will have to drill a new hole. Stainless Steel: You need a 11/16” (27 mm) to 13/8” (35 mm) knockout punch available at most hardware stores or drill a hole with an expandable drill.
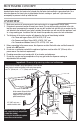
quick-connect fitting with filter and cap connects to cold water line and contains a filter inside fitting. It also has a cap at one end. faucet line connects to the inlet tube located on top corner of tank with quick-connect fitting (supplied with tank). cap filter faucet line connects to cold water supply. quick-connect clamp hose connects with clamp to faucet supply tube at center of tank.
Step 5 - Check for Leaks Open valve in water line. Turn faucet on (hold if necessary) to fill tank (about 1 minute). When tank is full, water will flow from faucet. Turn faucet off. Check for leaks. open Step 6 - Prepare for Power Double check thermostat control dial is in the OFF position. Thermostat control dial controls the water temperature, not the water flow or delivery.
CLEANING AND MAINTENANCE Seasonal Shutdown To prevent damage when dispenser is exposed to freezing temperatures, water must be drained. 1. Unplug dispenser tank to power supply. O-ring screw 2. Turn thermostat control dial to OFF position (fully counterclockwise). 3. Turn faucet on and run water until water is cold. 4. Place a 3-quart (2.8 L) container under drain plug at bottom of the tank. Use a screwdriver to remove the screw and O-ring in the drain tube opening.
TROUBLESHOOTING The following situations are not covered by the One Year Replacement Warranty. 1. Water is not hot: (assuming cold water supply is connected properly and valve is open) • Check if dispenser is plugged in. • Turn thermostat control dial fully clockwise. This may produce boiling water in approximately 15 minutes and possibly be accompanied by a gurgling sound in the tank and/or water “sputtering” from the faucet.