
Owner's manual

12
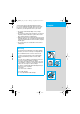
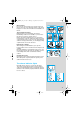
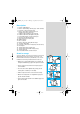
Description
1. Low-voltage adapter
2. «start cleaning» button
3. Station-to-shaver connecting contacts
4. Station lift button for cartridge exchange
5. Display for cleaning programs
6. Display for cleaning fluid status
7. Station mains socket
8. Cleaning cartridge
9. Shaver foil protection cap
10. Shaver foil
11. Cutter block
12. Foil release buttons
13. Long hair trimmer
14. Shaver-to-station connecting contacts
(shaver backside)
15. Switch
16. Shaver charging lights (green)
17. Shaver low-charge light (red)
18. Pilot light
19. Shaver mains socket
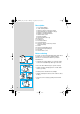
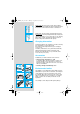
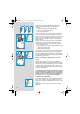
Before shaving
If you wish, you may start shaving right away (if the shaver
is charged, see section «Shaver indicator lights»).
However, we recommend to follow the procedure
described here:
• Using the low-voltage adapter (1), connect the mains
socket of the Clean&Charge station (7) to the mains.
• Press the station lift button (4) to open the housing.
• Hold the cleaning cartridge (8) down on a flat, stable
surface (e.g. table).
• Carefully remove the lid from the cartridge.
• Slide the cartridge into the base of the station as far as
it will go.
• Slowly close the housing by pushing it down until it
locks.
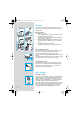
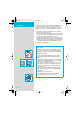
eco
normal
intensive
auto s
el
full
cartridge
empty
2
c
le
a
n
e
c
o
n
o
rm
al
in
te
n
siv
e
full
cartridge
auto
select
em
pty
1
c
le
a
n
e
c
o
n
o
r
m
a
l
in
ten
s
iv
e
full
cartridge
auto
select
em
pty
c
le
a
n
e
c
o
n
o
rm
a
l
in
ten
s
iv
e
full
cartridge
auto select
e
m
pty
5644450_S4_102 Seite 12 Montag, 6. September 2004 10:19 10